Difference between revisions of "Receiving from Settings"
| Line 89: | Line 89: | ||
|} | |} | ||
| − | |||
| − | These settings define an email alert when a data package arrives from sender. | + | ==Package Mail Settings== |
| + | |||
| + | These settings define an email alert when a new data package arrives from sender. This email will be automatically generated by the system. | ||
[[Image:PackageNotification.png]] | [[Image:PackageNotification.png]] | ||
| Line 101: | Line 102: | ||
* '''Body''' - Email message to recipient. | * '''Body''' - Email message to recipient. | ||
| + | [[Variables]] can be added to all the above fields to personalize the emails. | ||
| + | [[List Syntax]] can be used to include multiple recipients. | ||
==Notes Email Settings== | ==Notes Email Settings== | ||
Revision as of 09:37, 25 September 2013
Contents
Receiving from Settings
This section defines the alias, description and workflow to be associated with packages received from the sending instance.
The following settings are used to configure the receiving from instance:
- Alias - The alias of sending SmartSimple instance.
- Id - Arbitrary two digit number unique to sending instance.
- Description - The full company name of sending instance for identification.
- Unpack Workflow - A workflow to be executed when the package is unpacked.
When creating an Unpack Workflow select the UTA Name as the Workflow Type
and set the Trigger When as --Deactivate--.
Key Settings
This section is used to store the key generating in the sending instance and the source URL of the sending instance.
The values are as follows:
Acceptance Key - Combination of Id and Alias of the sending instance. Decryption Key - Key code generated by system of the sending instance. Source URL - The URL of the sending instance.
Unpack Rules
Unpack rules are used to define if new templates (Level 1) and types (Level 2 and Level 3) should be rejected in an incoming package.
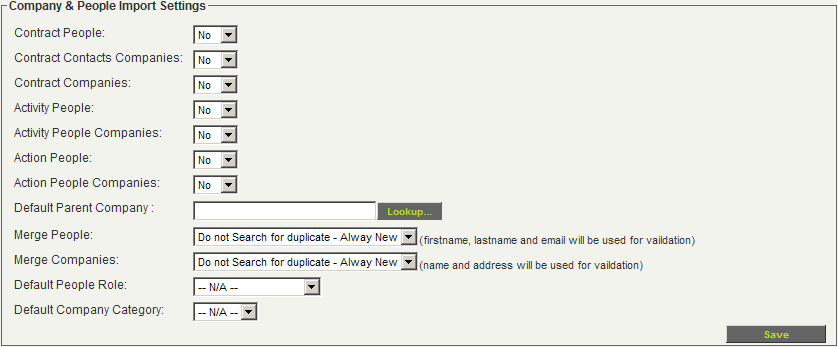
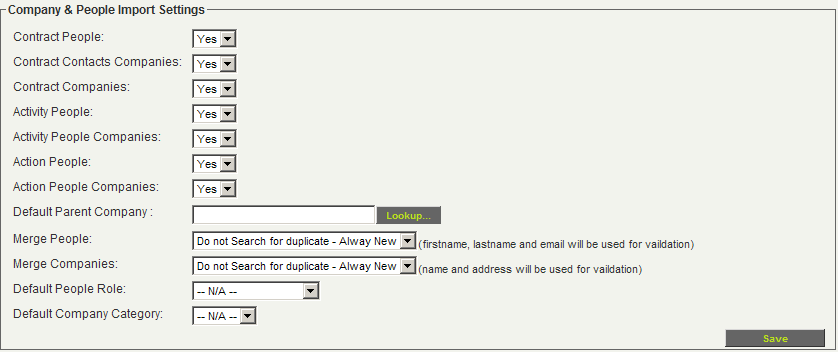
Company and People Import Settings
This section defines how attached companies and contacts should be handled when received in a package.
Exporting Companies and Contacts
You can also export the companies and contacts associated with the UTA item when exporting the item. Using this technique, these companies and contacts will be recreated within the receiving instance if they don’t already exist.
| Setting | Description |
| Level 1 People | Determines if contacts associated with Level 1 should be imported to the receiving instance. |
| Level 1 Contact Companies | Determines if companies associated with contacts that are associated with Level 1 should be imported to the receiving instance. |
| Level 1 Companies | Determines if companies associated with level 1 should be imported to the receiving instance. |
| Level 2 People | Determines if contacts associated with Level 2 should be imported to the receiving instance. |
| Level 2 People Companies | Determines if companies associated with contacts that are associated with Level 2 should be imported to the receiving instance. |
| Level 3 People | Determines if contacts associated with Level 3 should be imported to the receiving instance. |
| Level 3 People Companies | Determines if companies associated with contacts that are associated with Level 3 should be imported to the receiving instance. |
| Default Company | Choose a location in the organization hierarchy where new companies should be added. |
| Merge People | Determines the behaviour when merging people:
|
| Merge Companies | Determines the behaviour when merging companies:
|
| Default People Role | Defines the user role that should be associated with new people that are created in the system. |
| Default Company Category | Defines the company category that should be associated with new companies that are created in the system. |
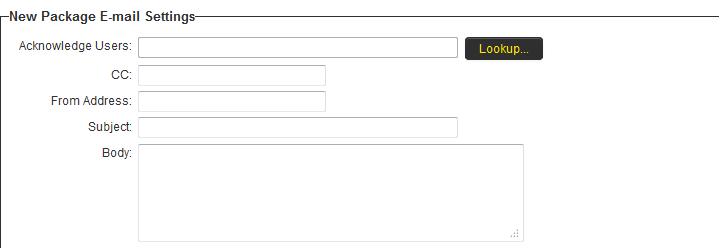
Package Mail Settings
These settings define an email alert when a new data package arrives from sender. This email will be automatically generated by the system.
- Acknowledge Users - Email addresses of recipients or groups. Use the Lookup button to select users.
- CC - Email addresses of recipients or groups who will be copied into the email.
- From Address - Sending email address if appropriate. If this address is not entered, the address smartsimplemailer@smartsimple.com.
- Subject - Message subject for email alert.
- Body - Email message to recipient.
Variables can be added to all the above fields to personalize the emails.
List Syntax can be used to include multiple recipients.
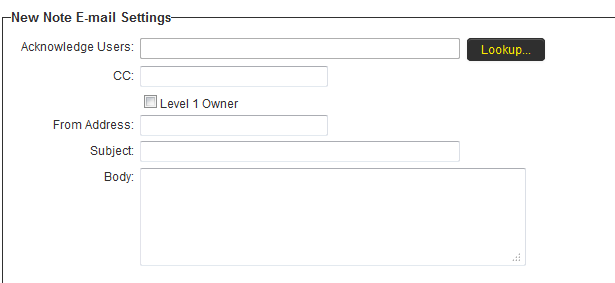
Notes Email Settings
These settings define an email alert when notes arrives from sender. This email will be automatically generated by the system.
- Acknowledge Users - Email addresses of recipients or groups. Use the Lookup button to select users.
- CC - Email addresses of recipients or groups who will be copied into the email.
- From Address - Sending email address if appropriate. If this address is not entered, the address smartsimplemailer@smartsimple.com.
- Subject - Message subject for email alert.
- Body - Email message to recipient.
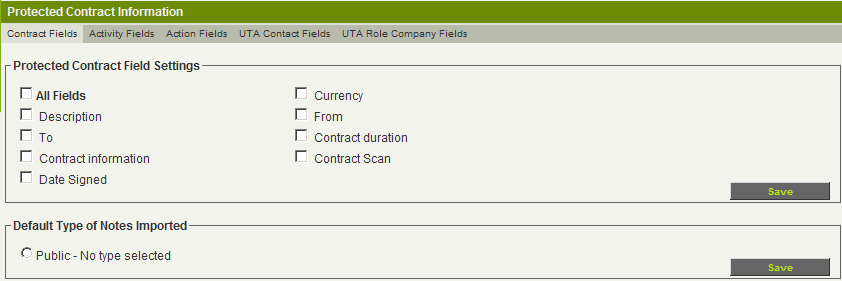
Protecting Fields
This section is used to define the Level 1, Level 2 and Level 3 fields to be protected.
- By default, NO FIELDS are protected so all fields will be updated from the incoming information.
- By default, the Level 1 fields are displayed. If you have enabled Level 2 and Level 3 entities, then tabs will be displayed so you can access and enable these fields.
- If you enable Company & Contact Settings, then additional tabs will be displayed so you can protect fields in these entities also.
Setting the Receiving Settings
1. Set up the details of the sending instance in the Receiving From Settings.
2. Set up the Acceptance Key, Decryption Key and Source URL based on the sending instance.
You will need to copy the decryption key from the sending instance into the receiving instance.
3. Leave the three Unpack Rules unchecked.
4. Set the Company & People Import Settings to import all companies and contacts.
5. Click any Save button.
As you are not going to protect any fields in this example, the set up is complete.


