Difference between revisions of "Configuration mode"
Nancy Sabo (talk | contribs) |
Mark Bridger (talk | contribs) (→Overview) |
||
| (10 intermediate revisions by one other user not shown) | |||
| Line 1: | Line 1: | ||
| − | Configuration Mode is an option available to all Administrators within the system | + | ==Overview== |
| + | '''Configuration Mode''' is an option available to all [[Global User Administrator|Administrators]] within the system. Configuration Mode provides an easier mechanism for accessing and editing fields. Admins can access the configuration from within a record. | ||
| − | + | Users without an [[Global User Administrator|Administrator]] role are unable to use Configuration Mode. | |
| + | |||
| + | ==Configuration Checklist== | ||
| + | The following checklist defines a sequence that you should consider when setting up your copy of [[SmartSimple]] prior to giving people access to the system: | ||
| + | |||
| + | * Configure Organization Settings - set [[Branding#Colors_.26_Styles|colour scheme]], [[License Definition|licensing]], [[Backup Server and Testing Instances|backup]] and [[Organization Terminology|terminology]]. | ||
| + | * If required, define the [[Custom Fields|custom fields]] required for organisations – add the fields you need to accurately reflect your business. | ||
| + | * Create or upload organization information for both [[Internal|internal]] and [[External|external]] organizations – add organization information to the system. | ||
| + | * Define [[Role|roles]] for people – add the [[Role|roles]] people play in the business to accurately reflect your business. | ||
| + | * Define any [[Custom Fields|custom fields]] for [[Role|roles]] – add the fields you need to accurately reflect the [[Role|roles]] people play in business. | ||
| + | * Define or upload "people" - [[Internal|internal]] or [[External|external]] organizations – add people to the system. | ||
| + | * Subscribe to [[SmartSimple]] [[Applications|applications]] – determine the applications required by each group of people. | ||
| + | * Give Manager Permission to specific [[Role|roles]] – determine which groups of people are responsible for each application and feature. | ||
| + | |||
| + | [[Category:Global Settings]][[Category:System Management]] | ||
==Using Configuration Mode== | ==Using Configuration Mode== | ||
| − | + | To get into Configuration Mode, the Administrator must first be in '''Edit Mode. ''' | |
| + | |||
| + | 1. After accessing any record, there will be an '''Edit '''button that takes you into '''Edit Mode.''' | ||
| + | |||
| + | :: [[File:EditButton.png|200px|border]] | ||
| + | 2. Select the '''Options '''button, which will produce a drop-down menu. | ||
| − | + | 3. Under '''Settings, '''select '''Configuration Mode. ''' | |
| − | + | :: [[File:ConfigurationMode.png|200px|border]] | |
| + | There will be a small tab at the top of the page to indicate you are in '''Configuration Mode''', with a Refresh and Close icon. | ||
:: [[Image:ConfigMode2.png|250px|border]] | :: [[Image:ConfigMode2.png|250px|border]] | ||
| − | |||
Then, when you scroll over the fields on the record, they will be highlighted and can be clicked on. | Then, when you scroll over the fields on the record, they will be highlighted and can be clicked on. | ||
:: [[Image:ConfigMode3.png|800px|border]] | :: [[Image:ConfigMode3.png|800px|border]] | ||
| − | |||
When a field is clicked, a modal window opens with the configuration page for that field. Changes can be made and saved, and will appear against the field once the page has been refreshed. | When a field is clicked, a modal window opens with the configuration page for that field. Changes can be made and saved, and will appear against the field once the page has been refreshed. | ||
:: [[Image:ConfigMode4.png|800px|border]] | :: [[Image:ConfigMode4.png|800px|border]] | ||
| − | |||
| − | |||
==Configuration Shortcuts / Syntax Checker== | ==Configuration Shortcuts / Syntax Checker== | ||
When the '''Configuration Mode''' icon is clicked in Edit mode, the '''Configuration Shortcuts''' section also appears on the right side of the screen. | When the '''Configuration Mode''' icon is clicked in Edit mode, the '''Configuration Shortcuts''' section also appears on the right side of the screen. | ||
| − | :: [[Image:ConfigShortcut.png|border]] | + | :: [[Image:ConfigShortcut.png|200px|border]] |
It includes links to many of the General Settings specific to the entity you are currently accessing. | It includes links to many of the General Settings specific to the entity you are currently accessing. | ||
| Line 30: | Line 47: | ||
:: [[Image:Syntax Checker.png|550px|border]] | :: [[Image:Syntax Checker.png|550px|border]] | ||
| − | * Click on the link to the '''Syntax Checker'''. | + | : |
| − | * Enter variable syntax in the panel on the left hand side of the '''Syntax Checker Tool''' page. | + | :* Click on the link to the '''Syntax Checker'''. |
| − | *:* '''NOTE:''' Press "Tab" key to see available keywords | + | :* Enter variable syntax in the panel on the left hand side of the '''Syntax Checker Tool''' page. |
| − | + | :*:* '''NOTE:''' Press "Tab" key to see available keywords | |
| − | |||
| − | |||
| + | :* Press "Process Variables" button. | ||
| + | :* Results appear in the grey panel on the right hand side of the '''Syntax Checker Tool''' page. | ||
| + | ==See Also== | ||
| + | * [[Configuring a SmartSimple Instance]] | ||
| + | * [[Custom fields]] | ||
[[Category:Custom Fields]] [[Category:Standard Fields]] [[Category:Universal Tracking Application]][[Category:UTA Settings]] | [[Category:Custom Fields]] [[Category:Standard Fields]] [[Category:Universal Tracking Application]][[Category:UTA Settings]] | ||
Latest revision as of 13:17, 27 November 2019
Contents
Overview
Configuration Mode is an option available to all Administrators within the system. Configuration Mode provides an easier mechanism for accessing and editing fields. Admins can access the configuration from within a record.
Users without an Administrator role are unable to use Configuration Mode.
Configuration Checklist
The following checklist defines a sequence that you should consider when setting up your copy of SmartSimple prior to giving people access to the system:
- Configure Organization Settings - set colour scheme, licensing, backup and terminology.
- If required, define the custom fields required for organisations – add the fields you need to accurately reflect your business.
- Create or upload organization information for both internal and external organizations – add organization information to the system.
- Define roles for people – add the roles people play in the business to accurately reflect your business.
- Define any custom fields for roles – add the fields you need to accurately reflect the roles people play in business.
- Define or upload "people" - internal or external organizations – add people to the system.
- Subscribe to SmartSimple applications – determine the applications required by each group of people.
- Give Manager Permission to specific roles – determine which groups of people are responsible for each application and feature.
Using Configuration Mode
To get into Configuration Mode, the Administrator must first be in Edit Mode.
1. After accessing any record, there will be an Edit button that takes you into Edit Mode.
2. Select the Options button, which will produce a drop-down menu.
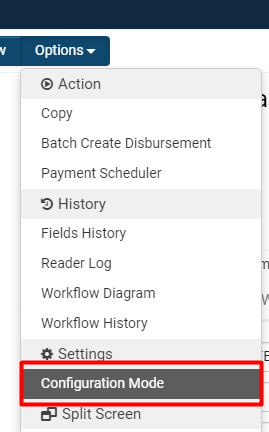
3. Under Settings, select Configuration Mode.
There will be a small tab at the top of the page to indicate you are in Configuration Mode, with a Refresh and Close icon.
Then, when you scroll over the fields on the record, they will be highlighted and can be clicked on.
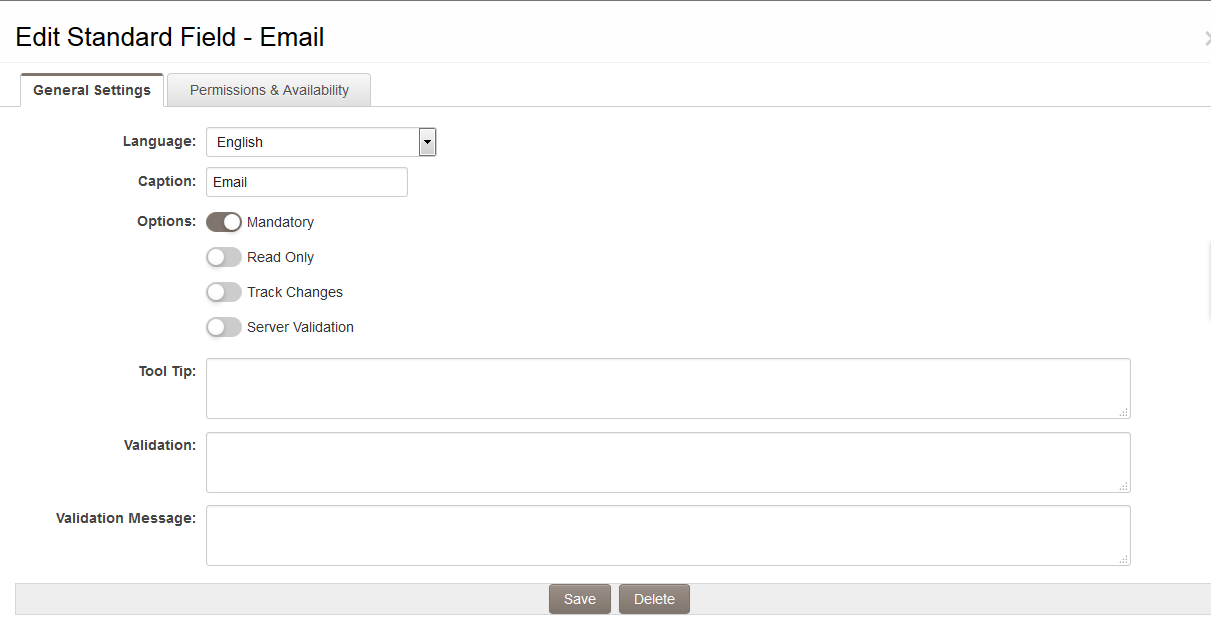
When a field is clicked, a modal window opens with the configuration page for that field. Changes can be made and saved, and will appear against the field once the page has been refreshed.
Configuration Shortcuts / Syntax Checker
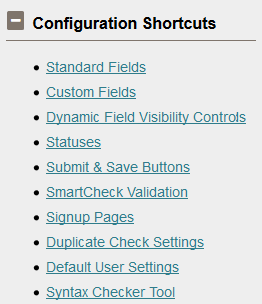
When the Configuration Mode icon is clicked in Edit mode, the Configuration Shortcuts section also appears on the right side of the screen.
It includes links to many of the General Settings specific to the entity you are currently accessing.
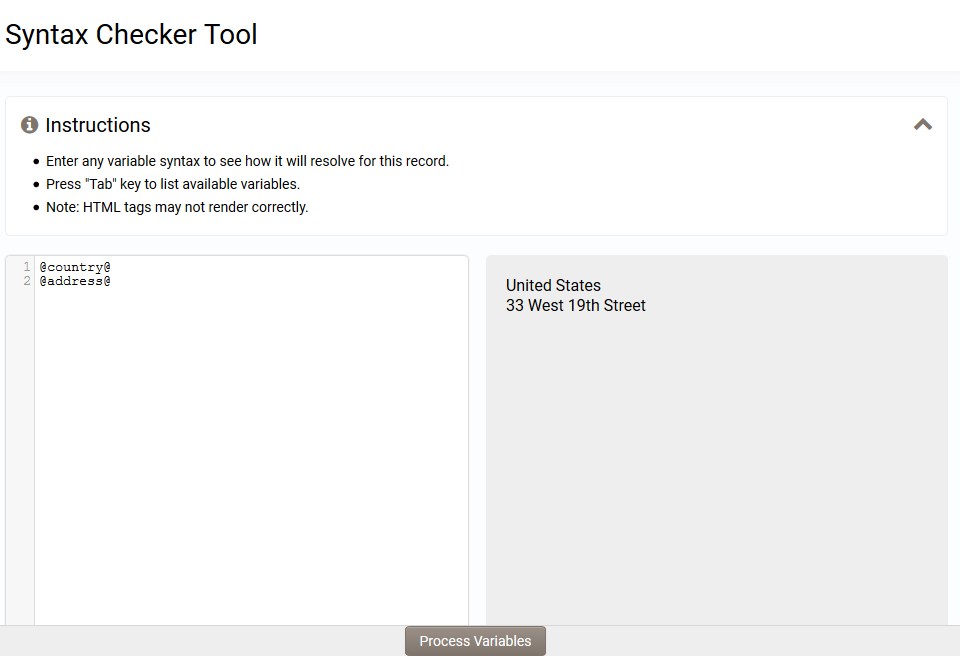
It also includes a link to the Syntax Checker. This feature allows administrators to test Variables syntax and Type Formulas against actual records.
-
- Click on the link to the Syntax Checker.
- Enter variable syntax in the panel on the left hand side of the Syntax Checker Tool page.
- NOTE: Press "Tab" key to see available keywords
- Press "Process Variables" button.
- Results appear in the grey panel on the right hand side of the Syntax Checker Tool page.


