Difference between revisions of "Status"
(→Status Settings) |
|||
| Line 73: | Line 73: | ||
Any number of triggers can be created for level 2 and level 3. | Any number of triggers can be created for level 2 and level 3. | ||
| + | |||
| + | ==See Also== | ||
| + | * [[Batch Update]] | ||
[[Category:Universal Tracking Application]] | [[Category:Universal Tracking Application]] | ||
Revision as of 10:25, 3 June 2009
The Settings page within the Universal Tracking Application allows you to define Statuses for your Level 1, Level 2 and Level 3 records. The Statuses can be used to track the state or condition of the records.
The Status settings for Level 1, Level 2 and Level 3 are similar, with a few differences outlined below.
Contents
Creating Statuses
1. Click the Settings tab.
2. Click the Statuses link.
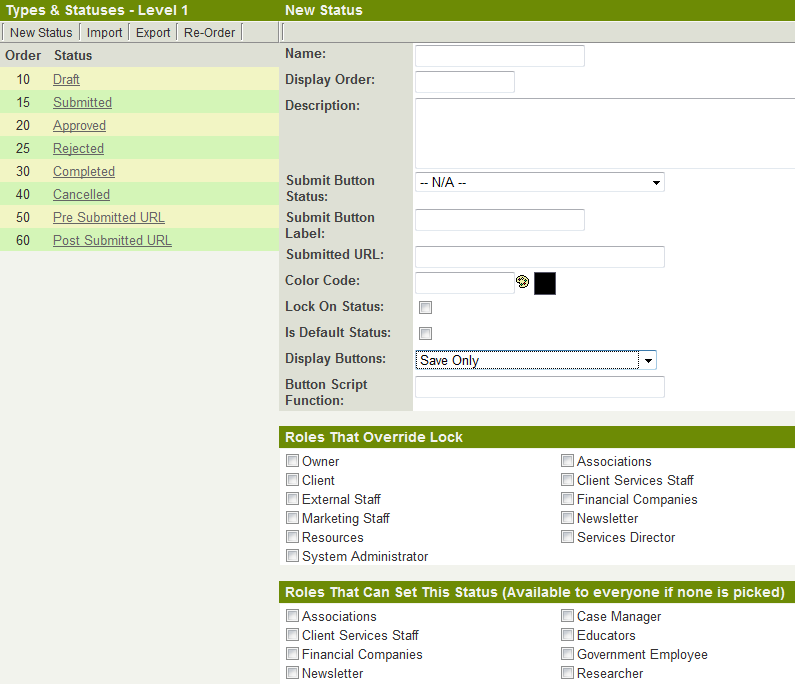
The Status page is displayed.
- Existing Statuses are listed on the left of the page.
- Details of each status are displayed on the right of the page and new statuses are added to the right of the page.
Status Settings
Each status has the following settings:
- Name - Display name for the Status.
- Display Order - The order that statuses are displayed in the Status combo box.
- Submit Button Status - This feature is used to present the user with a Submit button. You associate an additional status with this submit button. When the user clicks the Submit button the status of the Level 1 item is changed to the selected status. This may trigger a workflow or lock the item if the new status has the Lock on Status enabled. The Submit button will be displayed if a Status is selected in this section.
- Submit Button Label - Defines the label for the Submit button. If no Label is provided the button will say Submit.
- Submitted URL - When the Submit button is pressed at this status, instead of remaining on the view of the current record, the user will be redirected to the URL defined in this section. If no URL is entered the current record will stay in view. (Only available at Level 1)
- Colour Code - The colour code used to indicate each status. This colour will be used in the list view and the details view. Click the colour palette button to display a colour picker.
- Lock On Status - This setting is used to lock the Level 1 item so that it cannot be changed until it is unlocked.
- Is Default Status - Determines the default status to be selected when the item is saved or submitted.
- Display Buttons - Controls the Save buttons available to the user for a level 1 item at this status.
- Roles That Override Lock - The specific roles that can unlock a locked item. If you enable Lock on Status and do not set a role, then the item cannot be unlocked.
- Roles that Can Set This Status - The specific roles that can set the status. If you do not set a role, then any user can set any status.
Save and Submit Options
For each status you determine the save and submit options available to the user. There are eight settings available.
You do not need to associate all statuses with all types of Level 1 items.
Status Triggers
Sometimes you will need to control the status associated with level 2 and level 3 items based on a status change at the level 1 item.
For example, if you have an “abandoned” status for a project tracking UTA and you set a project to that status then you may need to set an “abandoned” status for all level 2 (or level 3 items) related to that project. This effect is achieved through a status trigger.
For each level one status change you can control status changed for all level 2 and level 3 items. You can further control this behavior by restricting the trigger to specific types of level 2 and level 3 items. Using the previous example you may not wish to change the status on a “reporting” type level 2 activity simply because the project is abandoned.
1. Click the Negotiation Status link.
2. Click the Status Trigger tab.
The Status Trigger page is displayed.
- Level 2 Triggers are created in the top section of the page; level 2 triggers are added in the second trigger.
- The level 2 Type is selected in the first combo box.
- The current level 2 status is selected in the second combo box.
- The new status is selected in the Set Status To combo box.
- The Add Trigger button is used to add the new trigger to the trigger list.
Any number of triggers can be created for level 2 and level 3.
