Difference between revisions of "Creating People Relationships"
(→Restricting Relationship Types to Specific Roles) |
|||
| Line 10: | Line 10: | ||
All aspects of this feature are controlled through the [[Configuration Menu|Configuration]], Roles and Permissions [[Menu|menu]]. First you will set up the relationship types and then permission the feature. | All aspects of this feature are controlled through the [[Configuration Menu|Configuration]], Roles and Permissions [[Menu|menu]]. First you will set up the relationship types and then permission the feature. | ||
| − | 1. | + | 1. Navigate to the Global Settings - [[Classic Options]] tab. |
2. Click the '''People Relationships''' link. | 2. Click the '''People Relationships''' link. | ||
Revision as of 13:23, 18 July 2017
Contents
[hide]Creating People Relationships
People relationship is used when you wish to link one contact to another, regardless of any organisation or roles. This technique is useful where you need to track informal or social relationships. In order to use this feature you will need to:
- Enable two Manager Permissions – one to view the relationships, and a second to be able to set the relationship. These permissions are separated in this manner as you may want lots of people to see the relationship, but a specific group to set the relationships.
- Define the types of relationships – these relationship types only have three properties, a name, a display order and a colour.
- Once you have made these configuration changes you can further control the behaviour by controlling which roles can set or view the relationship types you establish.
Setting up the People Relationships Feature
All aspects of this feature are controlled through the Configuration, Roles and Permissions menu. First you will set up the relationship types and then permission the feature.
1. Navigate to the Global Settings - Classic Options tab.
2. Click the People Relationships link.
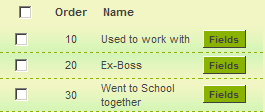
The name, display order and colour code are set on the right and the list of existing types is displayed on the left.
3. Create the following Relationship Types:
4. Choose the Configuration, Roles and Permissions menu.
Next you will set the permission to both view and set these relationship types.
5. Click the Manager Permissions link.
The two permissions are listed together.
6. Click the People Relationships – Edit link.
7. Set this Permission to the Employee role.
8. Click the People Relationships – View link.
9. Set this Permission to the Everyone role.
Setting People Relationships
The feature is now configured and you can establish the three types of relationships you specified between any one in the system.
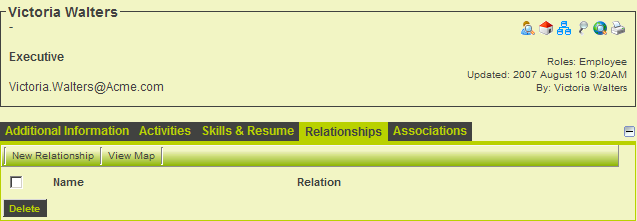
1. Locate the Victoria Walters internal user.
- The relationships tab has been added to the profile. This tab would not be visible if you were not in a role associated with the People Relationship – View permission.
2. Click the New Relationship link.
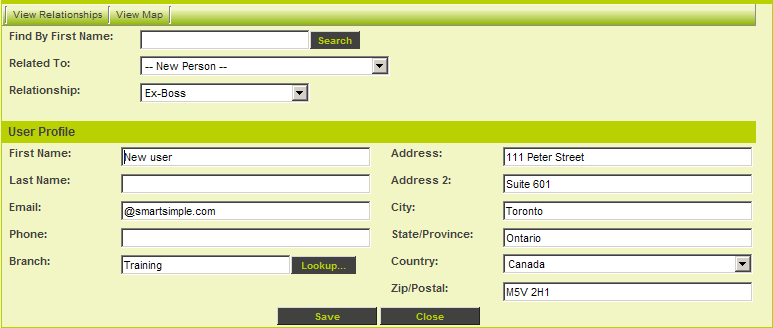
The New Relationship window is displayed.
This window provides the following functionality.
- Find by First Name – look up anyone in the system based on their first name.
- Related To – displays the person located by the search.
- User Profile – allows the creation of a new contact.
Adding People Relationships
1. Type Janet in the Find by First Name box.
2. Click the Search button.
The contact is located.
If multiple people with the same name are located they will be listed in the Related to combo box.
3. Set the Relationship to Went to School with.
4. Click the Save button.
The relationship is added.
5. Add the following relationships to the list.
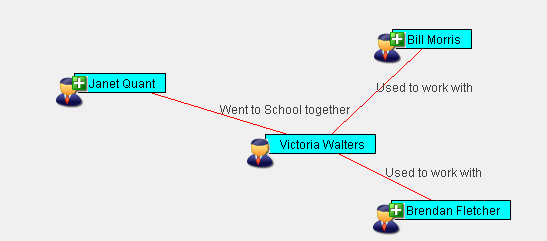
Viewing the Relationship Map
These relationships can also be displayed in a graphic mode.
You can use this mode to click through each user and review their relationships.
Restricting Relationship Types to Specific Roles
If you don’t want specific groups of users to set or view relationship types you can control this through role settings.
1. Choose the Configuration, Roles & Permissions menu.
2. Click the Roles link.
3. Choose the Employee role.
The Relationship Permissions are displayed below the Role Permissions.
- View will restrict the current role to only seeing the selected relationships. If no relationships are selected then all relationship types can be viewed.
- Edit will restrict the current role from being able to set the selected relationships. If no relationships are selected then all relationship types can be set.


