Difference between revisions of "Importing Address"
| (4 intermediate revisions by 2 users not shown) | |||
| Line 1: | Line 1: | ||
| − | + | The Multiple Address feature allows for bulk importing of data into address fields if the address type is already associated with the user or the organization. | |
There are two approaches for importing data into the Address Type fields: | There are two approaches for importing data into the Address Type fields: | ||
| − | * Import From Profile | + | * [[Importing Address#Import From Profile|Import From Profile]] |
| − | * Import From Text | + | * [[Importing Address#Import From Text|Import From Text]] |
| + | <pre style="white-space: pre-wrap; white-space: -moz-pre-wrap; white-space: -pre-wrap; white-space: -o-pre-wrap; word-wrap: break-word;"> | ||
| + | When enabling Multiple Addresses, one of these approaches must be used in order that existing addresses associated with user and organization profiles are not lost when new addresses are added to the profile. | ||
| + | </pre> | ||
[[image:ImportAddress.png|link=]] | [[image:ImportAddress.png|link=]] | ||
| Line 19: | Line 22: | ||
| − | * Click on the Import From Profile tab | + | * Click on the Import From Profile tab at the top of the screen. |
[[image:ImportFromProfile.png|link=]] | [[image:ImportFromProfile.png|link=]] | ||
| Line 35: | Line 38: | ||
| − | * Once you click '''Import''' then you will be presented with confirmation message. Simply click OK to proceed. | + | * Once you click '''Import''' then you will be presented with a confirmation message. Simply click OK to proceed. |
[[image:ImportFromProfile4.png|link=]] | [[image:ImportFromProfile4.png|link=]] | ||
| − | * You will be presented with message indicating the number of entities that have been successfully updated. | + | * You will be presented with a message indicating the number of entities that have been successfully updated. |
[[image:ImportFromProfile5.png|link=]] | [[image:ImportFromProfile5.png|link=]] | ||
| Line 61: | Line 64: | ||
* In the resulting screen you have the following options available: | * In the resulting screen you have the following options available: | ||
| − | :* Column Delimiter - drop-down list showing the delimiter options used to separate different values in the text field into different address fields on the system | + | :* Column Delimiter - drop-down list showing the delimiter options used to separate different values in the text field into different address fields on the system. |
:* Values enclosed by double quote - checked when you wish to indicate that individual values will be enclosed in double quotes. | :* Values enclosed by double quote - checked when you wish to indicate that individual values will be enclosed in double quotes. | ||
| − | :* First row contains field names - checked when you wish to indicate that the first row in the Text field will actually be column headers rather than address values | + | :* First row contains field names - checked when you wish to indicate that the first row in the Text field will actually be column headers rather than address values. |
| − | :* Text field - enter in the address values, separated by the column delimiter | + | :* Text field - enter in the address values, separated by the column delimiter. |
[[image:ImportFromText2.png|link=]] | [[image:ImportFromText2.png|link=]] | ||
| − | '''NOTE:''' You will have to provide an identifier in the text field | + | '''NOTE:''' You will have to provide an identifier in the text field for the individual company or organization that you wish to update. You can also enter multiple rows if you wish to update against multiple users/companies. |
* Click the Analyze button when you have added the address data. | * Click the Analyze button when you have added the address data. | ||
| Line 84: | Line 87: | ||
[[image:ImportFromText6.png|link=]] | [[image:ImportFromText6.png|link=]] | ||
| + | ==See Also== | ||
| + | * [[Address Types]] | ||
| + | * [[Viewing Address Types]] | ||
| + | * [[Troubleshooting Address Types]] | ||
| − | [[Category: | + | [[Category:Global Settings]][[Category:Contacts]] |
Latest revision as of 14:12, 5 August 2014
The Multiple Address feature allows for bulk importing of data into address fields if the address type is already associated with the user or the organization.
There are two approaches for importing data into the Address Type fields:
When enabling Multiple Addresses, one of these approaches must be used in order that existing addresses associated with user and organization profiles are not lost when new addresses are added to the profile.
Import From Profile
The Import From Profile feature allows an Address Type to be populated from existing standard address fields that exist against the user or organization profile.
It can be used to update all users or organizations with that Address Type.
- Access the Address Type by clicking on the hyperlink in the Name column.
- Click on the Import From Profile tab at the top of the screen.
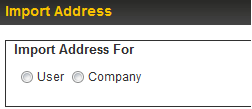
- Check the box for the entity type that you wish to import the address against, whether this is a User or a Company.
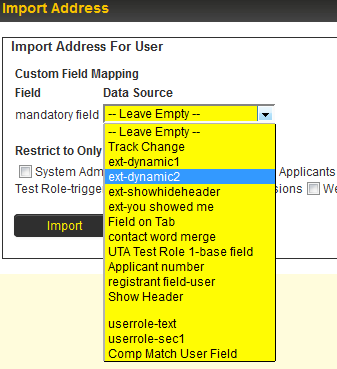
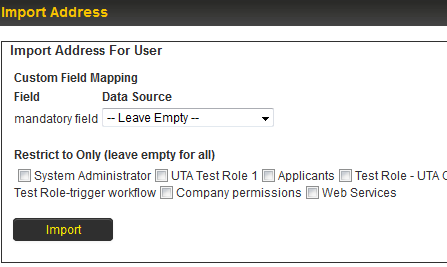
- In the resulting screen you can map custom fields from the overall entity, whether User or Company, to the custom fields on the Address Type.
- You can also select the User roles or Company categories to which this automated import will apply against, depending on the entity type that you wish to import the address against, or you can leave all options blank if you wish to apply to all roles or all categories.
- Once you click Import then you will be presented with a confirmation message. Simply click OK to proceed.
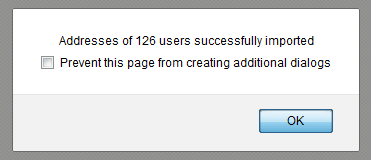
- You will be presented with a message indicating the number of entities that have been successfully updated.
Import From Text
The Import From Text feature allows an Address Type to be populated from text values.
It can be used to update addresses associated with individual users or organizations. As such you must provide a unique identifier for the individual company or organization.
- Access the Address Type by clicking on the hyperlink in the Name column.
- Click on the Import From Text tab long the top of the screen.
- Check the box for the entity type that you wish to import the address against, whether this is a User or a Company.
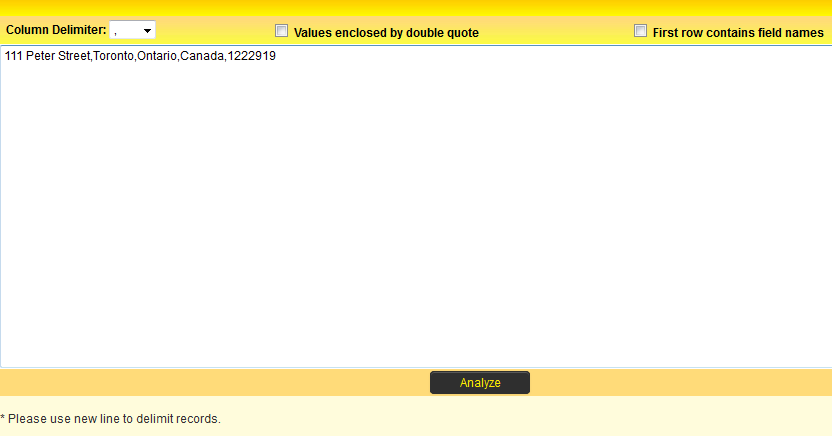
- In the resulting screen you have the following options available:
- Column Delimiter - drop-down list showing the delimiter options used to separate different values in the text field into different address fields on the system.
- Values enclosed by double quote - checked when you wish to indicate that individual values will be enclosed in double quotes.
- First row contains field names - checked when you wish to indicate that the first row in the Text field will actually be column headers rather than address values.
- Text field - enter in the address values, separated by the column delimiter.
NOTE: You will have to provide an identifier in the text field for the individual company or organization that you wish to update. You can also enter multiple rows if you wish to update against multiple users/companies.
- Click the Analyze button when you have added the address data.
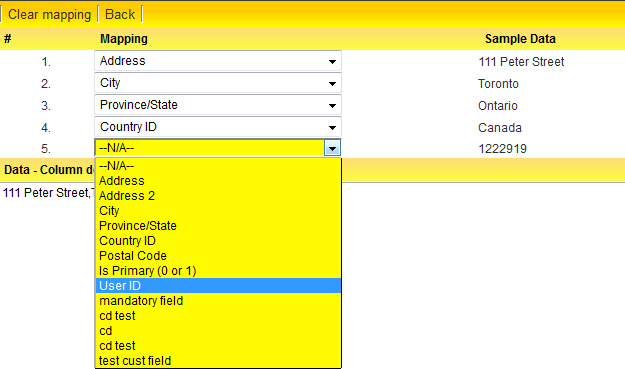
- In the resulting screen you can define the mappings from the data previously entered in the text field to the Address fields, including the individual User ID or Company ID that the update is applied against.
- Click the Parse button when you have defined the mappings.
- In the resulting screen you can review the mappings ensuring that the data entered in the text field is mapping to the correct Address fields, including the individual User ID or Company ID that the update is applied against.
- If issues emerge then click on the Back button to make changes to the mappings. If no issues emerge then click the Upload button.
- If you have clicked on the Upload button then you will be presented with a confirmation screen, indicating those company or user profiles that have been updated successfully.


