Difference between revisions of "Using Timesheets to update a Project"
From SmartWiki
| Line 1: | Line 1: | ||
=Overview= | =Overview= | ||
| − | In the proceeding | + | In the proceeding articles you will create timesheets and submit the timesheets to the project. |
1. Click the [[Applications]], '''Time Tracking''' [[Menu|menu]]. | 1. Click the [[Applications]], '''Time Tracking''' [[Menu|menu]]. | ||
Revision as of 14:25, 13 May 2011
Overview
In the proceeding articles you will create timesheets and submit the timesheets to the project.
1. Click the Applications, Time Tracking menu.
The Time Tracking application is displayed.
2. Click the New Timesheet button.
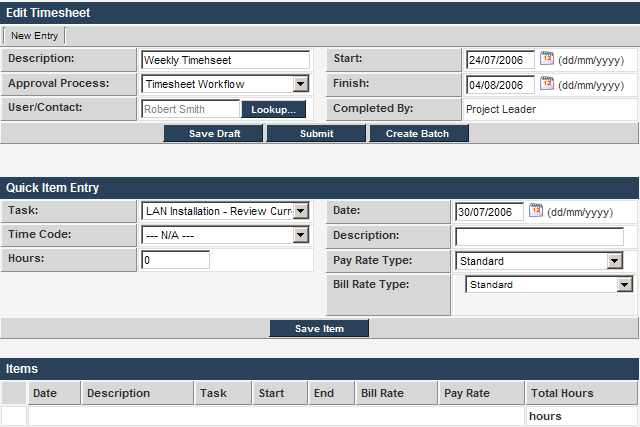
The New Timesheet window is displayed.
The following fields can be set.
- Description – A general description of the work or period covered.
- Approval Process – The workflow to be attached to this timesheet. The workflow created in the previous article is displayed.
- User/Contact – Because you are a Timesheet Administrator you can select any resource. For non-administrators this field defaults to their name.
- Start – Start date for the timesheets to be created.
- Finish – End date for the timesheets to be created.
- Complete By – the name of the person adding the timesheet, either the user, or a timesheet administrator.
3. Set the description to Weekly Timesheet.
4. Set the Start and Finish dates.
5. Click the Lookup button.
6. Lookup Robert Smith.
The Timesheet window will look as follows:
- Timesheet items are added using the Quick Item Entry section of the screen.
- Once the entry is saved, it will be displayed at the bottom of the screen.
- If you need to create a batch of similar entries, you can use the Create Batch button.
- Because the resource selected is a team member, you can assign their time to any task in the project.
- If the user was not a team member, you could only assign their time to the specific tasks that they are assigned to.
- As the tasks displayed can be taken from multiple projects, the task combo box displays the name of each project and the name of each task, separated by a dash.
7. Set the task to LAN Installation – File Server Install.
8. Set the Time Code to Configuration.
9. Set the Date.
10. Set the Hours to 8.
11. Click the Save Item button.
The item is added to the Item list.
12. Set the same hours and task for the following day.


