Difference between revisions of "Exporting List View Results to Microsoft Word"
From SmartWiki
| Line 3: | Line 3: | ||
| − | A major feature of SmartSimple [[list views]] is that list view results can be exported to a Microsoft Word Mail Merge with the click of a button. This feature works in conjunction with the [[Custom Field Type: Special - MS Word Merge|Special - MS Word Merge]] field type. Once your list view has been [[Configuring List Views|created]], take the following steps to enable exporting to a Microsoft Word Mail Merge: | + | A major feature of SmartSimple [[list views]] is that list view results can be exported to a Microsoft Word Mail Merge with the click of a button. This feature works in conjunction with the [[Custom Field Type: Special - MS Word Merge|Special - MS Word Merge]] field type. Once your list view has been [[Configuring List Views|created]] and you have [[Custom_Field_Type:_Special_-_MS_Word_Merge|configured one or more Word Merge custom fields]], take the following steps to enable exporting to a Microsoft Word Mail Merge: |
# Go to the [[Accessing the List View Configuration Page|list view configuration page]]. | # Go to the [[Accessing the List View Configuration Page|list view configuration page]]. | ||
# Click into the list view for which you wish to enable exporting. | # Click into the list view for which you wish to enable exporting. | ||
Revision as of 10:22, 6 May 2013
Template:UnderConstruction
 Click here to watch a video on creating and editing List Views.
A major feature of SmartSimple list views is that list view results can be exported to a Microsoft Word Mail Merge with the click of a button. This feature works in conjunction with the Special - MS Word Merge field type. Once your list view has been created and you have configured one or more Word Merge custom fields, take the following steps to enable exporting to a Microsoft Word Mail Merge:
- Go to the list view configuration page.
- Click into the list view for which you wish to enable exporting.
- Click on the "Export" tab.
- Select the
 option.
 - Click the "Save" button.
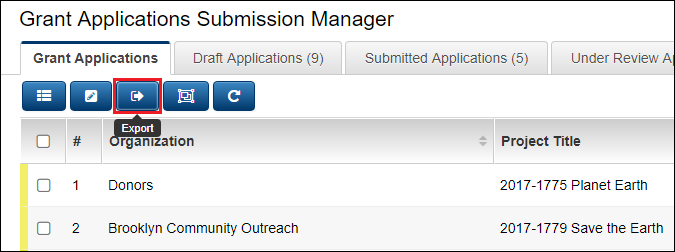
- The Export button will now be enabled for your list view.
- You can also tell the system where you want the results of the list view export to be positioned in the resultant Excel spreadsheet. Visit this page for instructions.
- Additionally, you can upload an Excel spreadsheet to be used as a template for list view result exports. Visit this page for instructions.
See Also
- List View Overview
- Accessing the List View Configuration Page
- Configuring List Views
- Setting the Sort Order on a List View
- Exporting List View Results to Microsoft Excel
- Exporting List View Results to Microsoft Word
- Download files from List View
- Preparing Existing Word Template for List View Export
- Quick Edit
- Historic List View
- Configuring Interactive List View Charts
- Import/Export and Integration Techniques Overview