Difference between revisions of "Versioning"
| Line 9: | Line 9: | ||
==Overview== | ==Overview== | ||
| − | '''Versioning''' greatly reduces the work required to manage changes that occurs in forms and applications. Versioning accomplishes this by allowing the creation of concurrent versions of applications and forms all using a common set of underlying fields. The result allows for the easy creation, modification, and testing of forms pre-launch. | + | '''Versioning''' greatly reduces the work required to manage the regular changes that occurs in forms and applications. Versioning accomplishes this by allowing the creation of concurrent versions of applications and forms all using a common set of underlying fields. The result allows for the easy creation, modification, and testing of forms pre-launch. Other benefits include the preservation of past forms values and appearance, allowing admins to view previous form versions in their original format. |
| − | Before '''Versioning''' making and testing changes to applications and | + | Before '''Versioning''' making and testing changes to applications and forms could be cumbersome, and to ensure a smooth transitions many organizations deployed whole testing environments to manage these periods. These environments allowed organizations the ability to build new applications and forms, and thoroughly test them before promoting the changes into the live production environment. Although '''Versioning''' does not eliminate the need for testing environments, organizations who regularly change or update requirements on applications can now manage this process within the '''Versioning''' feature set. |
Note: '''Global Administrator''' privileges are required to configure this setting. | Note: '''Global Administrator''' privileges are required to configure this setting. | ||
| Line 24: | Line 24: | ||
| − | Versioning works by first capturing all of the underlying fields that makes up an application or form. We call this total set of fields the baseline. The baseline set of fields contains all fields in all application and form versions. The first step in using Versioning is to create a new version | + | Versioning works by first capturing all of the underlying fields that makes up an application or form. We call this total set of fields the '''"baseline"'''. The baseline set of fields contains all fields in all application and form versions. The first step in using Versioning is to create a new version. This process includes giving the version a name and description, selecting the '''Application Name''' and '''Entity''' that contains the field-set, and taking a snapshot of the field-set which creates the baseline. Follow the details steps below to create the baseline. |
===Create a new version=== | ===Create a new version=== | ||
| Line 51: | Line 51: | ||
| − | + | :1. Select the '''Application Name''', the dropdown list will include all application forms within the system. | |
| − | + | :2. Select the '''Entity Level''', this dropdown list will allow the selection of the Level 1, 2, or 3 to make up the field-set that you wish to capture. | |
| − | + | ::[[Image:Version_objects_entity.png|link:|500px]] | |
| + | :3. Click the '''Take Snapshot''''. | ||
| + | :4. Click '''Save'''. | ||
| + | :5. After clicking the Save button, the window will capture the created on and modified by details as well as display the Version Objects fields. | ||
| + | ::[[Image:New_version_window_after_save.png|link:|500px]] | ||
| − | '''Note:''' You may want to capture fields-sets from the Level 1 and the | + | '''Note:''' You may want to capture fields-sets from the Level 1, Level 2, and Level 3. In this case you will repeat the steps above and create additional "Version Objects" line to capture any additional objects, activities, or transactions. |
| Line 62: | Line 66: | ||
| − | + | You have enabled Versioning and created your first snapshot. By default your Current Version is the baseline version. You can verify the current version at any time by following the steps below: | |
| + | :1. Navigate to the desired UTA | ||
| + | :2. Click on the UTA Settings icon | ||
| + | :3. Click on the Level 1 tab | ||
| + | :4. In the '''UTA Properties''' section locate the '''Current Version''' field. | ||
| + | ::[[Image:Current_version.png|link:]] | ||
| + | :5. The current version is displayed. | ||
| − | + | '''Note:''' To change the current version, click on the dropdown menu and select the new version you would like to activate, then click the "Activate" button, and finally click the '''Save''' button at the bottom of the window. | |
| − | |||
| − | |||
| − | |||
| − | |||
| − | |||
| + | ==Custom Fields and Versioning== | ||
| − | + | Once Versioning is enabled, there will be a new field added to the Level 1 and Level 2 Custom Fields page. | |
| + | |||
| + | |||
| + | [[Image:Select_custom_field_version.png|link:|700px]] | ||
| + | |||
| + | |||
| + | Notice the '''Version''' field added next to the '''Field Class''' field. The '''Version''' field contains the name of the version of the application or form that you are currently editing. It is this field that allows you to switch between the different concurrent versions that are available. Here is where you will switch between the "Baseline" application version, the current application version, and the new application you are building and testing. | ||
| + | |||
| + | ===Deleting fields in Versions=== | ||
| + | It is very important that you always double-check the version that you are editing. '''Always be careful''' when deleting fields from the baseline version. Deleting fields from the baseline will delete those fields from all associated applications and forms. Any new snapshots that are taken afterwards will not include the deleted fields. Also deleting fields from baseline will remove your ability to reference those fields and their values removing the ability to use the previously stored values. | ||
| − | + | Deleting fields from versions that are not the baseline, will only remove those fields from the specific version you are editing and not other versions. | |
===Editing fields in Versions=== | ===Editing fields in Versions=== | ||
| − | + | :1. Navigate to the desired UTA | |
| + | :2. Click on the UTA Settings icon | ||
| + | :3. Click on the appropriate Level 1, 2, or 3 | ||
| + | :4. Click on the '''Custom Fields" link | ||
| + | :5. From the '''Version''' dropdown option, select the Version that you will be editing | ||
| + | :6. Click '''Set''' | ||
| + | :7. Make any required changes to the version your are working on (remember that these edits will only affect the current version you are editing, unless you are making changes to the baseline version. | ||
| + | |||
| + | |||
| + | ==Viewing changes to the Version== | ||
| + | |||
| + | The changes that have been made to a version view can be viewed by opening the application or form and selecting the appropriate form document. | ||
| + | |||
| + | :1. Navigate to the desired UTA | ||
| + | :2. Open the desired application / form | ||
| + | :3. From the Version dropdown option, select the version you with to view. | ||
| + | |||
| + | [[Image:Viewing_changes_to_version.png|link:|800px]] | ||
| + | |||
| + | |||
| + | :4. Click '''Set''' | ||
| + | |||
| + | |||
| + | :'''Note:''' Toggling between different versions from this page will allow you to easily flip between the existing form and your modified version. | ||
| + | |||
| + | |||
| + | ==Creating a new field== | ||
| + | |||
| + | Best practice for creating new fields are to add them to the baseline version first. This makes the new field available to all versions once an update snapshot is taken. | ||
| + | |||
| + | :1. Navigate to the desired UTA | ||
| + | :2. Click on the UTA Settings icon | ||
| + | :3. Click on the appropriate Level 1, 2, or 3 | ||
| + | :4. Click on the '''Custom Fields" link | ||
| + | :5. Click on the '''+''' icon to add a '''New Field''' | ||
| + | :6. Add all fields required to create the new field. For details on creating custom fields click '''[[Creating Custom Fields|here]]'''. | ||
| + | |||
| + | ===Adding new field to existing Version=== | ||
| + | |||
| + | Add a new field that has been added to the baseline to an existing version by updating the Versions snapshot. This will update the field-sets that comprise the selected Version and will include any newly added fields added to the baseline since the last snapshot. | ||
| + | |||
| + | See the section above titled: '''Take a Snapshot/Create a baseline''' for details on taking a snapshot. | ||
| + | |||
| + | |||
| + | |||
| + | ==Activating a new Version== | ||
| + | |||
| + | :1. Navigate to the desired UTA | ||
| + | :2. Click on the UTA Settings icon | ||
| + | :3. Click on the appropriate Level 1, 2, or 3 | ||
| + | :4. Under the UTA Properties section, locate the '''Current Version''' field. | ||
| + | :5. From the dropdown options select the version you wish to make active. | ||
| + | :6. Click on the '''Activate''' button. | ||
| + | :7. Click '''Save'''. | ||
| + | |||
| + | :'''Note:''' Once an application or form is made active all new submissions will be completed and associated with the current version. Past submissions will retain their original version information. | ||
| + | |||
| + | |||
| + | ==Batch updating Versions== | ||
| + | |||
| + | To update many different applications and forms to a new version, first start by creating the new version, then use the batch update feature to update as many applications and forms as desired. | ||
| + | |||
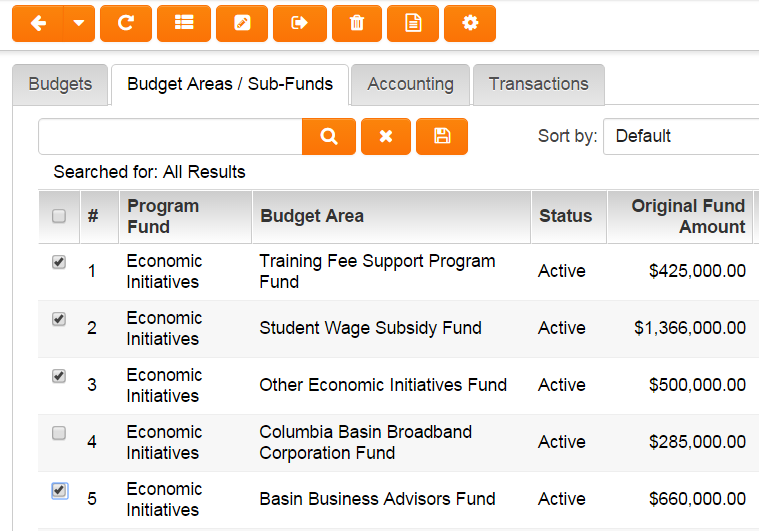
| + | :1. Navigate to the desired UTA | ||
| + | :2. Add a check mark to the check box for each application and form you want to bulk update | ||
| + | :[[Image:Batch_update_version_checkmark.png|link:|600px]] | ||
| + | |||
| + | |||
| + | |||
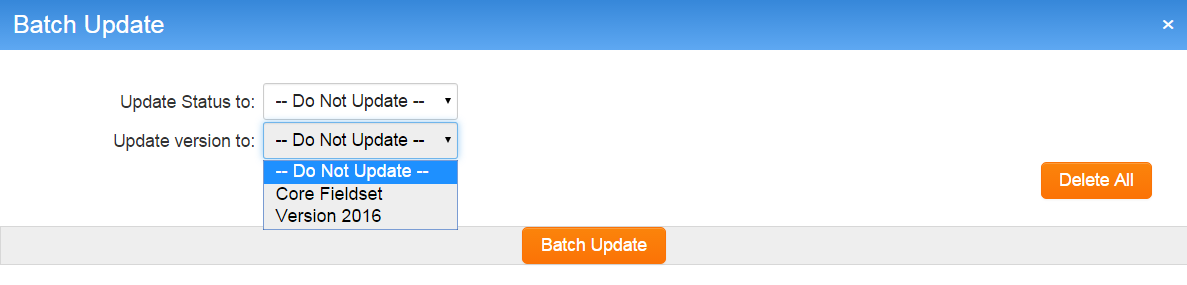
| + | :3. Click on the '''Batch Update''' icon | ||
| + | :[[Image:Batch_update_icon.png|link:]] | ||
| + | :4. From the '''Update version to:''' drop down field, select the new version | ||
| + | :5. Select the '''Batch Update''' button | ||
| + | :[[Image:Batch_update_window.png|link:|600px]] | ||
Revision as of 15:44, 29 December 2015

|
This article will explain how you can implement this feature for use on your SmartSimple system. |
Contents
Overview
Versioning greatly reduces the work required to manage the regular changes that occurs in forms and applications. Versioning accomplishes this by allowing the creation of concurrent versions of applications and forms all using a common set of underlying fields. The result allows for the easy creation, modification, and testing of forms pre-launch. Other benefits include the preservation of past forms values and appearance, allowing admins to view previous form versions in their original format.
Before Versioning making and testing changes to applications and forms could be cumbersome, and to ensure a smooth transitions many organizations deployed whole testing environments to manage these periods. These environments allowed organizations the ability to build new applications and forms, and thoroughly test them before promoting the changes into the live production environment. Although Versioning does not eliminate the need for testing environments, organizations who regularly change or update requirements on applications can now manage this process within the Versioning feature set.
Note: Global Administrator privileges are required to configure this setting.
Getting the Most Out of Versioning Webinar
Getting Started and Taking a Snapshot
Versioning works by first capturing all of the underlying fields that makes up an application or form. We call this total set of fields the "baseline". The baseline set of fields contains all fields in all application and form versions. The first step in using Versioning is to create a new version. This process includes giving the version a name and description, selecting the Application Name and Entity that contains the field-set, and taking a snapshot of the field-set which creates the baseline. Follow the details steps below to create the baseline.
Create a new version
- 1. Under the Configuration menu click on Global Settings

- 2. Under the System Configuration section, click on SmartVersioning

- 3. Click on the "+" icon to create a new version.

- 4. The New Version window is displayed.

- 5. Give the Version a Name and Description, when done click Save.
Take a Snapshot/Create a baseline
- 1. Select the Application Name, the dropdown list will include all application forms within the system.
- 2. Select the Entity Level, this dropdown list will allow the selection of the Level 1, 2, or 3 to make up the field-set that you wish to capture.
- 3. Click the Take Snapshot'.
- 4. Click Save.
- 5. After clicking the Save button, the window will capture the created on and modified by details as well as display the Version Objects fields.


Note: You may want to capture fields-sets from the Level 1, Level 2, and Level 3. In this case you will repeat the steps above and create additional "Version Objects" line to capture any additional objects, activities, or transactions.
Finding the Current Version
You have enabled Versioning and created your first snapshot. By default your Current Version is the baseline version. You can verify the current version at any time by following the steps below:
- 1. Navigate to the desired UTA
- 2. Click on the UTA Settings icon
- 3. Click on the Level 1 tab
- 4. In the UTA Properties section locate the Current Version field.
- 5. The current version is displayed.

Note: To change the current version, click on the dropdown menu and select the new version you would like to activate, then click the "Activate" button, and finally click the Save button at the bottom of the window.
Custom Fields and Versioning
Once Versioning is enabled, there will be a new field added to the Level 1 and Level 2 Custom Fields page.

Notice the Version field added next to the Field Class field. The Version field contains the name of the version of the application or form that you are currently editing. It is this field that allows you to switch between the different concurrent versions that are available. Here is where you will switch between the "Baseline" application version, the current application version, and the new application you are building and testing.
Deleting fields in Versions
It is very important that you always double-check the version that you are editing. Always be careful when deleting fields from the baseline version. Deleting fields from the baseline will delete those fields from all associated applications and forms. Any new snapshots that are taken afterwards will not include the deleted fields. Also deleting fields from baseline will remove your ability to reference those fields and their values removing the ability to use the previously stored values.
Deleting fields from versions that are not the baseline, will only remove those fields from the specific version you are editing and not other versions.
Editing fields in Versions
- 1. Navigate to the desired UTA
- 2. Click on the UTA Settings icon
- 3. Click on the appropriate Level 1, 2, or 3
- 4. Click on the Custom Fields" link
- 5. From the Version dropdown option, select the Version that you will be editing
- 6. Click Set
- 7. Make any required changes to the version your are working on (remember that these edits will only affect the current version you are editing, unless you are making changes to the baseline version.
Viewing changes to the Version
The changes that have been made to a version view can be viewed by opening the application or form and selecting the appropriate form document.
- 1. Navigate to the desired UTA
- 2. Open the desired application / form
- 3. From the Version dropdown option, select the version you with to view.

- 4. Click Set
- Note: Toggling between different versions from this page will allow you to easily flip between the existing form and your modified version.
Creating a new field
Best practice for creating new fields are to add them to the baseline version first. This makes the new field available to all versions once an update snapshot is taken.
- 1. Navigate to the desired UTA
- 2. Click on the UTA Settings icon
- 3. Click on the appropriate Level 1, 2, or 3
- 4. Click on the Custom Fields" link
- 5. Click on the + icon to add a New Field
- 6. Add all fields required to create the new field. For details on creating custom fields click here.
Adding new field to existing Version
Add a new field that has been added to the baseline to an existing version by updating the Versions snapshot. This will update the field-sets that comprise the selected Version and will include any newly added fields added to the baseline since the last snapshot.
See the section above titled: Take a Snapshot/Create a baseline for details on taking a snapshot.
Activating a new Version
- 1. Navigate to the desired UTA
- 2. Click on the UTA Settings icon
- 3. Click on the appropriate Level 1, 2, or 3
- 4. Under the UTA Properties section, locate the Current Version field.
- 5. From the dropdown options select the version you wish to make active.
- 6. Click on the Activate button.
- 7. Click Save.
- Note: Once an application or form is made active all new submissions will be completed and associated with the current version. Past submissions will retain their original version information.
Batch updating Versions
To update many different applications and forms to a new version, first start by creating the new version, then use the batch update feature to update as many applications and forms as desired.
- 1. Navigate to the desired UTA
- 2. Add a check mark to the check box for each application and form you want to bulk update

- 3. Click on the Batch Update icon

- 4. From the Update version to: drop down field, select the new version
- 5. Select the Batch Update button

Also See

|
Click here to learn why this feature is a benefit to your organization. |