Difference between revisions of "Types"
From SmartWiki
(→Creating Types) |
|||
| Line 8: | Line 8: | ||
==Creating Types== | ==Creating Types== | ||
You can configure Types via the '''Types''' link on the [[UTA Settings Page|Settings page]] of your [[UTA]]. | You can configure Types via the '''Types''' link on the [[UTA Settings Page|Settings page]] of your [[UTA]]. | ||
| − | To navigate there, | + | To navigate there: |
| − | Next, select the [[UTA Settings Page|Configuration Settings Button]], signified by the gear icon. | + | #First, navigate to your [[UTA]]. |
| − | For [[Level 1 types]], select the second tab from the left. For [[Level 2 types]], select the third tab from the left, and so on. <br /> | + | #Next, select the [[UTA Settings Page|Configuration Settings Button]], signified by the gear icon. |
| + | #For [[Level 1 types]], select the second tab from the left. For [[Level 2 types]], select the third tab from the left, and so on. | ||
| + | #Select the '''Types''' link to view the types that have been created for this level entity.<br /> | ||
[[Image:Uta91.png]] | [[Image:Uta91.png]] | ||
Revision as of 15:59, 26 October 2021
Types provide a method of delineating between different varieties of Level 1, Level 2 and Level 3 items.
Note: Level 3 Types are configured the same manner as Level 2 Types. Any differences are noted below.
Contents
Creating Types
You can configure Types via the Types link on the Settings page of your UTA. To navigate there:
- First, navigate to your UTA.
- Next, select the Configuration Settings Button, signified by the gear icon.
- For Level 1 types, select the second tab from the left. For Level 2 types, select the third tab from the left, and so on.
- Select the Types link to view the types that have been created for this level entity.
![]()
- Existing Types are listed on the left of the page.
- Details of each type are displayed on the right of the page and new types are added to the right of the page.

Links to Related Configuration Pages
The Type Settings page has the following links to other configuration pages:
![]()
- Template Page - See Template Page for information.
- Status Trigger - See Cascading Status Changes page for information.
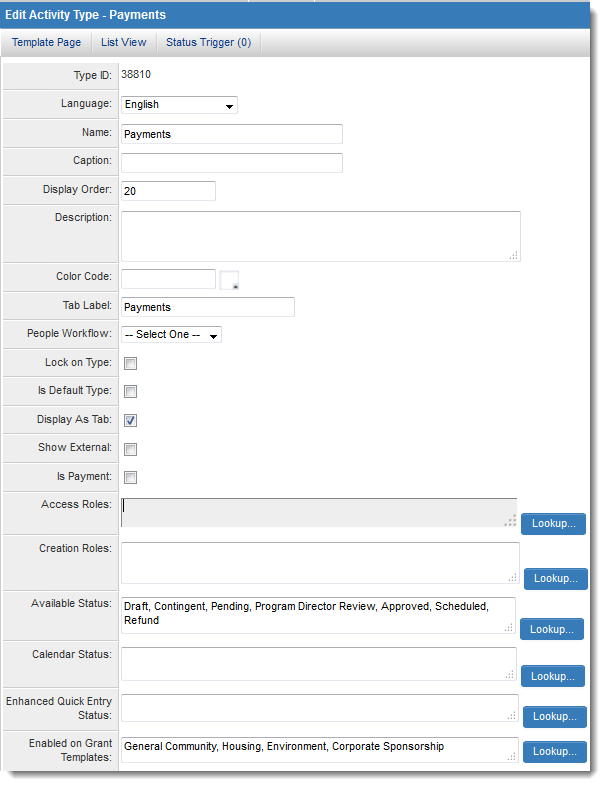
Type Settings
Each type of Level 2 Entity or Level 3 Entity has the following settings:
- Type ID - This is the unique identifier for this Type. See Type ID for further information.
- Language - Allows you to create a language-specific display name for the Type.
- Name - Unique name for the Type.
- Caption - Display name for the Type. See Caption for further information.
- Display Order - The order in which the types are listed in the type combo box. See Display Order for further information.
- Description - Any comments or notes you wish to include. Note: These don't manifest anywhere except on this page.
- Color Code - A color code used to display different types in the list view.
- Tab Label (Level 2 only) - Allows you to define a name for the tab if Display as Tab is selected. See Display as Tab article for details.
- People Workflow (Level 2 only) - Allows you to attach a Tracking Activity Assignment Workflow to this Type.
- Lock on Type (Level 2 and Level 3) - Allows you to lock this type after creation to prevent it from being changed.
- Is Default Type - Allows you to select which Type will be the default when a new Level 2 or Level 3 record is created.
- Note: if you select more than one type to be the default this will not function.
- Display as Tab - This Type will be displayed on a separate tab in the list of activities at the bottom of their parent record. See Display as Tab article for details.
- Show External (Level 2 only) - This check box indicates whether or not this type of activity should be shown to external users.
- Is Payment - allows the ability to use SmartSimple's Payment Integration features with this Type.
- Access Roles - Sets the roles able to access records associated with this Type.
- Creation Roles - Sets the roles that are able to create records with this Type.
- Available Status - Select the Level 2 Statuses that can be selected for this Type.
- Enhanced Quick Entry Status - Select the Level 2 Statuses that will be displayed when creating level 2s via Quick Entry. Only available when the Show Enhanced Quick Entry Tab option is activated on the main settings page. If no statuses are defined then it will use the statuses defined in the Available Status for the specific level 2 type. If no statuses are defined there, then the Quick Entry will show all Level 2 statuses.
- Calendar Status - Select the Level 2 Statuses in which records of this Type will be displayed on Calendars. The option None can be selected, in which case this Type will not be displayed on any Calendar.
- Enabled on Level 1 Templates - Currently only available against level 2 tasks. Allows you to define the level 1 templates that the current level 2 type is associated with.
- Available to Level 2 Types - Currently only available against level 3 tasks. Allows you to define the level 2 types that the current level 3 type is associated with.
- Associated Parent Settings - Source - Currently only available against level 3 tasks. Provides ability to select between 2 level two entities in the same UTA or in related provider UTAs. Used in conjunction with the Associated Parent standard field.
- Associated Parent Settings - Level 2 Activity Status - Currently only available against level 3 tasks. Allows selection of the level 2 statuses, based on the selected source, with the selected statuses controlling what is displayed in the Associated Parent standard field.
- Associated Parent Settings - Level 2 Activity Type - Currently only available against level 3 tasks. Allows selection of the level 2 types, based on the selected source, with the selected types controlling what is displayed in the Associated Parent standard field.
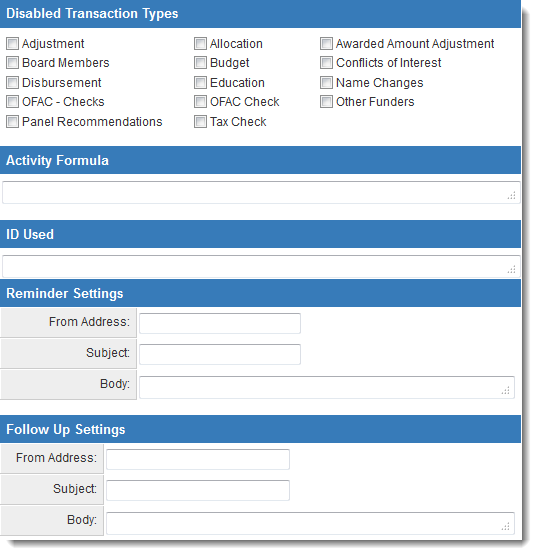
- Disabled Transaction Types - See Disabled Transaction Types for detailed instructions.
- Level 2/Level 3 Formula - A set of expressions used to calculate values when the Level 2 or Level 3 item is saved. Similar to the Level 1 Template formula. (See Template / Type Formula)
- ID Used - Used in concert with Level 2/Level 3 Formula above. Only the custom fields with field IDs entered into this section will be taken into account when running a Template/Type Formula. If this section is left blank, template formulas will run, but performance may be impacted.
- Reminder Settings (Level 2 only) - The subject and content of the Reminder message. These fields are only applicable if you have included reminder standard fields in your Level 2 Entity.
- By default, if there is no owner standard field - as is the case with calendar activities - then the last person to update the activity will be set as the owner.
- If there is an owner standard field enabled, then the owner will be selected when creating reminders or follow-ups.
- Follow Up Settings (Level 2 only) - The subject and content of the Follow up message. These fields are only applicable if you have included follow up standard fields in your Level 2 Entity.
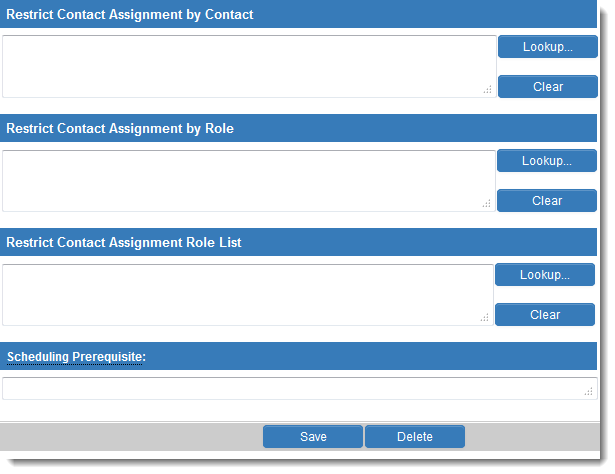
- Restrict Contact Assignment by Contact (Level 2 only) - Allows you to restrict contact assignment for this Level 2 Type to named contacts.
- For example, if the Level 2 Type is "Dissertation Review", and if there are 2 people in your company that look after all dissertation reviews you would specify them here by name so that only they could be assigned to level 2 records of this type
- Restrict Contact Assignment by Role (Level 2 only) - Allows you to define which contact Roles can be assigned to this Level 2 Type.
- For example, if the Level 2 Type is "Legal Contract", you may wish to specify that only contacts with the role of "Lawyer" can be assigned to records of this type.
- Restrict Contact Assignment Role List - When assigning contacts to a Level 2 record, you can restrict the UTA Roles that are available from the dropdown with this section.
See also Restrict Contact Assignment.
- Scheduling Prerequisite
Type Custom Fields
You can define Custom Fields that will appear only on the Level 2 or Level 3 records of a given Type.
- To define these fields, click on the Fields button next to the relevant Type. Then create the desired custom fields in the normal fashion.
- The Display Order of the Custom Fields you create on a Type works in conjunction with the Display Order on any general Level 2 or Level 3 Custom Fields that have been defined.
- For example, if you have a Custom Field on a Level 2 Type with Display order of 15, it would appear between the global Level 2 custom fields with display orders of 10 and 20.
Notes
Notes can also be added to individual Types. This feature assists system administrators keep track of the functionality and changes to individual types.
See Also
| Restricting Level 2 Types to Specific Level 1 Templates |