Difference between revisions of "Template Page"
From SmartWiki
(→General Settings) |
Lorena Ruiz (talk | contribs) m |
||
| Line 68: | Line 68: | ||
:example: | :example: | ||
:<pre>http://alias.smartsimple.xxx/ex/ex_Evtpage.jsp?token=HQ0gNSAYbZfdhdgFhRBBFQhdQ&parentids=5551234&eventid=678543</pre> | :<pre>http://alias.smartsimple.xxx/ex/ex_Evtpage.jsp?token=HQ0gNSAYbZfdhdgFhRBBFQhdQ&parentids=5551234&eventid=678543</pre> | ||
| + | |||
| + | :To go to a specific Level 2 record while using [[ssEncrypt]] to hide the record IDs, use the following syntax: | ||
| + | : '''<nowiki>http://alias.smartsimple.xxx/ex/ex_Evtpage.jsp?token=HQ0gNSAYbZfdhdgFhRBBFQhdQ&enparentids=<ssEncrypt2>LevelOneIds</ssEncrypt2>&codeid=<ssEncrypt2>eventid</ssEncrypt2></nowiki>''' | ||
| + | :example: | ||
| + | :<pre>http://alias.smartsimple.xxx/ex/ex_Evtpage.jsp?token=HQ0gNSAYbZfdhdgFhRBBFQhdQ&enparentids=H3B3T2FdBCs6RnA9Pm4JQTMLESwFaAwvH2pcU0VGYlk~&codedid=aAVNOExzZiYtEUEcHVFIIB9TJ0o0UBA3H2JcV0VGa11b</pre> | ||
Revision as of 10:07, 26 June 2017
Template Pages, sometimes referred to as external pages, are a feature in SmartSimple that:
- allow users to enter records in a SmartSimple UTA without having to log into SmartSimple;
- allow system administrators to configure customized formatting for UTA records;
- can be configured to include a confirmation page upon submission of the record.
Template Pages are associated with a particular Level 1 Template, Level 2 or 3 Type or Transaction.
Contents
Accessing the Template Page
To access the Template Page for a Level 1 Template or Level 2 or 3 Type:
- Go to the UTA Settings Page.
- For Level 1 Templates, click on the "Templates" hyperlink. For Level 2 or 3 Types, click on the "Types" hyperlink.
- On the left-hand list of Templates or Types, click on the hyperlink for the Template or Type for which you want to configure a Template Page.
- At the top of the Edit Template/Type page, click on the "Template Page" button.
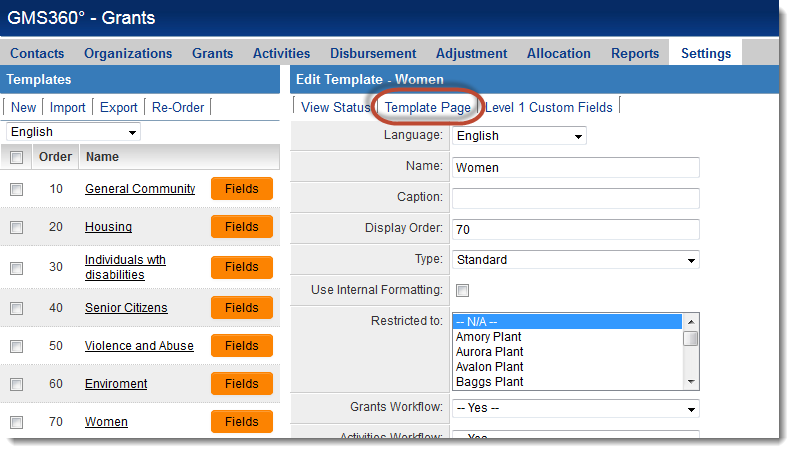
- You will now be brought to the Template Page configuration screen.
To access the Template Page for a Transaction:
- Go to the Global Settings page.
- Under the Company & Account Settings header, click on the hyperlink for "Transaction Types".
- Choose from "People" or "Company" Transaction Types from the drop-down field at the top of the page.
- On the left-hand list of Transaction Types, click on the hyperlink for the Transaction Type for which you want to configure a Template Page.
- At the top of the Edit Transaction Type page, click on the "Template Page" button.
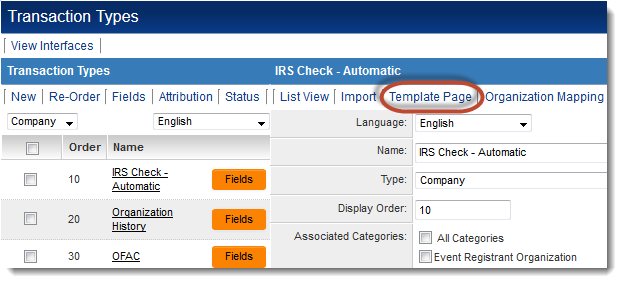
- You will now be brought to the Template Page configuration screen.
The Template Page Configuration Screen
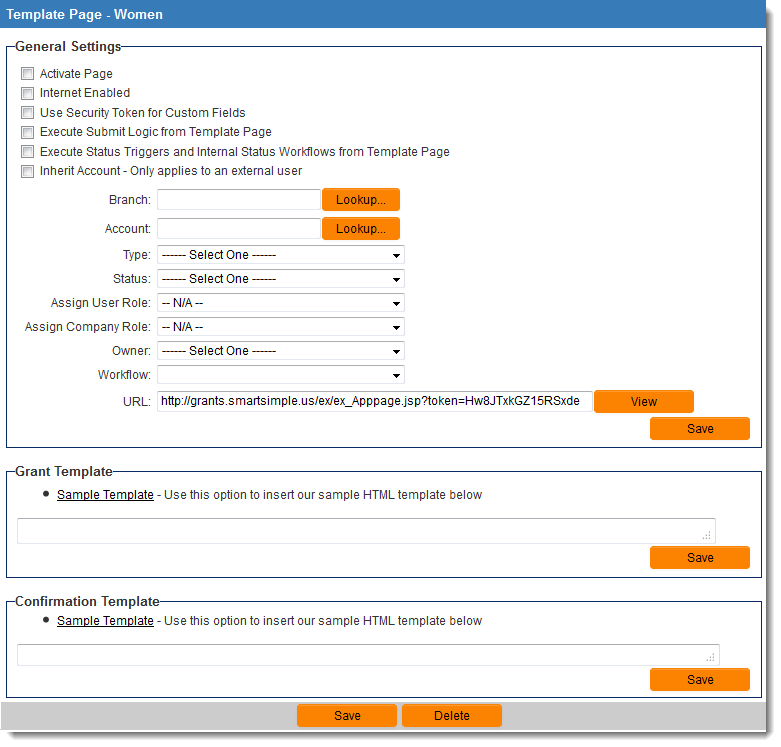
The Template Page Configuration Screen contains the following settings:
General Settings
- Activate Page - This Template Page will only be accessible if the "Activate Page" option is checked.
- Internet Enabled - Making a Template Page "Internet Enabled" will allow users who are not logged into the system to access this page.
- Use Security Token for Custom Fields - enhances security of external sign-up and template pages by validating the fields that are submitted with expected values.
- Execute Submit Logic from Template Page - enables submit logic check when submitting from the template page. Only available against level 1 template pages.
- Execute Status Triggers and Internal Status Workflows from Template Page - See Status Trigger and Workflow pages for more information.
- Inherit Account - Only applies to an external user - The current user's company will be added to the Account standard field.
- Branch - defines the default branch of the newly-created record.
- Account - defines the default account of the newly-created record.
- Type - defines the default Template or Type of the newly-created record.
- Status - defines the default status of the newly-created record.
- Assign User Role - adds the current user to the newly-created record as an associated contact with the supplied role.
- Assign Company Role - adds the current user's company to the newly-created record as an associated organization with the supplied Company Role.
- Owner - adds the current user to the Owner field.
- Workflow - Workflow to be triggered upon submission of Template Page.
- URL - This setting will be completed by default and includes an alphanumeric "token" which serves as a unique identifier for this Template Page.
Level 1
- For Level 1 you will be presented with a URL in the following format, which is to create a new Level 1 record:
- http://alias.smartsimple.xxx/ex/ex_Apppage.jsp?token=HwkITfexoGZdgsaVla
- To go to a specific Level 1 record use the following syntax:
- http://alias.smartsimple.xxx/ex/ex_Apppage.jsp?token=HwkITfexoGZdgsaVla&oppid=LevelOneIds&appid=appid
- example:
http://alias.smartsimple.xxx/ex/ex_Apppage.jsp?token=HwkITfexoGZdgsaVla&oppid=5551234&appid=543213
Level 2
- For Level 2 you will be presented with a URL in the following format, which is to create a new Level 2 record under the specified Level 1:
- http://alias.smartsimple.xxx/ex/ex_Evtpage.jsp?token=HQ0NSdsAYbdZFhZRBfBQhdQ&parentids=LevelOneIds
- where LevelOneIds is the Opportunity ID of the Level 1 you will be creating a new Level 2 under.
- example:
http://mysite.smartsimple.com/ex/ex_Evtpage.jsp?token=HQ0gNSAYbZfdhdgFhRBBFQhdQ&parentids=5551234
- To go to a specific Level 2 record use the following syntax:
- http://alias.smartsimple.xxx/ex/ex_Evtpage.jsp?token=HQ0gNSAYbZfdhdgFhRBBFQhdQ&parentids=LevelOneIds&eventid=eventid
- example:
http://alias.smartsimple.xxx/ex/ex_Evtpage.jsp?token=HQ0gNSAYbZfdhdgFhRBBFQhdQ&parentids=5551234&eventid=678543
- To go to a specific Level 2 record while using ssEncrypt to hide the record IDs, use the following syntax:
- http://alias.smartsimple.xxx/ex/ex_Evtpage.jsp?token=HQ0gNSAYbZfdhdgFhRBBFQhdQ&enparentids=<ssEncrypt2>LevelOneIds</ssEncrypt2>&codeid=<ssEncrypt2>eventid</ssEncrypt2>
- example:
http://alias.smartsimple.xxx/ex/ex_Evtpage.jsp?token=HQ0gNSAYbZfdhdgFhRBBFQhdQ&enparentids=H3B3T2FdBCs6RnA9Pm4JQTMLESwFaAwvH2pcU0VGYlk~&codedid=aAVNOExzZiYtEUEcHVFIIB9TJ0o0UBA3H2JcV0VGa11b
Transactions
- Example:to create a new person transaction (in a popup window) for the current user:
<input type="button" class=Button value="Open"
  onClick="window.open('/ex/ex_Transactionpage.jsp?token=Fg8IUh8YZFQA%3D%3D&objecttype=40&parentids=@me.userid@&transid=0')">
- To create a new company transaction (in a popup window) for the current organization:
<input type="button" class=Button value="Open"
  onClick="window.open('/ex/ex_Transactionpage.jsp?token=Fg8IUh8YZFQA%3D%3D&objecttype=30&parentids=@companyid@&transid=0')">
HTML Template
- This section may be renamed to match the terminology of your copy of SmartSimple. In the illustration above, HTML Template has been renamed to Grant Template because Level 1s have been renamed as "Grants" in this example.
- Clicking on the "Sample Template" hyperlink will insert a default HTML template into this setting, overwriting the current contents.
- See the Template Page - HTML Template for examples of implementation.
- Ensure that the content of any HTML templates confirm to all Accessibility legislation.
Confirmation Template
- The Confirmation Template will be displayed after the Template Page is submitted by the end user. Variables such as sslogic can be implemented in this setting to present different confirmation pages depending on how the external page is completed.
- Clicking on the "Sample Template" hyperlink will insert a default HTML template into this setting, overwriting the current contents.
- See the Confirmation Template page for examples of implementation.
- Ensure that the content of the Confirmation template conforms to Accessibility legislation..
Coordinating the Formatting of the External Page with Internal Formatting
- By default, the Level 1 external page will not pick up the formatting of the internal page (for example, Title Bars configured as tabs will be displayed as simple Title Bars).
- To use the formatting defined within SmartSimple for the external page, enable the "Use Internal Formatting" setting on the Template Settings page.