Difference between revisions of "Style Sheet for XML Budgets and Defined Default Classes"
| Line 7: | Line 7: | ||
===Updates to the XML Data Custom Field=== | ===Updates to the XML Data Custom Field=== | ||
| − | |||
| − | |||
| + | 1. Navigate to, and edit, the specific '''Special - XML Data''' custom field.<br /> | ||
| + | 2. In the XSL Template field, copy the section variable, then click on the '''Sample Template''' hyperlink.<br /> | ||
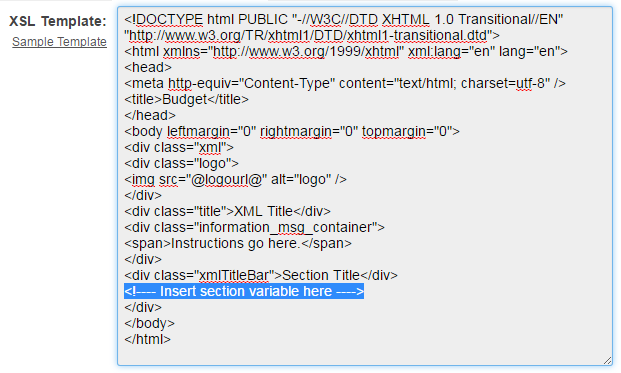
| + | 3. Inside the XSL Template field the Sample Template is populated.<br /> | ||
| − | + | :[[Image:Xsl_sample_template.png|link=|500px]]<br /> | |
| − | + | :''Illustration of the XSL Template field with the Sample Template code populated (above).'' | |
| − | + | ||
| − | + | ||
| − | + | 4. Locate the line within the Sample Template that reads '''"<---- Insert section variable here ---->"''' and replace it with the section variable copied from step 2.<br /> | |
| − | + | 5. Under the '''Options''' section, add a check mark to the '''Enable Builder''' field.<br /> | |
| + | 6. Click '''Save'''. | ||
===The New Section Builder=== | ===The New Section Builder=== | ||
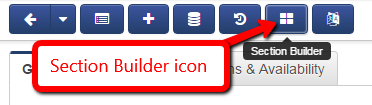
| − | [[Image:Section_builder_icon.png|link=]]<br /> | + | 1. At the top of the Custom Field page click on the '''Section Builder''' icon. |
| − | ''Section Builder icon illustrated (above).'' | + | |
| + | :[[Image:Section_builder_icon.png|link=]]<br /> | ||
| + | :''Section Builder icon illustrated (above).''<br /> | ||
| + | |||
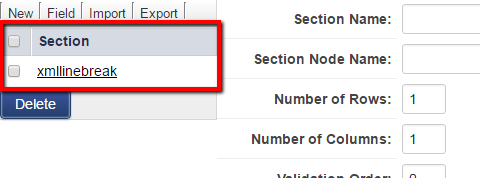
| + | 2. The '''New Section Builder''' page is displayed.<br /> | ||
| + | 3. Under Section, click on the '''custom field hyperlink''', this action will populate the Edit Section and the Cell Grid section with the field details.<br /> | ||
| + | |||
| + | |||
| + | |||
| + | :[[Image:XML_Section_Builder_Section.png|link=]] | ||
| + | |||
| + | |||
| + | 4. Inside the Edit Section, ensure that the Apply Default Styles check box is checked.<br /> | ||
| − | |||
| − | |||
| − | |||
| − | |||
| Line 35: | Line 45: | ||
# In the Cell Grid section, clicking on any of the cells will populate the cell details into Cell Properties | # In the Cell Grid section, clicking on any of the cells will populate the cell details into Cell Properties | ||
| − | # Once the cell grid has been updated, if any are required, click Build to save the changes. | + | # Once the cell grid has been updated, if any changes are required, click '''Build''' to save the changes. |
Revision as of 09:06, 3 May 2016
Contents
Overview
XML data custom fields have been updated with a new default style sheet. This enhancement eliminates the need for hand coded HTML styling when creating XML data fields.
Applying the Default Style Sheet and Defined Default Classes
Updates to the XML Data Custom Field
1. Navigate to, and edit, the specific Special - XML Data custom field.
2. In the XSL Template field, copy the section variable, then click on the Sample Template hyperlink.
3. Inside the XSL Template field the Sample Template is populated.
- Illustration of the XSL Template field with the Sample Template code populated (above).
4. Locate the line within the Sample Template that reads "<---- Insert section variable here ---->" and replace it with the section variable copied from step 2.
5. Under the Options section, add a check mark to the Enable Builder field.
6. Click Save.
The New Section Builder
1. At the top of the Custom Field page click on the Section Builder icon.
- Section Builder icon illustrated (above).
2. The New Section Builder page is displayed.
3. Under Section, click on the custom field hyperlink, this action will populate the Edit Section and the Cell Grid section with the field details.
4. Inside the Edit Section, ensure that the Apply Default Styles check box is checked.
Cell Grid
- In the Cell Grid section, clicking on any of the cells will populate the cell details into Cell Properties
- Once the cell grid has been updated, if any changes are required, click Build to save the changes.