Difference between revisions of "Status"
(→Organization Statuses) |
(→Organization Statuses) |
||
| Line 187: | Line 187: | ||
This variable follows the convention: status, statusid, statuscaption. | This variable follows the convention: status, statusid, statuscaption. | ||
| − | In other words, the variable to refer to the organization status is "@prefix.status@". The prefix can be replaced with the object type. | + | In other words, the variable to refer to the organization status is "@''prefix''.status@". The prefix can be replaced with the object type. |
To display the organization of the assigned company on a {{l1}} object: | To display the organization of the assigned company on a {{l1}} object: | ||
Revision as of 13:33, 31 March 2015
Organization statuses are accessible from Global Settings>Organization
Go under Organization Statuses to create a new status. Click here to find the syntax to reference the organization's status.
The Settings page within the Universal Tracking Application allows you to define Statuses for your Level 1, Level 2 and Level 3 records. The Statuses can be used to track the state or condition of the records.
The Status settings for Level 1, Level 2 and Level 3 are similar, with a few differences outlined below.
Contents
Creating Statuses
Statuses can be created and modified using the Settings page of your UTA.
![]()
- For Level 1 statuses click the Statuses link in the Level 1 settings section.
- For Level 2 and Level 3 statuses click the Statuses link in the Level 2 settings section.
- Note: Level 2 and Level 3 Statuses are both created and managed on the same page.
- By default any statuses you create here will be available to both Level 2 and Level 3 records, but can be restricted to either Level 2 or Level 3 using the Status Availability section (described below).
- Existing Statuses are listed on the left of the page.
- Details of each status are displayed on the right of the page and new statuses are added to the right of the page.
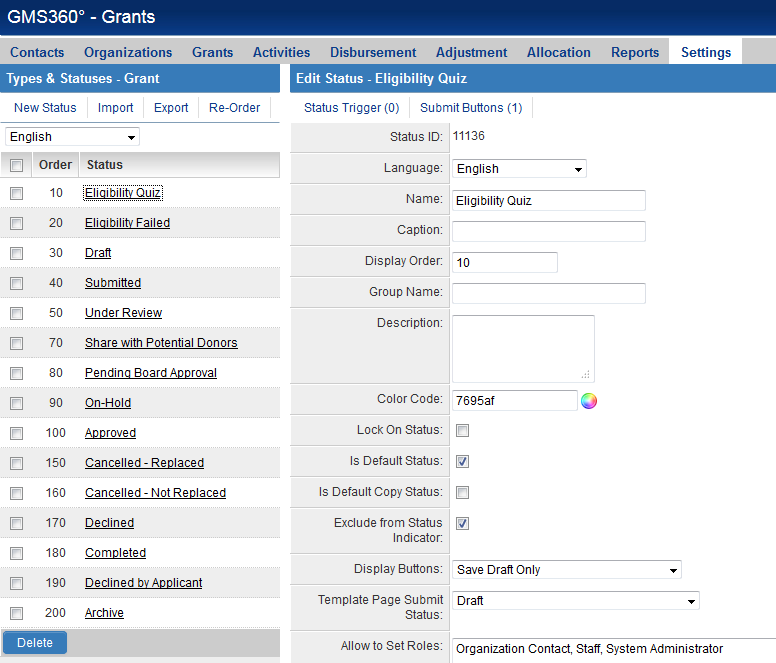
Status Settings
Each status has the following settings:
- Status ID - Internal unique system ID used when referencing the status.
- Language - Language that the current Name value will apply against. Users can specify different translation options for the languages used when accessing the system.
- Name - Name for the Status.
- Caption - Default display name for the status.
- Display Order - The order that statuses are displayed in the Status combo box.
- Group Name - Used in conjunction with the Arcadia Settings to mask multiple individual statuses with a single overall status.
- Description - Any comments or notes you wish to include. Note: These don't manifest anywhere except on this page.
- Colour Code - The colour code used to indicate each status. This colour will be used in the list view and the details view. Click the colour palette button to display a colour picker.
- Lock On Status - This setting is used to lock the record so that it cannot be changed until it is unlocked.
- Is Default Status - Determines the default status to be selected when the item is saved or submitted.
- Is Default Copy Status (Level 2 & 3 only) - When the Copy button is used to create a copy of a Level 2 or Level 3 record, the new record will have the status that has this setting enabled. If no status is set as Is Copy Status, copied Level 2 or Level 3 records will have the same status as the original record.
- Exclude from Status Indicator - Checking this will exclude this status from the Status Indicator Level 1 Standard field.
- Display Buttons - Controls which buttons are available to the user for a record at this status. (See Button Options below).
- Template Page Submit Status - Controls the assigned status when submitted via a template page.
- Status Availability - Only available when configuring Level 2 Statuses. By default any statuses created for a Level 2 will be available to both Level 2 and Level 3 records, but can be restricted to either Level 2 or Level 3 using the Status Availability section. (See Status Availability below).
- Allow to Set Roles - The specific roles that can set the status. If you do not set a role, then any user can set any status.
- Override Lock Roles - The specific roles to which the Lock On Status setting does not apply. If you enable Lock on Status and do not set an Override Lock Role, then the item cannot be unlocked.
- Note: Any Role with the UTA Manager Permission will be able to override the Lock on Status setting, even if not specified here.
- Available Status - Controls the statuses that can be set from the status you are configuring, for example if the status being configured is "Draft", and "Draft" status can only be changed to "Submitted" status, then populate this field with "Submitted" status.
- Enabled on Level 1 Templates - The specific templates that the status is available against. You can also restrict which Statuses are available to each Level 1 Template by navigating into the template itself. See here for details.
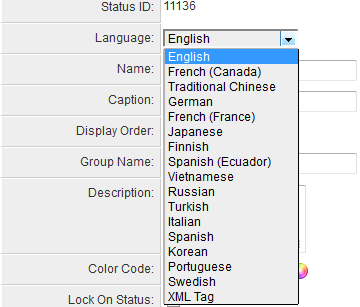
Translation Options
The system allows a Status to have multiple captions added, potentially one for each language available in the system.
- Select the language from the Language drop-down list.
- In the resulting screen populate the Caption field with an appropriate value for the selected language.
- You can also enter a translation for the Group Name of the status.
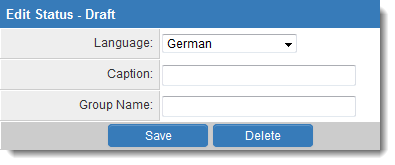
- Click Save
- Now when a user, who has this language configured against their Personal Settings, accesses the system then they will see the status labelled using the relevant caption.
Button Options
For each status you determine which of the "Save", "Save Draft" and "Save & New" buttons are available to the user with the Display Buttons setting mentioned above.
The Submit button is not included in the Display Buttons options. The Submit button will be displayed whenever the Submit Button Status has been defined.
| Button | Description |
| Save |
|
| Save Draft |
|
| Save & New |
|
| Submit |
Important: If a Submit Button Script has been defined the Submit button will run that function, and will NOT perform the tasks listed above. |
Submit Button Script (Level 1 Only)
In order to use the Submit Button Script you must select a Submit Button Status so that the Submit button will appear.
You must also create a Browser Script containing a JavaScript function that is called within the Submit Button Script setting.
- This feature can be used to perform tasks such as confirmation or custom validation of the data on the page, prior to submission.
- The function must return either a value of true if the record should be submitted; or false if the record should not be submitted.
- Standard and Custom Field validation is performed after this script is run, provided that the function has returned true. If the function returns false no further validation is performed and the record is not saved/submitted.
- You can optionally re-label the Submit button using the Submit Button Label setting.
For example, if your Browser Script contains a function called customsubmit you would put the following into the Submit Button Script section:
The following sample JavaScript function will prompt the user to confirm if they want to submit the record.
function customsubmit()
{
var answer = confirm ("Do you really want to submit this?")
if (answer)
   {
   alert ("Consider it done")
   return true
   }
else
   {
   alert ("Keep filling it in then")
   return false
   }
}
- The "return false" isn't strictly necessary. If the function does not return true then false is assumed.
- Note that JavaScript is case sensitive.
If you would like to define a custom script that runs when a record is saved or submitted you can use savefunc.
Status Availability
By default any statuses you create here will be available to both Level 2 and Level 3 records, but can be restricted to either Level 2 or Level 3 using the Status Availability section.
The following 3 options are available:
- Available for Tasks - will make it available to both Level 2 and Level 3 records.
- Not available for Tasks - will make it available to Level 3 records only.
- Not available for Level 3 Activities - will make it available to Level 2 records only.
Status Triggers
Sometimes you will need to control the status associated with level 2 and level 3 items based on a status change at the level 1 item.
For example, if you have an “abandoned” status for a project tracking UTA and you set a project to that status then you may need to set an “abandoned” status for all level 2 (or level 3 items) related to that project. This effect is achieved through a status trigger.
For each level one status change you can control status changed for all level 2 and level 3 items. You can further control this behavior by restricting the trigger to specific types of level 2 and level 3 items. Using the previous example you may not wish to change the status on a “reporting” type level 2 activity simply because the project is abandoned.
Status Triggers can be defined by clicking the Status Trigger link when editing the relevant Status:

Which brings you to the Status Trigger page:
| Level 1: |
Level 2: |


- From Level 1 you can define status triggers for associated Level 2 records, Level 3 records, and Transactions.
- From Level 2 you can define status triggers for the associated Level 1 record (the "parent") as well as any associated Level 3 records.
- Level 3 status triggers are not supported.
- The Type (or Template for Level 1) is selected in the Type Filter combo box.
- The current status is selected in the Status Filter combo box.
- The new status is selected in the Set Status To combo box.
- The Add Trigger button is used to add the new trigger to the trigger list.
So for the defined Type/Template any associated records that were at the status selected in Status Filter will be changed to the Set Status To status.
- Any number of triggers can be created.
Submit Logic
- This feature provides for the creation of any number of submission rules that control a submission process.
- When a submission process is controlled by submission logic, then values at other levels can be validated.
- Values are validated based on the sequence defined within the submission logic.
- From Level 1 the submission rules can access any field at Level 1, account/contact fields, as well as aggregated fields at Level 2 and/or Level 3.
- The Submit Logic feature is associated with a particular status. Associating the conditions with each status allows for different statuses to control sets of Submit Logic rules.
Organization Statuses
This variable follows the convention: status, statusid, statuscaption.
In other words, the variable to refer to the organization status is "@prefix.status@". The prefix can be replaced with the object type.
To display the organization of the assigned company on a Level 1 object:
"@client.status@"
The status name will be displayed. Example:
Active
This syntax can be used on the submit logic validation script by adding the object type prefix:
"@level1.client.statuscaption@"
The status caption will be displayed. Example:
Verified
See Submit Logic for detailed instructions.
See Also