Difference between revisions of "Make a List View Available to Multiple Roles"
| Line 17: | Line 17: | ||
4. The '''List Views''' page is displayed.<br /> | 4. The '''List Views''' page is displayed.<br /> | ||
| − | [[Image:System_views_list_view_option.png|Link:]]<br /><br /> | + | [[Image:System_views_list_view_option.png|Link:|500px]]<br /><br /> |
5. Select the '''System Views''' tab, and click on the '''+''' icon to create a new list view (you may also edit an existing list view).<br /> | 5. Select the '''System Views''' tab, and click on the '''+''' icon to create a new list view (you may also edit an existing list view).<br /> | ||
| Line 26: | Line 26: | ||
7. Checkmark all selected roles, click '''OK''' to add selected roles to the '''Role''' field.<br /> | 7. Checkmark all selected roles, click '''OK''' to add selected roles to the '''Role''' field.<br /> | ||
| − | [[Image:List_view_roles.png|link:]]<br /><br /> | + | [[Image:List_view_roles.png|link:|400px]]<br /><br /> |
8. Complete all other required fields, click '''Save'''<br /> | 8. Complete all other required fields, click '''Save'''<br /> | ||
| − | [[Image:List_view_save.png|link:| | + | [[Image:List_view_save.png|link:|600px]]<br /> |
==Notes== | ==Notes== | ||
Revision as of 14:02, 18 January 2016

|
This article will explain how you can implement this feature for use on your SmartSimple system. |
Overview
This feature allows multiple roles to a be added to a single List View. Global Administrator privileges are required to configure this feature.
How to implement it?
1. Navigate to the desired Universal Tracking Application.
2. Click on the Settings icon, and select the Level 1, Level 2 or Level 3 record. Any System List View can be selected.
3. In the Properties section, click on the List Views hyperlink.
4. The List Views page is displayed.

5. Select the System Views tab, and click on the + icon to create a new list view (you may also edit an existing list view).
![]()
6. Locate the Role field and use the Lookup button to add all applicable roles.
![]()
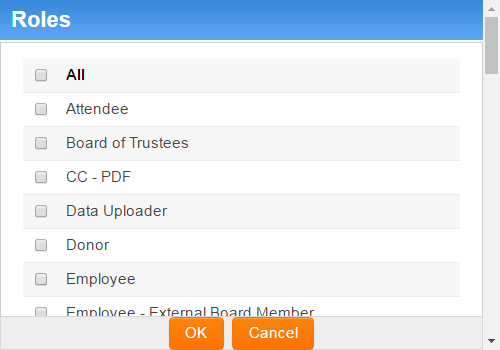
7. Checkmark all selected roles, click OK to add selected roles to the Role field.

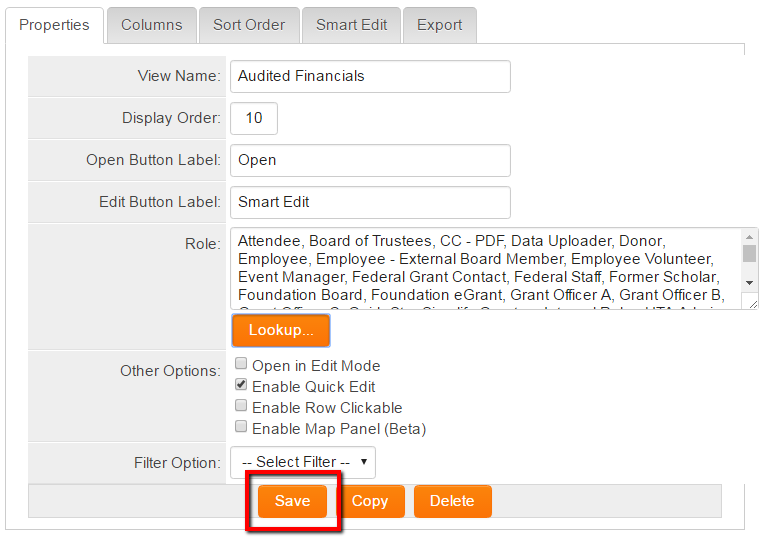
8. Complete all other required fields, click Save

Notes
This feature is available for all System List Views.
Also See
- List View Overview
- Configuring List Views