Difference between revisions of "Login Page"
| Line 7: | Line 7: | ||
In this above example, the login page consists of numerous components: an actual login section for username and password, a [[Signup Page|registration button]], a [[Configuring Privacy, Confidentiality and Other Policies|privacy and security policies hyperlink]], language options, and [[Branding]] that customizes the background, logo, and description. | In this above example, the login page consists of numerous components: an actual login section for username and password, a [[Signup Page|registration button]], a [[Configuring Privacy, Confidentiality and Other Policies|privacy and security policies hyperlink]], language options, and [[Branding]] that customizes the background, logo, and description. | ||
| − | =Configuration - Essentials= | + | =Configuration - Essentials= |
| − | ==Branding== | + | |
| − | You are able to brand your login page so that it reflects the design-based and enterprise-facing needs of your company. | + | ==Branding== |
| − | 1. Click the 9-square menu icon on the top right of your page. | + | |
| − | :: {{Icon-Menu}} | + | You are able to brand your login page so that it reflects the design-based and enterprise-facing needs of your company. |
| − | 2. Under the | + | |
| − | 3. | + | 1. Click on the 9-square menu icon on the top right of your page. |
| − | 4. Click on the hyperlink for '''Login Pages''' | + | |
| − | :: [[File:Finding login pages branding.png|800px|border]] | + | :: {{Icon-Menu}} |
| − | 5. The list of login pages available in your system will be | + | |
| + | 2. Under the heading '''Configuration, '''select '''Global Settings.''' | ||
| + | |||
| + | 3. Click on the second tab - it will be labelled '''Branding.''' | ||
| + | |||
| + | 4. Click on the hyperlink for '''Login Pages.''' | ||
| + | |||
| + | :: [[File:Finding login pages branding.png|800px|border]] | ||
| + | |||
| + | 5. The list of login pages available in your system will be displayed; if there are none, this page will be displayed as blank. | ||
| + | |||
:: [[File:List of login pages.png|900px|border]] | :: [[File:List of login pages.png|900px|border]] | ||
| − | + | =See Also= | |
| + | |||
* [[Adding the SmartSimple Login to your Website]] | * [[Adding the SmartSimple Login to your Website]] | ||
[[Category:System Management]][[Category:Glossary]][[Category:Login Pages]] | [[Category:System Management]][[Category:Glossary]][[Category:Login Pages]] | ||
Revision as of 10:07, 25 June 2019
Overview
After a User has been added to the system or they have signed up, they will then be able to login to the system through a customizable login page. Generally, the username and password are embedded in the website.
- Note: Language-specific login pages can be created and can be accessed using a drop-down when a person tries to login.
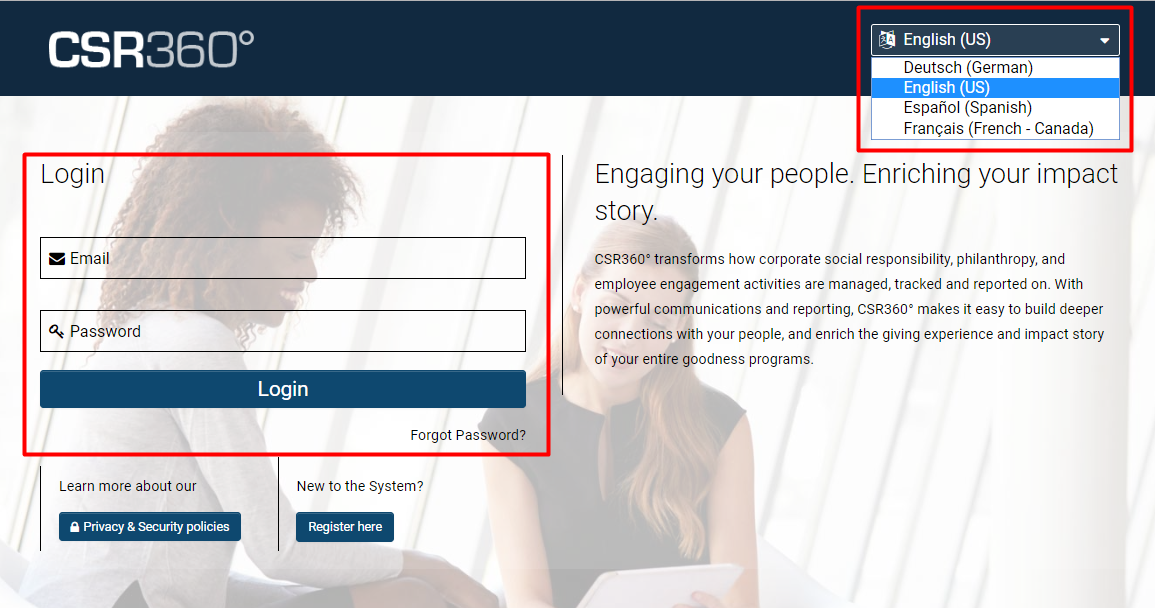
In this above example, the login page consists of numerous components: an actual login section for username and password, a registration button, a privacy and security policies hyperlink, language options, and Branding that customizes the background, logo, and description.
Configuration - Essentials
==Branding==
You are able to brand your login page so that it reflects the design-based and enterprise-facing needs of your company.
1. Click on the 9-square menu icon on the top right of your page.
2. Under the heading Configuration, select Global Settings.
3. Click on the second tab - it will be labelled Branding.
4. Click on the hyperlink for Login Pages.
5. The list of login pages available in your system will be displayed; if there are none, this page will be displayed as blank.


