Difference between revisions of "IRS and CRA - Automatic Verification"
(→Database Check Records on the Company Profile) |
(→Configuration) |
||
| Line 20: | Line 20: | ||
==Configuration== | ==Configuration== | ||
| − | [[Image: | + | To configure this feature: |
| − | + | # Click the ''Transaction Types'' hyperlink on the [[Global Settings]] menu under the [[Company & Account Settings]] heading.<br />[[Image:TransactionTypesHyperlink.png|link=]] | |
| − | Type: | + | # Ensure that the appropriate Transaction Type is selected from the Transaction Type selection dropbox (''People'' or ''Company'').<br />[[Image:TransactionTypeChooser.png|link=]] |
| − | + | # Click on the hyperlinked name of the Transaction Type you want to use to synchronize with the external database. | |
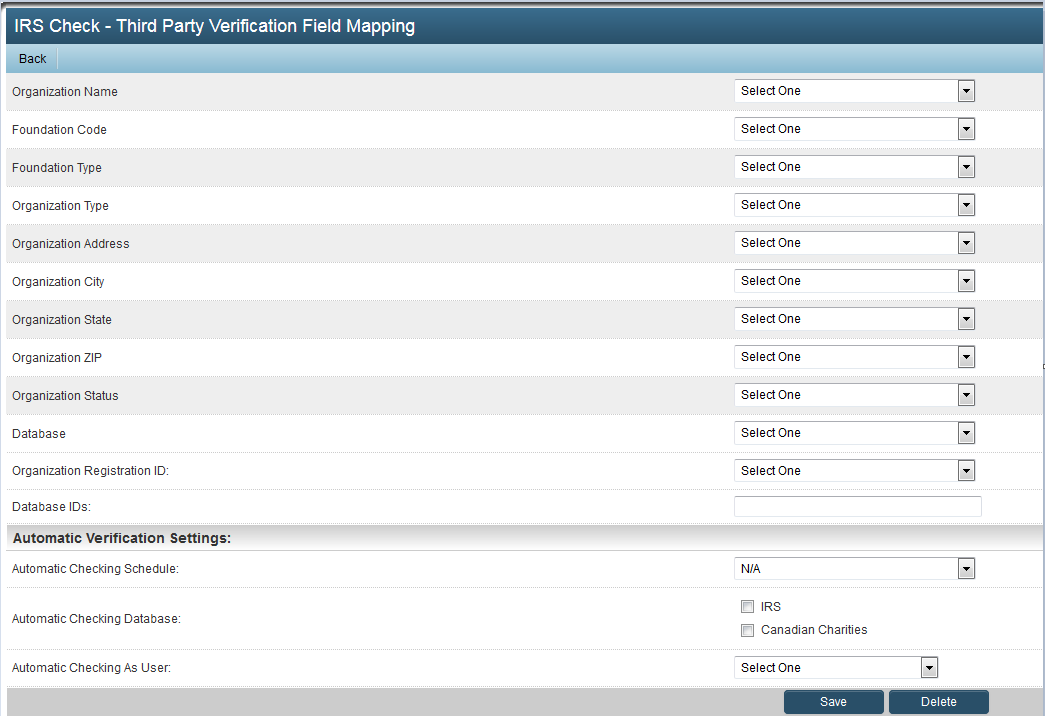
| − | + | # Select the ''User Third party Verification Service'' option.<br />[[Image:IRSCheck.png|link=|500px]] | |
| − | + | # Hit the ''Save'' button. | |
| − | Transaction Type | ||
| − | |||
| − | |||
| − | |||
| − | |||
| − | |||
| − | |||
| − | |||
| − | |||
| − | |||
| − | |||
| − | [[Image:IRSFieldMapping.png|link=|500px]] | + | You will now see a button at the top of the page named ''Third Party Verification Mapping''. <br />[[Image:IRSFieldMapping.png|link=|500px]] |
| − | + | ||
| − | Transaction | + | From this page, you can select the [[custom fields]] created on the Transaction that will store the values returned from your search of the external database. |
| − | + | ||
| − | + | Under the ''Automatic Verification Settings'' heading you can set the following options: | |
| − | + | * '''Automatic Checking Schedule''': Can be set to ''N/A'', ''Once a month'', ''Once every two months'' or ''Once every three months'' | |
| − | + | * '''Automatic Checking Database''': You can select from IRS, Canadian Charities and OFAC | |
| − | + | * '''Automatic Checking As User''': This is a drop down field providing a selection of internal [[users]] in your system. | |
| − | |||
| − | |||
| − | |||
| − | |||
| − | |||
| − | |||
| − | |||
| − | Automatic Verification Settings: | ||
| − | Automatic Checking Schedule: Can be set to ''N/A'', ''Once a month'', ''Once every two months'' or ''Once every three months'' | ||
| − | Automatic Checking Database: | ||
| − | |||
| − | |||
| − | |||
| − | Automatic Checking As User: This is a drop down field providing a selection of internal [[users]] in your system. | ||
==See Also== | ==See Also== | ||
Revision as of 13:24, 26 November 2013
SmartSimple supports automatic verification of organizations with multiple databases such as IRS, CRA, OFAC, or UK Charities.
System Administrators can set up automatic monthly checks of organizations in a certain category or categories against these databases, and save the record of the check as a transaction on the company profile.
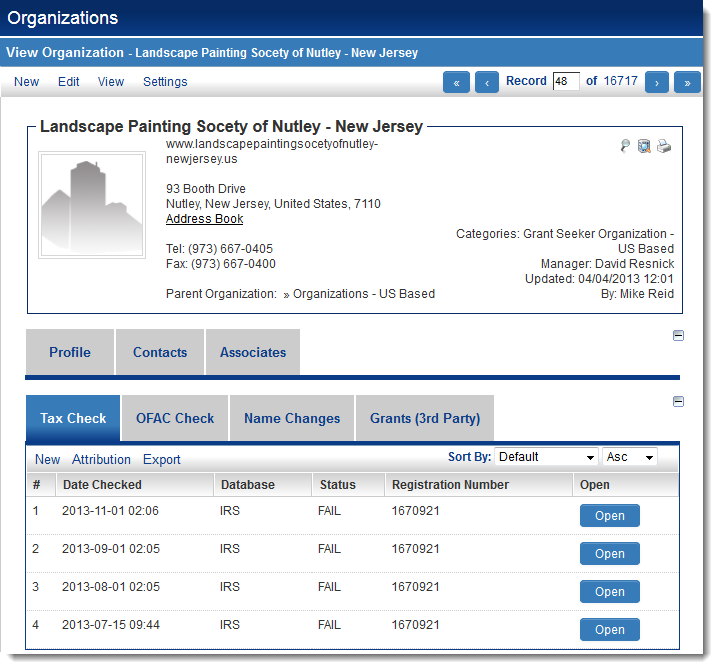
Database Check Records on the Company Profile
When configured, this feature will display each check against the online database as a transaction on the Organization profile. Each type of check can be displayed as a different tab.
In the example below, checks against the IRS database are stored under a tab named "Tax Check":
Clicking the Open button will open the specific tax check transaction:
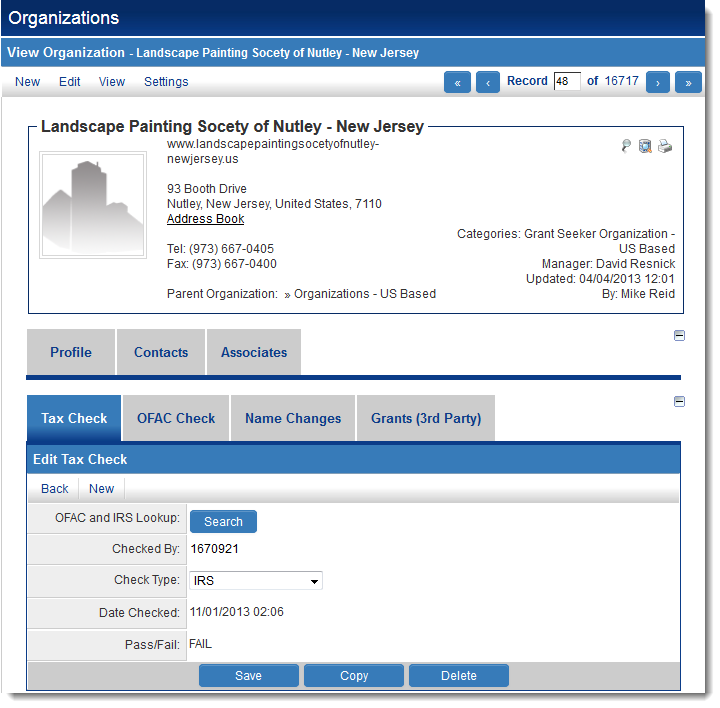
- The details of the check can be displayed, including the date the check was performed and a notification of whether the record was found on the IRS' database.
- In this case, a FAIL message was displayed, indicating that the organization was not found on the IRS' database.
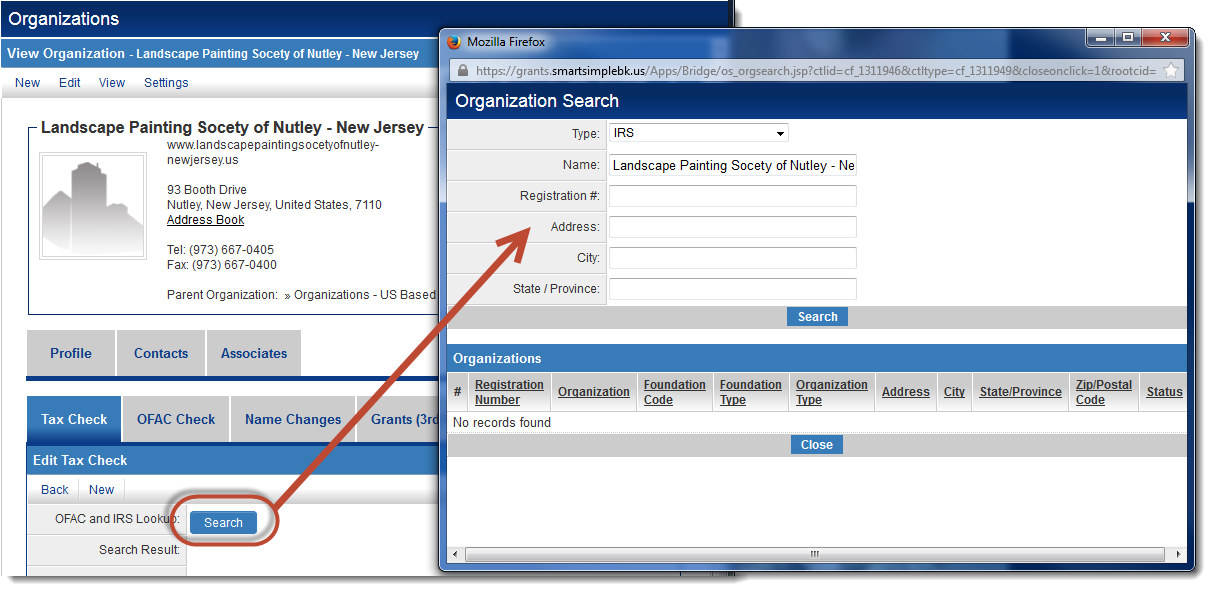
From the specific tax check, another check against the online database (in this case, the IRS database) can be performed manually by clicking on the Search button:
Configuration
To configure this feature:
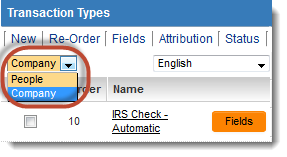
- Click the Transaction Types hyperlink on the Global Settings menu under the Company & Account Settings heading.

- Ensure that the appropriate Transaction Type is selected from the Transaction Type selection dropbox (People or Company).
- Click on the hyperlinked name of the Transaction Type you want to use to synchronize with the external database.
- Select the User Third party Verification Service option.
- Hit the Save button.
You will now see a button at the top of the page named Third Party Verification Mapping. 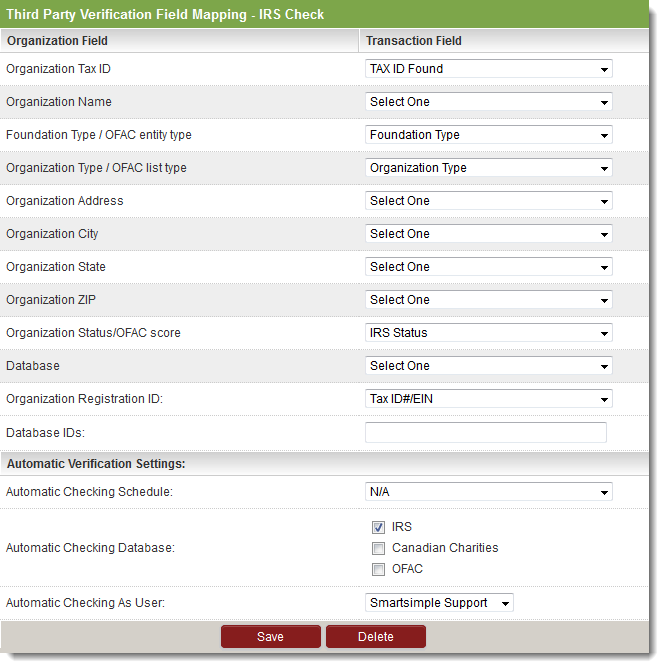
From this page, you can select the custom fields created on the Transaction that will store the values returned from your search of the external database.
Under the Automatic Verification Settings heading you can set the following options:
- Automatic Checking Schedule: Can be set to N/A, Once a month, Once every two months or Once every three months
- Automatic Checking Database: You can select from IRS, Canadian Charities and OFAC
- Automatic Checking As User: This is a drop down field providing a selection of internal users in your system.
See Also
- OFAC, IRS, CRA Checks
- IRS and CRA lookup (for further configuration instructions)