Difference between revisions of "Determining the Level 1 Tabs Displayed to the User"
From SmartWiki
Julia Decker (talk | contribs) |
|||
| Line 29: | Line 29: | ||
[[Image:Uta78.png]] | [[Image:Uta78.png]] | ||
| + | {{PrevNextStart}} [[Determining the Application Tabs Displayed to the User]] | ||
| + | {{PrevNextMid}} [[Accessing Level 1 from Other Screens]] | ||
| + | {{PrevNextEnd}} | ||
[[Category:Universal Tracking Application]][[Category:Applications]] | [[Category:Universal Tracking Application]][[Category:Applications]] | ||
Revision as of 11:41, 17 July 2013
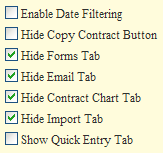
Within a Level 1 item you can control the tabs that are displayed to the user.
- Hide Forms check box suppresses the link to any forms associated with the application.
- Hide Email check box disables the user’s ability to send and save an email as a Level 2 activity.
- Hide Contract Chart check box disables the graphic display of the Level 1 and all associated Level 2 items.
- Hide Import check box disables the Level 2 import wizard.
- Show Quick Entry check box enables the user to enter multiple Level 2 items at the same time.
1. Click the Hide Forms tab, the Hide Email tab, the Hide Contract Chart tab and the Hide Import tab.
2. Click the Save button.
These types of changes require you to refresh or reload your browser.
3. Refresh your browser session.
The revised application tab set is displayed.
4. Click into one of the contracts.
The revised Level 1 item tab set is displayed.


