Difference between revisions of "Custom Export"
| Line 58: | Line 58: | ||
Simply click on the options in drop-down list to have them store to the Details section. | Simply click on the options in drop-down list to have them store to the Details section. | ||
| − | The columns should then be separated from each other | + | The columns should then be separated from each other by selecting the {TAB} syntax. |
The last column selected should be preceded by the {BREAK} syntax. This is required to ensure that each new record in the report appears on a separate line. | The last column selected should be preceded by the {BREAK} syntax. This is required to ensure that each new record in the report appears on a separate line. | ||
Revision as of 15:26, 18 September 2013
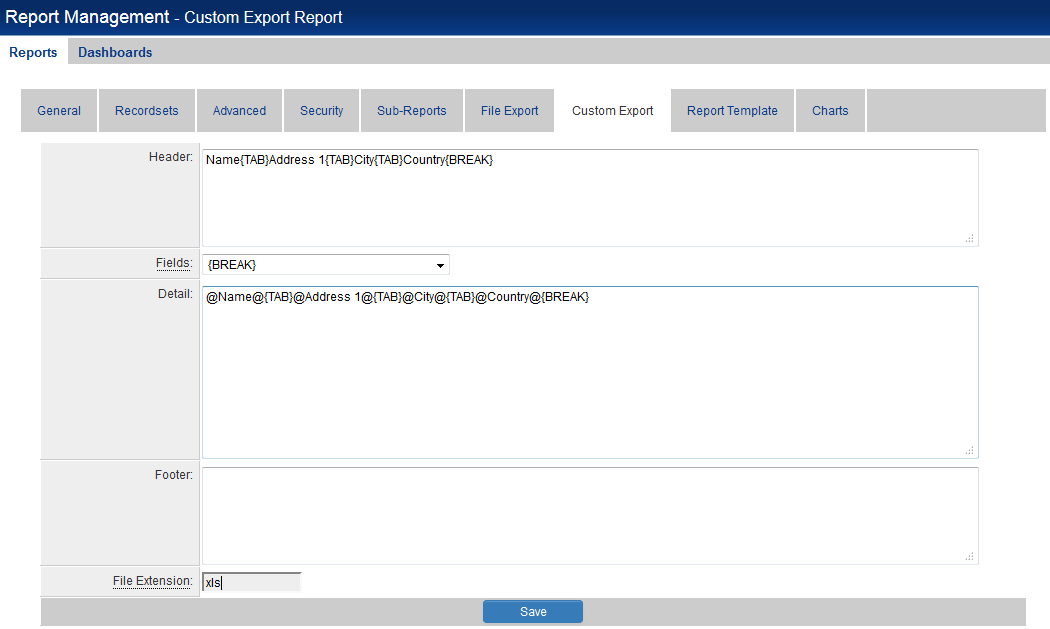
The Custom Export settings allows users to configure the information they wish to export from SmartSimple to external applications such as MS Word, MS Excel or Quickbooks.
The image above shows the Custom Export settings that will result in the Company Name, Address, City and Country fields being pulled into an Excel file.
The following sections appear on the Custom Export page:
- Header - defines the text and column headings that will appear above the main body of the report.
- Fields - used to select the columns to be exported.
- Detail - used to store the selected columns to be exported.
- Footer - defines the text that will appear below the main body of the report.
- File Extension - used to define the format of the exported report, indicating the external application that will be used to display the report.
Header
This section is used top define the text and column headings that will appear above the main body of the report.
Basic descriptive text can be typed into the Header field. Use carriage return to move the cursor onto a new line prior to saving.

This will ensure that when the report is then exported the header text will be on a new line from the main data, rather than on the same line.

If there needs to be multiple lines of text then use carriage return to move the cursor onto the next line, type in the text and click Save.

When the report is then exported both lines of text will appear on separate lines at the top of the report, above the main data.

If there needs to be column headers then simply go onto a new line within the Header section and start typing in the column headers.
The headers should then be separated from each other using the {TAB} syntax. This will ensure that the headers are aligned with the corresponding data when the report is exported.
You can also use the {BREAK} syntax at the end of the column header text to ensure that the headers will appear above the actual data or use carriage return to move the cursor onto the next line.

When the report is then exported the column headers will appear at the top of the report, just above the main data.

Fields / Detail
The Field section is used to select the columns from within the report that are to be exported, which are then stored in the Details section.
It consists of a drop-down list, showing all the exposed report columns as well as the {TAB} and {BREAK} options.

Simply click on the options in drop-down list to have them store to the Details section.
The columns should then be separated from each other by selecting the {TAB} syntax.
The last column selected should be preceded by the {BREAK} syntax. This is required to ensure that each new record in the report appears on a separate line.
In the example below there are 4 columns selected (i.e. Name, Address 1. City, Country).

When the report is then exported there are 4 discreet columns, with each new record appearing on a new line.

This section defines the text that will appear below the main body of the report.
Basic descriptive text can be typed into the Footer field.

When the report is then exported the footer text will be appear below the main data in the report.

You can also use the {BREAK} syntax prior to the footer text to ensure that there is some space between the footer and the actual data or use carriage return to move the footer text onto the next line.

When the report is then exported the footer text will be appear below the main data in the report.
