Difference between revisions of "Create Consumer Records in Batch from Provider"
| Line 1: | Line 1: | ||
==Overview== | ==Overview== | ||
| − | + | This feature allows the creation of consumer associated records in batch based on the contacts or companies associated to the provider record. | |
==Features Illustrated== | ==Features Illustrated== | ||
| Line 9: | Line 9: | ||
==Configuring This Feature== | ==Configuring This Feature== | ||
| − | 1. Navigate to the UTA, click on the Configuration Settings icon.<br /> | + | 1. Navigate to the Provider UTA, click on the '''Configuration Settings''' icon.<br /> |
| + | [[Image:MenuBarSettingsIcon.png|link=]]<br /> | ||
| + | <br /> | ||
2. Click on the '''Connectivity''' tab.<br /> | 2. Click on the '''Connectivity''' tab.<br /> | ||
3. In the '''Connectivity Settings''' section, ensure there is a check mark in the option for '''Enable UTA Connection as Provider'''. <br /> | 3. In the '''Connectivity Settings''' section, ensure there is a check mark in the option for '''Enable UTA Connection as Provider'''. <br /> | ||
| − | 4. Under Enable UTA Connection as Provider are the listed UTA Consumer list views | + | 4. Under Enable UTA Connection as Provider are the listed UTA Consumer list views.<br /> |
5. Click on the '''Batch Create Consumer Button Settings''' hyperlink. | 5. Click on the '''Batch Create Consumer Button Settings''' hyperlink. | ||
[[Image:Batch_create_consumer_button_settings_hyperlink.png|link:|800px]]<br /> | [[Image:Batch_create_consumer_button_settings_hyperlink.png|link:|800px]]<br /> | ||
''Batch Create Consumer Button Settings hyperlink illustrated above''<br /> | ''Batch Create Consumer Button Settings hyperlink illustrated above''<br /> | ||
| − | |||
6. The '''Batch Create Consumer Button Settings''' page is displayed.<br /> | 6. The '''Batch Create Consumer Button Settings''' page is displayed.<br /> | ||
7. Edit an existing button or click on the '''+ New Batch Create Consumer Object Button''' to create a new button.<br /> | 7. Edit an existing button or click on the '''+ New Batch Create Consumer Object Button''' to create a new button.<br /> | ||
| − | |||
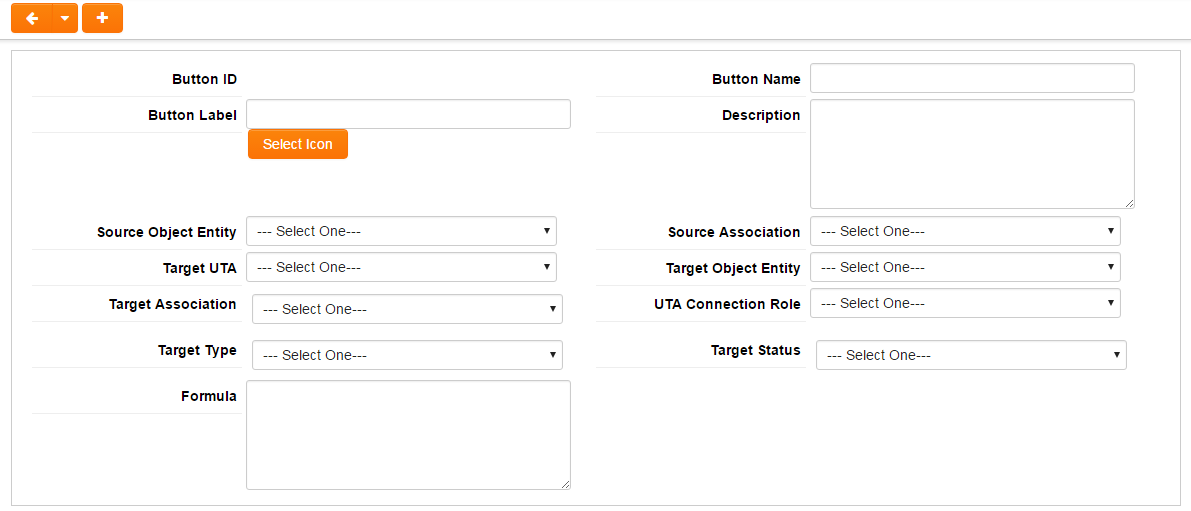
8. Complete the Batch Create Consumer Button form.<br /> | 8. Complete the Batch Create Consumer Button form.<br /> | ||
| − | |||
9. Click '''Save'''. | 9. Click '''Save'''. | ||
| − | ==Options== | + | ==Batch Create Consumer Button form Options== |
* '''Button Name''' - The unique name used when retrieving button | * '''Button Name''' - The unique name used when retrieving button | ||
* '''Button Label''' - Both a text and an icon can be selected. If both are set, the button label will be the icon with text as its title. If no icon selected, the button label will be the text. If neither text or icon is selected, the default text will be '''Create''' | * '''Button Label''' - Both a text and an icon can be selected. If both are set, the button label will be the icon with text as its title. If no icon selected, the button label will be the text. If neither text or icon is selected, the default text will be '''Create''' | ||
Revision as of 17:24, 5 May 2016
Contents
Overview
This feature allows the creation of consumer associated records in batch based on the contacts or companies associated to the provider record.
Features Illustrated
Configuring This Feature
1. Navigate to the Provider UTA, click on the Configuration Settings icon.

2. Click on the Connectivity tab.
3. In the Connectivity Settings section, ensure there is a check mark in the option for Enable UTA Connection as Provider.
4. Under Enable UTA Connection as Provider are the listed UTA Consumer list views.
5. Click on the Batch Create Consumer Button Settings hyperlink.

Batch Create Consumer Button Settings hyperlink illustrated above
6. The Batch Create Consumer Button Settings page is displayed.
7. Edit an existing button or click on the + New Batch Create Consumer Object Button to create a new button.
8. Complete the Batch Create Consumer Button form.
9. Click Save.
Batch Create Consumer Button form Options
- Button Name - The unique name used when retrieving button
- Button Label - Both a text and an icon can be selected. If both are set, the button label will be the icon with text as its title. If no icon selected, the button label will be the text. If neither text or icon is selected, the default text will be Create
- Source Object Entity - Select Level 1 or Level 2 from Provider UTA
- Source Association - Select Contacts/Companies field from Provider UTA.
- Target UTA - Consumer UTAs that has a Level 1 connection (ie Provider Level 1 - Consumer Level 1 or Provider Level 2 - Consumer Level 1) with the Provider UTA.
- Target Object Entity - Currently only Level 1 term from Target UTA are displayed. This will only populate when Target UTA is selected. Note: Level 2s and Level 3s may be added in a future enhancement.
- Target Association - Select the contact or company field for target Level 1. If Contacts/Companies is selected, the contact/company role combo box will appear.
- UTA Connection Role - The role used when establishing provider/consumer linkage.
- Target Type/Target Status - The default type/status of the new consumer Level 1 object to be created. This field will only populate when a Target UTA and Target entity is selected. It allows you to select value from custom field. Once selected the Custom Field option from the combo box, a textbox will appear where you can enter the custom field ID (accepts variable syntax).
- Formula - Use this formula to populate other desired fields after the new consumer Level 1 is created. Use same syntax as Level 1 template formula. This will run before the actual Level 1 template formula.
Notes
- The Variable Syntax used will be similar to the template formula format (example @level1.name@ ="Button Name"). Please note this variable will only resolve on Level 1 and Level 2 objects.
- Target Object Entity field only the Level 1 entity will be displayed. The Level 2s and Level 3s may be added in a future enhancement.