Difference between revisions of "Configuring the Excel Plug-In"
From SmartWiki
(deprecating) |
|||
| Line 1: | Line 1: | ||
| + | {{Deprecated}} | ||
| + | |||
'''[http://www.smartsimple.com/DotOrg/flash/Configuring_the_Excel_Add-in_viewlet_swf.html View It Here]''' | '''[http://www.smartsimple.com/DotOrg/flash/Configuring_the_Excel_Add-in_viewlet_swf.html View It Here]''' | ||
| Line 41: | Line 43: | ||
In future you will be automatically connected to [[SmartSimple]] every time you start Excel. | In future you will be automatically connected to [[SmartSimple]] every time you start Excel. | ||
| − | |||
| − | |||
| − | |||
Latest revision as of 17:17, 19 October 2017
The first time you wish to use the Excel Add-in, you need to input your SmartSimple username and password.
If you have previously installed SmartDoc for Microsoft Word, then your user setting will already be established.
Setting the user options
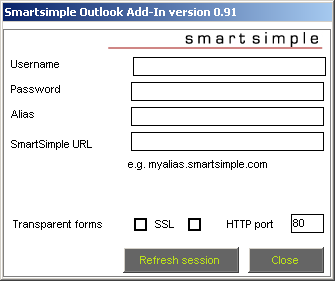
1. Click the SmartSimple Settings button.
The SmartSimple Settings window is displayed.
You use this window to set the following settings:
- Username - The same name you use to log into SmartSimple using a Web Browser.
- Password - Your normal SmartSimple password.
- Using SSL (port 443) - Select this option if your company is using Secure Socket Layers (SSL) to connect to SmartSimple. If in doubt, consult your administrator.
- Alias - Your organization's SmartSimple "entry point"
- HTTP Port - Defines the communications port used in your copy of SmartSimple. Normally this will be Port 80. Check with your administrator if this port does not work. You don't need to change this setting if you use SSL.
- SmartSimple URL - The alias is your organization's SmartSimple "entry point" (i.e. for ACME it would be acme.smartsimple.com). Do not use a www or http:// prefix.
Resume Processing
- Document Merging - Choose the option required for both resume processing and document merging. Select both check boxes.
SmartSimple URL Samples
1. Set the username to the name you use to log into SmartSimple.
2. Set the password to your SmartSimple password.
3. Set the Alias.
4. Set the URL.
5. Click the OK button.
In future you will be automatically connected to SmartSimple every time you start Excel.

