Configuring a SmartSimple Instance
Contents
- 1 Overview
- 2 Configuration - Essentials
- 2.1 Configuration Checklist
- 2.2 Menu and Global Settings
- 2.3 Branding
- 2.4 Using the Colour Picker
- 2.5 Login Screen Content
- 2.6 Storage Summary
- 2.7 Security Settings
- 2.8 Password Policy
- 2.9 Intruder Log
- 2.10 User Email Templates
- 2.11 Enable SSL (Secure Socket Layer)
- 2.12 Setting the Web Alias
- 2.13 Setting an E-mail Domain
- 2.14 Session Timeout
- 2.15 Company & Account Settings
- 2.16 User & Contact Settings
- 2.17 Default User Settings
- 2.18 Association Settings
- 2.19 People Online Settings
- 2.20 SmartFolder Settings
- 2.21 Organisational Terminology
- 2.22 Data Loading & Backup Settings
- 2.23 See Also
Overview
SmartSimple is a cloud-based platform that prides itself on its total flexibility; we have highly configurable options for almost every part of our system, so that you can easily tailor your instance to your company's direct needs as well as your personal preferences. This page will bring you through the general chronological steps for configuring a SmartSimple instance. By the end of it, you will have built the foundations for a system that is designed for your unique business aims.
Configuration - Essentials
Configuration Checklist
Prior to beginning your configuration, read over this sequence that you should consider when setting up your copy of SmartSimple (before anyone is given access into the system). These highlight the general topics/areas that are configurable and that will help you make your system an ideal tech solution for your company.
| Configuration Organization Settings | Set a colour scheme, licensing, backup instance and customized terminology. |
| Custom Fields | If required, define the Custom Fields required for your organizations. These are fields that you might need to accurately reflect your business, but go beyond the standard Name, Phone Number, Address etc. |
| Internal and External Organization Information | Create or import organization information for the organizations in your system's organization hierarchy. |
| Roles |
Define the roles that people play in your business. 'Example: If you are a research-based company serving university grants, you might want to make roles labelled Peer-Reviewer, 'Professor, Departmental Lead etc. |
| User Imports | Define or upload "people" (users/contacts) into their respective substrata of your organization hierarchy. |
| System Administrator/Manager Permissions | Give high-level permissions to specific roles and choose your Global User Administrators. Determine which groups of people will be responsible for each application and feature in your SmartSimple copy. |
Tip: Keep this page open while opening hyperlinks from this page. Although other articles will give more specific instructions for configuring certain features, this page will be helpful by providing a broad sequence of areas required for successful configuration.
Menu and Global Settings
If you are a System Administrator, you will have access to Global Settings. Users with SysAdmin permissions will be able to access all functions within the system and to customize roles, security, feature visibilities, etc. Be cautious with who you assign in a SysAdmin role, as their access into the system has the potential to make wide and immediate impact.
No matter what, best practice is to test configuration and changes to your system in the Backup Instance prior to modifying the live instance.
- The Backup Server and Testing Instance will not retain any changes into the live instance; the backup is overwritten nightly with that day's production copy.
In order to properly configure your system, you must know where your menu icon is as well as Global Settings.
Your menu icon is located on the top right of your page, and looks like a 9-square icon.

The Global Settings area of the system is available under the heading Configuration.
See Global Settings for a full list of the available features in a set of sections.

Note: We aim to end support for the Classic Interface after our upcoming November 2019 Upgrade. For this reason, we encourage all clients to switch to the Arcadia Interface now, and to use the Arcadia Interface configuration options.
Branding
- See Branding for more detailed information.
As part of the implementation process, SmartSimple or its partners will configure the look and feel of your system for you. Anyone with SysAdmin privileges will then be able to change the branding and visual settings of the system at any time.
Accessing Branding & Visual Settings
1. Click on the 9-square menu icon on the top right of your page.
2. Under the heading Configuration, select Global Settings.
3. Click onto the second tab, labelled Branding.

Colors & Styles
You have the freedom to adjust the colours and style choices of fonts in your system. All colour settings will affect all users: What a Global User Administrator sees will be the same colours that an applicant sees.
See Colors & Styles for more.
Login Pages
Logo, Header, Web Alias and Email Domain
Terminology
Using the Colour Picker
Colours are selected by clicking the colour palette icon to the right of the colour box.
1. Click the square icon of a colour next to any branding setting that allows colour change.
The colour pallet is displayed.

If you need to match colours exactly with your organisation web site, you can view the HTML source of your organisation web page and find the hex codes for “colour”.
You can then type these colour codes into the text boxes.
Alternatively, you can use a program such as Photoshop to “sample” an image and determine the correct colour.
Login Screen Content
You can further “brand” the login page by creating your own login page.
1. Click the Login Screen Content link.
The Login screen content is displayed.

2. Modify the content as required.
3. Click the Save button.
You are returned to the Global Settings page.
SmartSimple recommends that users should log in through their web site.
In order to add the username and password boxes to your web site, download the instructions from the SmartSimple Wiki – www.smartsimple.org
Title Type
The Title Type defines whether text or a login should be displayed in the top left corner of the main window.
![]()
When the organisation first registers, the title text displayed on the top left of the SmartSimple page is set to the organisation name.
Title Image
This setting is used to upload and display a logo, or other image files that you may wish to display on the login page, and in the top left corner of the SmartSimple main window.
For the best presentation, this image should be pre-sized to 133 by 46 pixels.
If you need to resize the image you can use a program such as Adobe Photoshop that allows you to set an exact height and width in pixels.
Title Text
You can define alternative text to be displayed on the login page, and in the top left corner of the SmartSimple main window as an alternate to the image.
Storage Summary

This section displays the current number of Branches (internal), Accounts (external), Users (internal) and Contact (external) in this instance of SmartSimple. A list of deleted companies/accounts, users/contacts is also displayed. You can review the deleted companies or contacts by clicking on the word “deleted”. You can then review the list and either restore one or more contact, or purge (permanently delete) from the system. The total storage used by the instance is calculated by clicking the Re-calculate Storage button.
Security Settings
These setting are used to control system security.


Password Policy
Password Policy is used to control the length and complexity of passwords, the number of retries that the user is allowed, and the lockout time for the account if they exceed the number of retries.
1. Click the Password And Activation Policies link.
The Password Policy window is displayed.

The following password settings are available:
Password length – the minimum length allowed for a password, between 6 and 32 characters.
Complexity – the level of complexity required in the password, the options are:
- No Restriction – any character can be used. This is the default.
- Alpha Only – only letters can be used.
- Alpha & Numeric – letters and numbers must be used in the password.
- Alpha & Numeric & Special characters – letters, numbers and special characters must be used. The following special characters are allowed:
~ ! @ # $ % ^ & * ( ) { } [ ] ; : ' " < > ?
If you enable special characters, the special character list will be displayed to the user when they change their password.


Intruder Lockout Settings – these settings determine the actions that should be taken if someone attempts to log into your copy of SmartSimple.
- Number of Attempts – the number of attempts to log in with an account before the account is locked.
- Lockout Duration – the duration of the account lockout. The user will not be able to log in during this period. Period can be set to 5 minutes, 15 minutes, 30 minutes, 1 hour, 3 hours, 12 hours, 24 hours or forever (until unlocked by administrator).
Intruder Email Alert – these settings define who should be informed by email if an intruder alert is detected.
- Email From – the “from” address for the email. If you do not set this value, the address: support@smartsimple.com will be used.
- Email To – select the internal person to receive the email.
- Subject – the subject of the email. See below for the variables that you can use in the subject.
- Body – the body of the alert email. See below for the variables that you can use in the body.
Intruder Alert Email Variables – because the user in not logged into the system the amount of information available is limited to IP Address @ip@, the attempted username @username@ and time @time@.
Intruder Log
The View Log tab is used to access the Intruder Alert log.
2. Click the View Log tab.

- The list can be sorted by clicking the column title.
- You can filter the list by username, year, and month.
View Locked Users
The View Locked Users link will display all currently locked users.
If a user is locked, then you need to go to the user records and reactivate by sending a new password.
User Email Templates
This organisation settings page is also used to manage content for the default new user and request password emails.

You can alter the text as required.
Enable SSL (Secure Socket Layer)
Secure Socket Layer (SSL) is an industry standard encryption technique that encrypts all the information transmitted between the user’s browser and the SmartSimple server.
Anyone intercepting this information over the Internet would be unable to decrypt the information.
1. Click the Enable SSL check box.
![]()
If your organisation is using a dedicated SmartSimple Server, you will need to purchase an SSL certification for this feature to function.
If you are using a SmartSimple server, then you can enable this feature at any time.
Setting the Web Alias
The web alias defines the prefix to your copy of SmartSimple.
2. Set the Web Alias as required.
![]()
The Web Alias should be set before other users begin to use the system.
If a user sets their home page to a page referenced by the numeric alias and the alias is changed, the user will get an invalid session error when the system attempts to display that page during the login process.
For security reasons, SmartSimple will never display if an alias is not valid when you try to log in.
Setting an E-mail Domain
Setting the organisation e-mail domain lets users from your organisation domain log in without keying their entire e-mail address.
3. Set the Email Domain as required.
![]()
Users of the system that are not in your email domain must use their full email address to log into SmartSimple.
Session Timeout
The session timeout feature will automatically log out any user if their session remains inactive for the defined number of minutes.
4. Set the Session Timeout as required.
![]()
We recommend that you always set this option. Generally, 30 or 60 minutes are acceptable timeout periods.
Business Configuration Settings
The Business Configuration settings provide access to key features to personalize this instance of SmartSimple for specific business needs.

ObjectSync Settings
This feature supports sharing information between instances of SmartSimple.

Company & Account Settings
-
-
- Branch Custom Fields – custom fields associated with internal companies.
- Account Custom Fields – custom fields associated with external companies.
- User and Contact Signup Pages – used to manage external web pages where people can register as contacts.
- Branch and Account Signup Pages – used to manage external web pages where companies can register.
- Company Parent - enables the display of a parent organisation in the list views throughout the system. This feature is useful if the organisations you deal with are subsidiaries, and you need to be aware of the parent organisations.
- Resources – displays the company resource tab, only required when using job costing.
- NAIC Codes - the North American Industry Classification System (NAICS, pronounced Nakes) was developed as the standard for use by US, Canadian, and Mexican agencies in classifying business establishments. Enable this setting if you wish to track organisations by NAIC codes. You can set two codes for each organisation, a primary and secondary code.

![]()
- Display UTA Items – displays tracking items from the Universal Tracking Application associated as a set of tabs on the company record.
User & Contact Settings
-
-
- User Custom Fields – custom fields associated with internal users.
- Contact Custom Fields – custom fields associated with external contacts.
- Default User Settings – the default system settings that will be set for each new user or contact.
- Disable Pre-load People List – this option is used to improve performance when you have in excess of 50,000 contacts in your copy of SmartSimple. Enabling this option will disable the display of contacts in all Search People pages.
- Enforce Homepage - you can force all users to the same web page when they first log into the system. This feature is useful if you have customers using the system and want to present them with some specific information such as your own organisation web site.
- Homepage – specifies a web page to be used as the homepage.
- Language – the default language for all new users.

Checking this box does not override the home page setting for each user, but simply defines the first page they will see when logging in.
Default User Settings
The default user setting options provide you with a way of controlling the setting each user will have when they first log into the system. We recommend that you set these values before setting up any additional users.
1. Click the Default User Settings link.
The Default User Setting window is displayed.
You can set the following values:
Default User – Display Options
- Left Navigation Style – choose Static for menus that don’t expand or dynamic for menus that open and close.
- UTA Tabs – used to control the presentation of tabbed fields when the Universal Tracking Application is used.
- Font Size – choose a larger font size for your view of the system.
- Number of Records Per page – defines the number of records per page you wish to see when information is displayed as a list. You can choose 20, 40, 60, 80 or 100.
- Text Editor – enables and disables the Rich Text/HTML Editor.
- Publish Pin Board – make your personal Pin board visible to other people.
- List View Thumbnail Size – determines the size of images in reports.
Default User – Regional Settings
These options determine your regional settings.

- Input Date Format – the individual user’s preferred entry format for date time values.
- Input Short Date Time Format – the individual user’s preferred short display format for date time values.
- Input Long Date Time Format – the individual user’s preferred link format for date time values.
- Time Difference – used to set your local time.
- Home Currency – the default currency for this user. This currency will be referenced in applications such as Sales Tracking and Expense Tracking. This currency will be assumed to be the default currency for this user.
- Language – the language that you wish to use. Currently you can select from seven languages.
- Internet Map Service – determines the Internet service you wish to use when displaying maps.
1. Click the Global Settings tab to return to the Global Settings page.
Association Settings
These settings provide the ability to link the same person to any number of organisations.

Associates/Associations – enabling this feature will allow you to associate a single contact with multiple companies. The Associates tab will be displayed in each company record – to show associated people. The Associations tab will be displayed on each contact record to display the companies that they are associated with.
People Online Settings
These settings control the fields displayed when you mouse over users listed in the people online.

SmartFolder Settings
These settings are only displayed when you enable the Smart Folder application.

- On-Line Editing – provides users with the ability to open, edit, and save edited files to SmartSimple. This feature is used in conjunction with a desktop plug-in that must be downloaded and installed in any workstation where you wish to use this feature.
- Size Subscribed – defines the amount of disk storage required for SmartFolders – up to 5 GB.
Organisational Terminology
You can define specific terminology for some basic SmartSimple objects.

These terms relate to both internal and external “organisations” – singular and plural and internal and external “users” – singular and plural.
For example, your internal organisation unit may be a “branch” or a “business unit”, and your internal people may be “employees”.
Phone Number Format
These settings define the accepted formats for phone numbers of varying length.

Data Loading & Backup Settings
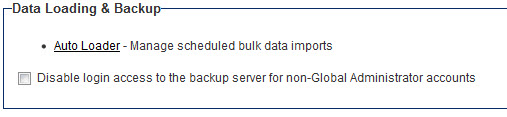
- Autoloader – used to define scheduled upload of data from SmartFolders into company, contact, and applications.
- Disable Login Access... – checkbox disables access to the backup server for all non-Global User Administrator accounts.