Configuring UTA Provider/Receiver (Consumer) Relationships
UTA Provider/Consumer Relationships allow for the sharing of data between different Universal Tracking Applications™.
Both the Level 1s and Level 2s can be used in this Provider/Consumer relationship.
The required configuration steps are described in detail below.
Enable Provider UTA
The first thing you need to do is to indicate that one (UTA) will act as the provider, allowing the information held within that UTA to be accessible from a second UTA.
1. Click on the Settings tab in your UTA.
2. Click on the General tab.
3. Scroll down to the Connectivity Settings section.
4. Select the check-box adjacent to Enable UTA Connection as Provider - UTAs can be linked to Other UTAs.

5. Click Save.
Enable Consumer UTA
You must also indicate that a second UTA will act as the consumer, pulling in the information from the provider UTA.
1. Click on the Settings tab.
2. Click on the General tab.
3. Scroll down to the Connectivity Settings section.
4. Populate check-box adjacent to Enable UTA Connection as Receiver - UTAs can be linked to Other UTAs.

5. Click Save.
Configure Provider UTA connection settings
You must then formally link the provider UTA to the consumer UTA, including selecting whether the link will be based on Level 1s or Level 2s.
1. Click on the Settings tab in your provider UTA.
2. Click on the General tab.
3. Scroll down to the Connectivity Settings section.
4. There are 2 options available for configuring a link with a consumer UTA.
- L1 Provider Connection Settings - Configure L1 Provider UTA connection settings: click on this if you wish to link level 1 records in the Provider UTA with a consumer UTA.
- L2 Provider Connection Settings - Configure L2 Provider UTA connection settings: click on this if you wish to link level 2 records in the Provider UTA with a consumer UTA.
5. Click on either of these options to go to the UTA Connection Settings page.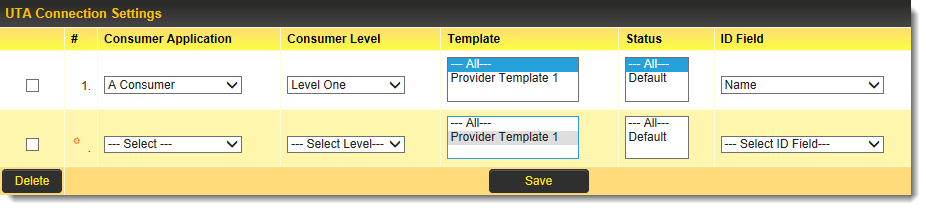
6. The UTA Connection Settings consists of the following sections:
- Consumer Application: select the UTA you wish to act as the consumer UTA from a list of all UTAs that have been enabled as consumer UTAs.
- Consumer Level: select whether the consumer UTA will access the provider UTA data from Level 1 records or the Level 2 records.
- Template: If you have clicked on the L1 Provider Connection Settings then this will list all Level 1 Templates in the provider UTA. If you have clicked on the L2 Provider Connection Settings this will list all Level 2 Types in the provider UTA. You can choose to link records of a particular type or template in the Provider UTA with a Consumer UTA or can select All if all Provider UTA records should be available, regardless of type or template.
- Status: If you have clicked on the L1 Provider Connection Settings then this will list all Level 1 statuses in the provider UTA. If you have clicked on the L2 Provider Connection Settings this will list all Level 2 statuses in the provider UTA. You can choose to link records of a particular status in the provider UTA with a consumer UTA or can select All if all provider UTA records should be available regardless of status.
- ID Field: The field that will be used as the unique identifier for the provider records.
7. Complete the Connection Settings as necessary and then click Save.
Configure Provider UTA display settings
The provider UTA can be configured to list all records in the consumer UTA that are associated with an individual provider record, as well as controlling what fields will be displayed in the list view.
1. Click on the Settings tab in your provider UTA.
2. Click on the Entity tab.
3. Click on the link for "Standard Fields" in the section Level 1 or Level 2, depending on where you want the list of consumer records to appear.
4. In the left hand list of standard fields, click on the name of the standard field you wish to add. The relevant options are listed below.
- LEVEL ONE

- UTA Consumers: Will list all level one records in the consumer UTA that are linked to the current provider Level one UTA record.
- UTA Consumers (L2): Will list all level two records in the consumer UTA that are linked to the current provider Level one UTA record.
- LEVEL TWO

- UTA Consumers: Will list all records in the consumer UTA that are linked to the current provider Level two UTA record.
5. In the right hand standard field detail frame, enter text into the "Caption" field.
6. Scroll to the bottom of the right hand frame and click the Save button.
7. The standard field will now be displayed in your UTA, using the nomenclature you have defined.
8. The next step is to configure the list view for how the consumer UTA records will be displayed in the provider UTA.
9. Click on the Settings tab, then click on the General tab and scroll down to the Connectivity Settings section.
10. Configure the list view based on whether the consumer record is a level 1 or level 2.

- UTA Consumer Level 1 List View from A Consumer - Create and manage list view for UTA consumer level 1: Click on this if you wish to configure the list view for UTA consumer level 1 records.
- UTA Consumer Level 2 List View from A Consumer - Create and manage list view for UTA consumer level 2: Click on this if you wish to configure the list view for UTA consumer level 2 records.
Configure Consumer UTA Connection roles
You can also define a Role for Consumer/Provider relationships, including the ability to have role based custom fields to track attributes of the association between specific consumer and provider records. You can then use these roles when adding a UTA provider to a Level 1 record.
1. Click on the Settings tab in the consumer UTA.
2. Click on the General tab.
3. Scroll down to the Connectivity Settings section.
4. Click on the UTA Connection Roles link.

5. You will be taken to the UTA Connection Roles page.

6. Click New - UTA Connection Roles to begin adding a new role.

7. Enter appropriate details in the available fields and click Save.

8. The Connection role will now be listed on the left hand panel with 2 buttons available to allow the creation of custom fields specific to the association of the provider and consumer:

- L1-L1 Fields: custom fields accessible from the association of Level 1 provider records with Level 1 consumer records.
- L1-L2 Fields: custom fields accessible from the association of Level 1 provider records with Level 2 consumer records.
Configure Consumer UTA display settings
The consumer UTA can be configured to list all records in the provider UTA that are associated with an individual consumer record, as well as controlling what fields will be displayed in the list view.
1. Click on the Settings tab in your consumer UTA.
2. Click on the Entity tab.
3. Click on the link for "Standard Fields" in the section Level 1 or Level 2, depending on where you want the list of provider records to appear.
4. In the left hand list of standard fields, click on the name of the standard field you wish to add. The relevant options are listed below.
- LEVEL ONE

- UTA Providers: Will list all level one records in the provider UTA that are linked to the current consumer Level one UTA record.
- UTA Providers (L2): Will list all level two records in the provider UTA that are linked to the current consumer Level one UTA record.
- LEVEL TWO

- UTA Providers: Will list all records in the provider UTA that are linked to the current consumer Level two UTA record.
5. In the right hand standard field detail frame, enter text into the "Caption" field.
6. Scroll to the bottom of the right hand frame and click the Save button.
7. The standard field will now be displayed in your UTA, using the nomenclature you have defined.
8. The next step is to configure the list view for how the provider UTA records will be displayed in the consumer UTA.
9. Click on the Settings tab, then click on the General tab and scroll down to the Connectivity Settings section.
10. Configure the list view based on whether the provider record is a level 1 or level 2.

- UTA Provider Level 1 List View from A Provider - Create and manage list view for UTA provider level 1: Click on this if you wish to configure the list view for UTA provider level 1 records.
- UTA Provider Level 2 List View from A Provider - Create and manage list view for UTA provider level 2: Click on this if you wish to configure the list view for UTA provider level 2 records.