Arcadia X Layout Picker
Overview
The Arcadia X layout picker enables the point-and-click configuration of portal sections using pre-made templates and the choice of Arcadia X themes and backgrounds. For novice users and those not familiar with HTML, the Arcadia X layout picker provides pre-made templates with various layouts eliminating the need for technical know-how. Arcadia X layouts built using the layout picker are responsive by default, making them accessible on devices with different screen sizes and resolutions.
How to Create an Arcadia X Section Using the Layout Picker
1. From the Configuration menu, select the Roles and Permissions hyperlink.
2. Under the User Role & Category Settings section, click on the User Roles hyperlink.
3. The Roles page is displayed.
4. Here you can either create a new role or edit an existing role. Once a user role is created (details on creating new user roles here), click on the edit icon associated with an existing role. The Edit Roles page will be displayed.
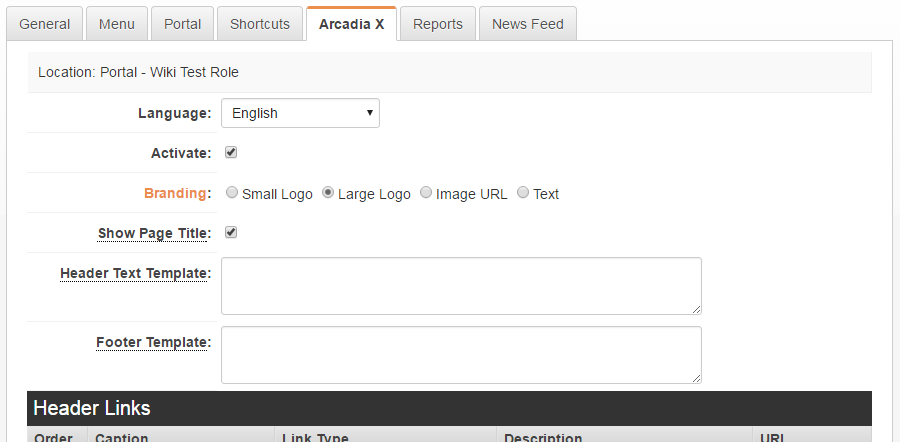
5. From the tab options displayed at the top of the page, click on Arcadia X. If this role was not configured with a portal before add a checkmark to the Activate checkbox and click Save.
6. Under the Action Tabs Section, click on the Add button.
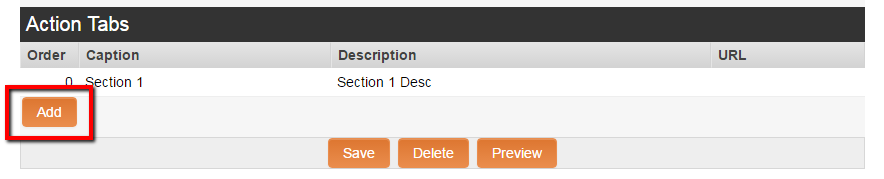
7. Complete the required fields: Display Order, Caption, Description, Content Type, URL (if necessary).
- Note - The Layout Picker is only available through the "Sections" Content Type.
8. Click Save to continue.
9. The Sections section is displayed.
10. Under the Sections section, click on the Add Layout button.
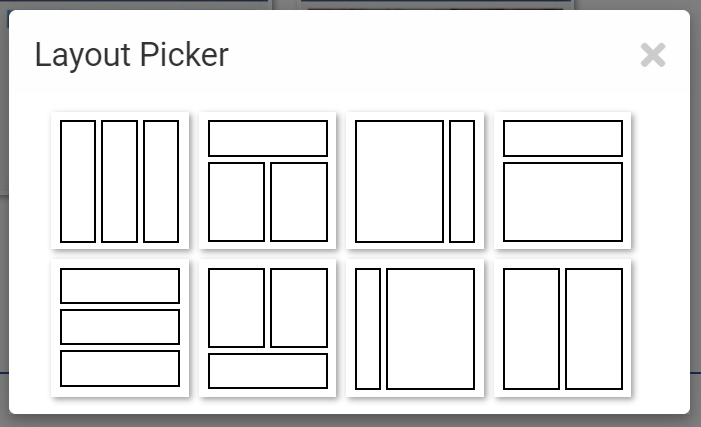
11. Displayed is the Layout Picker lightbox with available layout themes. Select the layout theme you want to build by clicking on the desired layout.
12. The Layout Picker Section Designer is displayed. The Section Designer allows the easy population of content into a specific Arcadia X Section.
- Note - The section highlighted in blue is the section that you are currently editing.
13. Complete the following sections:
- Language - Select the language of the section.
- Type' - Select the type of content that will popluate the section.
- Style Options - Add or remove checkmark to include Shadow and Margin formatting to the section.
- Background Color - Select the background color for the section.
- Description - Enter a description for the section.
- Title (and Icon) - Select a title and icon (if desired) for the section.
- Instruction - Enter any text instructions to be displayed within the section.
- URL - This option is available based on the section "Type" selected. Enter the URL of an external link that will be displayed in the section.
- System List View (and options) - This option is available based on the section "Type" selected. This option allows you to select the specific list view that will be displayed within the section.
14. Click Next when complete. Repeat this process until all portal sections are completed.
15. To preview your work, click on the Preview' button at the bottom of the Edit Roles page. A popup window will appear displaying the layout and options selected.
Notes
- This feature will configure sections for the Arcadia X interface only
- The layouts created are responsive by default
- Also called Arcadia X Portal Builder