Difference between revisions of "Adobe Sign"
Lorena Ruiz (talk | contribs) m (→Configuring Global Settings) |
Nancy Sabo (talk | contribs) |
||
| Line 1: | Line 1: | ||
| − | |||
==Configuring Global Settings== | ==Configuring Global Settings== | ||
| − | |||
''Note: In order to use this feature you must request your URL to be whitelisted with development. This can be requested via support ticket.'' | ''Note: In order to use this feature you must request your URL to be whitelisted with development. This can be requested via support ticket.'' | ||
| − | 1. Go to Global settings - Integrations section. There should be a section called Service Settings. | + | 1. Go to Global settings - Integrations section. There should be a section called Service Settings. |
| − | 2. Access the option for '''Integration Key Management'''. | + | 2. Access the option for '''Integration Key Management'''. |
3. Click on New Integration Key. You will be presented with the following fields: | 3. Click on New Integration Key. You will be presented with the following fields: | ||
| + | |||
* Key Type: set to Adobe Sign | * Key Type: set to Adobe Sign | ||
* Key name: set to Adobe Sign | * Key name: set to Adobe Sign | ||
| − | * Application ID: unique Adobe ID for the client | + | * Application ID: unique Adobe ID for the client |
| − | * Client Secret: unique secret code for the client | + | * Authentication URL: URL is generic based on your location. Please check your Adobe Sign account - Account - Account Settings - Account Setup - Hostname for the URL. (eg. https://secure.echosign.com/public/oauth or https://secure.na2.echosign.com/public/oauth or https://secure.eu1.echosign.com/public/oauth, etc.) |
| + | * Client Secret: unique secret code for the client | ||
| − | 4. Click Save. | + | 4. Click Save. |
| − | 5. The '''Online Signature Provider''' section allows you to select the e-signature partners, which in this case would be Adobe Sign. | + | 5. The '''Online Signature Provider''' section allows you to select the e-signature partners, which in this case would be Adobe Sign. |
| − | 6. You are then required to click Save to expose a button labelled Verify Adobe Sign Access. | + | 6. You are then required to click Save to expose a button labelled Verify Adobe Sign Access. |
7. When the button is click you can enter your login details for the relevant Adobe Account. | 7. When the button is click you can enter your login details for the relevant Adobe Account. | ||
| Line 26: | Line 26: | ||
1) Online Signature : This will enable a new button on the {{WPV}} called "Online Signature" | 1) Online Signature : This will enable a new button on the {{WPV}} called "Online Signature" | ||
| − | :[[Image:Signority-PDFOptions.png|link=]] | + | |
| + | : [[Image:Signority-PDFOptions.png|link=]] | ||
2) Store-To value : Determines where the finalized PDF document will be stored in the system. | 2) Store-To value : Determines where the finalized PDF document will be stored in the system. | ||
| − | |||
| + | : [[Image:Signority-ValueStoresTo.png|link=]] | ||
==Signature Tag Parameters== | ==Signature Tag Parameters== | ||
| − | The signature tag is used to define the contact details and signing order for the signee. | + | The signature tag is used to define the contact details and signing order for the signee. |
| − | * <nowiki>{{_es_:sender:title}} </nowiki>- name of the sender. Will be the name associated with the Adobe Sign account configured in the Global Settings. | + | * <nowiki>{{_es_:sender:title}} </nowiki>- name of the sender. Will be the name associated with the Adobe Sign account configured in the Global Settings. |
| − | * <nowiki>{{_es_:signer1:signatureblock}} </nowiki> - may be used for defining one signature line placement in conjunction with syntax for defining the signee using variable syntax <!--signature @Signee Email@;@Signee Firstname@;@Signee Lastname@;1--> | + | * <nowiki>{{_es_:signer1:signatureblock}} </nowiki> - may be used for defining one signature line placement in conjunction with syntax for defining the signee using variable syntax <!--signature @Signee Email@;@Signee Firstname@;@Signee Lastname@;1--> |
| − | * <nowiki>{{_es_:signer~Index~:signature}}</nowiki> - will automatically add all the signees from the contact list to the web page view as required signatures | + | * <nowiki>{{_es_:signer~Index~:signature}}</nowiki> - will automatically add all the signees from the contact list to the web page view as required signatures |
* <nowiki>{{_es_:signer~Index~:signatureblock}}</nowiki> - will automatically add all the signees from the contact list to the web page view as required signatures | * <nowiki>{{_es_:signer~Index~:signatureblock}}</nowiki> - will automatically add all the signees from the contact list to the web page view as required signatures | ||
| − | * <nowiki>{{_es_:signer~Index~:initials}} </nowiki>- | + | * <nowiki>{{_es_:signer~Index~:initials}} </nowiki>- will automatically add all the signees initials from the contact list to the web page view |
* <nowiki>{{_es_:signer~Index~:company}} </nowiki>- will automatically add all the signees Company from the contact list to the web page view | * <nowiki>{{_es_:signer~Index~:company}} </nowiki>- will automatically add all the signees Company from the contact list to the web page view | ||
* <nowiki>{{_es_:signer~Index~:fullname}}</nowiki> - will automatically add all the signees from the contact list to the web page view | * <nowiki>{{_es_:signer~Index~:fullname}}</nowiki> - will automatically add all the signees from the contact list to the web page view | ||
| − | * <nowiki>{{_es_:signer~Index~:optsignature}} </nowiki> - will automatically add all the signees from the contact list to the web page view as optional signatures | + | * <nowiki>{{_es_:signer~Index~:optsignature}} </nowiki> - will automatically add all the signees from the contact list to the web page view as optional signatures |
| − | * <nowiki>{{_es_: signer~Index~:optinitials}}</nowiki>:- | + | * <nowiki>{{_es_: signer~Index~:optinitials}}</nowiki>:- will automatically add all the signees initials from the contact list to the web page view |
| + | |||
| + | The Signature tabs are used in conjunction [[List Syntax]] for contacts and with the <!--Signature--> tag appropriate for the signing order. There are 2 tags used depending on the order: | ||
| − | |||
* Parallel: <nowiki><!--SignatureFlow P--> </nowiki> | * Parallel: <nowiki><!--SignatureFlow P--> </nowiki> | ||
* Sequencial: <nowiki><!--SignatureFlow S--></nowiki> | * Sequencial: <nowiki><!--SignatureFlow S--></nowiki> | ||
| − | [[Category:Integration]] | + | [[Category:Integration]] |
[[Category:External Services]] | [[Category:External Services]] | ||
[[Category: e-Signature]] | [[Category: e-Signature]] | ||
Revision as of 15:39, 6 May 2019
Configuring Global Settings
Note: In order to use this feature you must request your URL to be whitelisted with development. This can be requested via support ticket.
1. Go to Global settings - Integrations section. There should be a section called Service Settings.
2. Access the option for Integration Key Management.
3. Click on New Integration Key. You will be presented with the following fields:
- Key Type: set to Adobe Sign
- Key name: set to Adobe Sign
- Application ID: unique Adobe ID for the client
- Authentication URL: URL is generic based on your location. Please check your Adobe Sign account - Account - Account Settings - Account Setup - Hostname for the URL. (eg. https://secure.echosign.com/public/oauth or https://secure.na2.echosign.com/public/oauth or https://secure.eu1.echosign.com/public/oauth, etc.)
- Client Secret: unique secret code for the client
4. Click Save.
5. The Online Signature Provider section allows you to select the e-signature partners, which in this case would be Adobe Sign.
6. You are then required to click Save to expose a button labelled Verify Adobe Sign Access.
7. When the button is click you can enter your login details for the relevant Adobe Account.
Configuring the Web Page View
On the Web Page View where you wish to enable signing, enable the following two settings:
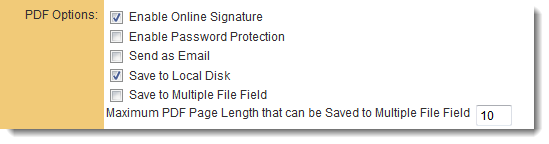
1) Online Signature : This will enable a new button on the Web Page View called "Online Signature"
2) Store-To value : Determines where the finalized PDF document will be stored in the system.

Signature Tag Parameters
The signature tag is used to define the contact details and signing order for the signee.
- {{_es_:sender:title}} - name of the sender. Will be the name associated with the Adobe Sign account configured in the Global Settings.
- {{_es_:signer1:signatureblock}} - may be used for defining one signature line placement in conjunction with syntax for defining the signee using variable syntax
- {{_es_:signer~Index~:signature}} - will automatically add all the signees from the contact list to the web page view as required signatures
- {{_es_:signer~Index~:signatureblock}} - will automatically add all the signees from the contact list to the web page view as required signatures
- {{_es_:signer~Index~:initials}} - will automatically add all the signees initials from the contact list to the web page view
- {{_es_:signer~Index~:company}} - will automatically add all the signees Company from the contact list to the web page view
- {{_es_:signer~Index~:fullname}} - will automatically add all the signees from the contact list to the web page view
- {{_es_:signer~Index~:optsignature}} - will automatically add all the signees from the contact list to the web page view as optional signatures
- {{_es_: signer~Index~:optinitials}}:- will automatically add all the signees initials from the contact list to the web page view
The Signature tabs are used in conjunction List Syntax for contacts and with the tag appropriate for the signing order. There are 2 tags used depending on the order:
- Parallel: <!--SignatureFlow P-->
- Sequencial: <!--SignatureFlow S-->