Configuring Privacy, Confidentiality and Other Policies
Contents
Overview
Privacy is a shared responsibility. This feature allows organizations to better highlight their privacy and other stated policies, provides tools to manage country and language combinations, and places persistent links to policies on login pages and user portals.
If you are in need of a list of features that will help make your SmartSimple instance GDPR-compliant, please see the General Data Protection Regulation (GDPR) article.
To see SmartSimple's own privacy policy, please visit our website.
Note: Note: In the July 2024 upgrade, a new enhanced version of this feature will be released with a new interface and behaviors. Existing policies will not be migrated to the new feature and will have to be reconstructed manually. If you wish to opt into the new feature, you can read more on the updated wiki page for privacy and security policies.
Feature Illustrated

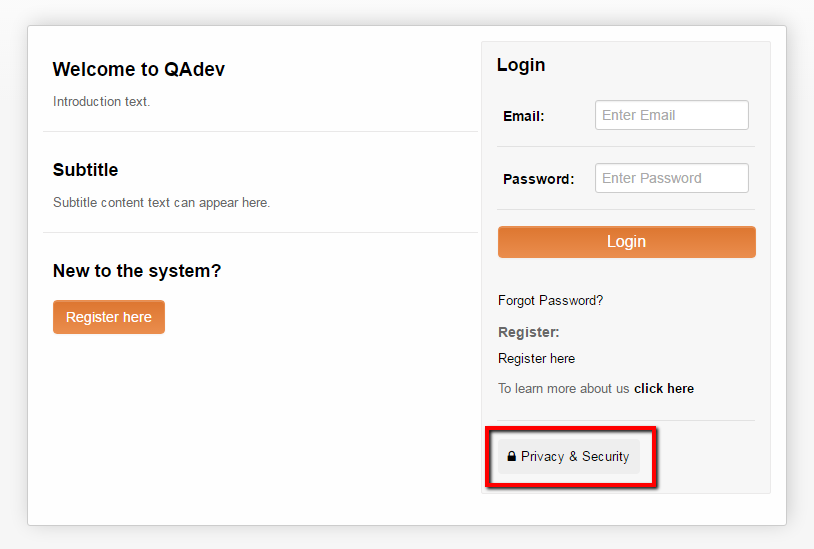
Privacy and Security link displayed on a users portal (above).

Privacy and Security link displayed on user login page (above).

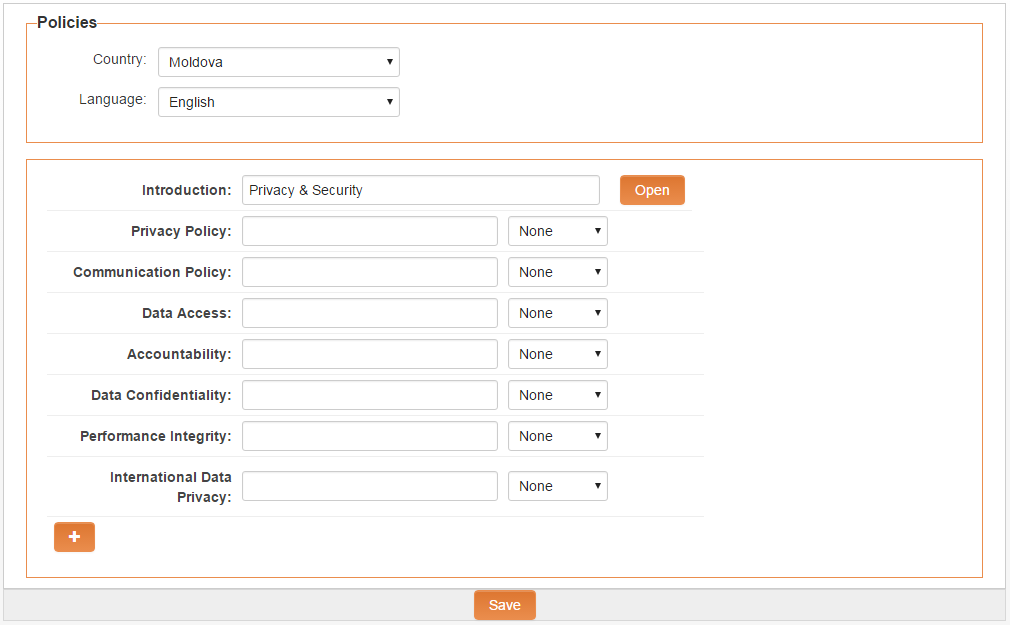
Country and language policy configuration page is displayed above. Found under Configuration > Global Settings > Security tab.
Configuring the Privacy and Security Settings
You must create a policy for the Default Country and English language first. The default will be displayed to all users prior to login.
- From the Configuration menu, click on Global Settings.
- Click on the Security tab.
- Click on the Privacy and Security Policies link within the Security Settings.
- The list of configured Privacy and Security policies is displayed.
- Click New Policy icon to configure a new policy, or click on the "Edit Policy" icon to modify an existing policy.
- Complete the privacy settings field options.
- Click Save to save the policy.
Privacy and Security Field Options
The following are field options for configuring Privacy and Security policies:
Policies
This section allows you to create specific country and language policy combinations.
- Country - Select the country this specific policy will pertain to from the drop down list. Choose the Default Country option when creating a general (non-country specific) policy. The Default Country is displayed pre login. Post login, the privacy policy displayed is determined by the users settings.
- Language - Select the language that will be associated with the country selected from the above option.
Policy Details
This section allows for the labeling of policies and the adding of policy details via rich text or external link. Each policy can be labeled individually using the label field to the right of the policy name.
- Enforce User Acceptance - determine if/when policies require acceptance by end-users. Used in conjunction with the User Acceptance Required option to enforce acceptance specific to individual policies.
- Interval - Drop-down with fee interval options. If one of the options is selected it will make users re-accept the policies at the set interval.
- Introduction - This defines the first policy page displayed and can be used to introduce the policies that have been defined. Only the rich text option is available for defining the introduction (no URL option).
- Privacy Policy - This option allows the privacy policy to be defined.
- Communications Policy - This option allows the communication policy to be defined.
- Data Access - This option allows the data policy to be defined.
- Accountability - This option allows the accountability policy to be defined.
- Data Confidentiality - This option allows the data confidentiality policy to be defined.
- Performance Integrity - This option allows the performance integrity policy to be defined.
- International Data Privacy - This option allows the international data privacy policy to be defined.
The policies (with the exception of Introduction) have 3 options None, Rich Text, and URL. . .
- The None option means that this policy is not defined for this country/language policy combination
- The Rich Text option allows the creation of the specific policy using the rich text editor
- The URL allows the specifying of a URL link resource to be referenced from an external site.
They also have a User Acceptance Required option to indicate that the user is required to provide acceptance specific to individual policies after the date specified in the Enforce User Acceptance setting.
If the User Acceptance Required option is switched on then an additional Role Lookup option is displayed. If Roles are selected here then the policy will only affect users with these roles.
Adding the Privacy & Security link to Existing login pages
For login pages created prior to the introduction of this feature (April 2016) the Privacy & Security link will not show by default. This can be added manually by updating the Standard Template located on the Login Screen Content page. Note: Updating the Standard Template will remove any previous formatting. It is recommended that you start with the Standard Template and then customize the page to your satisfaction. In the case where you decide that you do not want to use the Standard Template the code below includes the link to insert it manually:
| [s_viewpolicies.jsp?companyid=@companyid@&policylang=@lang@&isexternal=1 Privacy & Security] |
Notes
- Each field includes a last modified by and modified date stamp
- Policy formats include both rich text format and URL link to a webpage containing the policy
- Additional policies can be added by clicking the + plus icon at the bottom of the Policy Details section.
Privacy logs
When a user confirms and completes the Privacy policy then a PDF version is stored against the corresponding policy under the View Log tab.
The PDF is named using the structure [userid]-[firstname]_[lastname]_policy-[policyid]-[countryid]-[langid]_V_[version].pdf
