Level 2 Types
Contents
- 1 Creating the Level 2 Types
- 2 Type Settings
- 3 Defining Level 2 Status
- 4 Level 2 Status Settings
- 5 Adding Custom Fields to the Level 2 Entity
- 6 Restricting Level 2 Types to Specific Level 1 Templates
- 7 Define the Level 2 list view
- 8 Defining the Activity List View
- 9 Setting the Level 2 List Field Order
- 10 Setting the Activity List Order
- 11 Adding Level 2 Items
- 12 Completing the Invoice Level 2 Type
Creating the Level 2 Types
In this article, you will create two types of Level 2 entities – an invoice entity for use with the billable contracts, and an addendum entity for use with the Non-Disclosure contract.
1. Click the Types link.
The Types window is displayed.
- Existing Types are listed on the left of the page.
- Details of each type are displayed on the right of the page and new types are added to the right of the page.
Type Settings
Each type of Level 2 Entity has the following settings:
- Name - Display name for the template.
- Display Order - The order in which the types are listed in the type combo box.
- Colour Code - A colour code used to display different types in the list view.
- Access Roles - Select the roles that can create this type of activity.
- Providers - In some circumstances only certain type of people can provide a specific type of service and therefore only their names should appear when you attempt to assign someone to the Level 2 item. For example, perhaps only a lawyer can be assigned to produce the contract addendum.
- Show External - This check box indicates if this type of activity should be shown to external users.
- Level 2 Formula - A set of expressions used to calculate values when the Level 2 item is saved. Similar to the Level 1 Template formula.
- Reminder Settings - The subject and content of the Reminder message. These fields are only applicable if you have included reminder standard fields in your Level 2 Entity.
- Follow Up Settings - The subject and content of the Follow up message. These fields are only applicable if you have included follow up standard fields in yourLevel 2 Entity.
Adding Activity Types
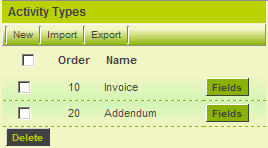
1. Create the following types:
Defining Level 2 Status
As with Level 1 you create and associate Level 2 statuses with Level 2 types.
1. Click the Settings link.
2. Click the Activity Setting Status link.
No Statuses are currently set up. The statuses are set up in the right panel and when saved displayed in the list view.
Each Level 2 Status consists of the following fields:
- Existing Statuses are listed on the left of the page.
- Details of each status are displayed on the right of the page and new statuses are added to the right of the page.
Level 2 Status Settings
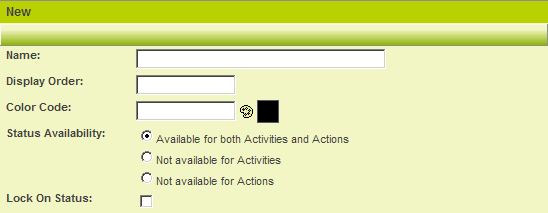
Each status has the following settings:
- Name - Display name for the Status.
- Display Order - The order that statuses are displayed in the Status combo box.
- Colour Code - The colour code used to indicate each status. This colour will be used in the list view and the details view. Click the colour palette button to display a colour picker.
- Status Availability - Unlike Level 1 statuses, Level 2 statuses are common to both Level 2 and Level 3. You control the availability by setting at which level each status can be used,
- Lock On Status - This setting is used to lock the Level 1 item so that it cannot be changed until it is unlocked.
- Roles That Override Lock - The specific roles that can unlock a locked item. If you enable Lock on Status and do not set a role, then the item cannot be unlocked.
- Roles that Can Set This Status - The specific roles that can set the status. If you do not set a role, then any user can set any status.
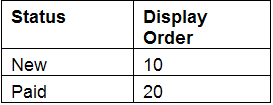
1. Create the following Statuses:
Adding Custom Fields to the Level 2 Entity
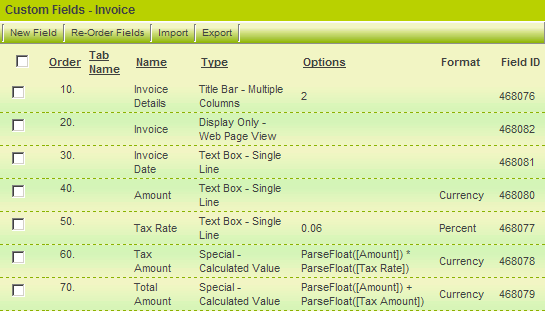
For the invoice type Level 2 item some additional custom fields are required. The amount tax rate, the tax amount, the total amount and a web page view field that actually displays the invoice.
1. Click on the Fields button for the Invoice Type.
The custom field list for the Invoice is displayed.
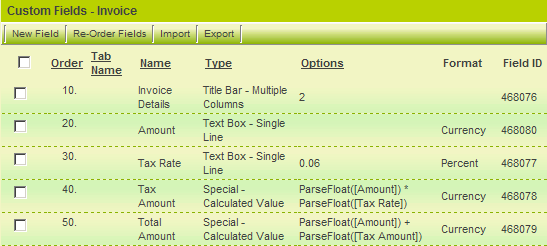
2. Add the following fields:
The completed field list will look as follows:
Restricting Level 2 Types to Specific Level 1 Templates
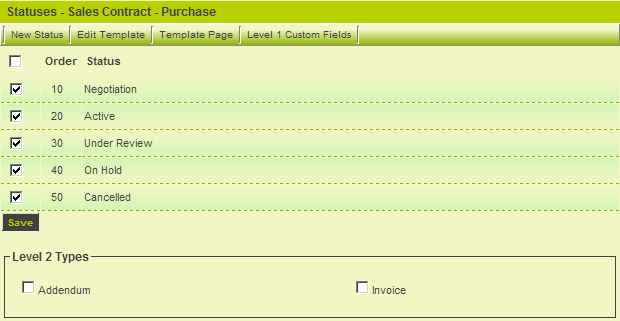
You may not wish to associate all Level 2 item types with all Level 1 templates. In this example the invoice transaction is only appropriate to the Level 1 templates that require a billing process – the Sales Contract – Purchase, Sales Contract – Service and the Support Contract.
This type of restriction is applied through the Level 1 template settings.
1. Click the Settings, Templates link.
2. Click the Sales Contract – Purchase link.
The Level 2 types are displayed below the Status list.
3. Click the Invoice check box.
4. Repeat this process for the Sales Contract – Service and the Support Contract templates.
5. Associate the Addendum Level 2 type with the Non-Disclosure agreement.
Define the Level 2 list view
First, you will select the fields that you wish to see when viewing Level 2 items in the list view using the My Activities or Activities tab.
1. Click the Settings tab.
2. Click the List View link for the Activity Settings.
The List view page is displayed.
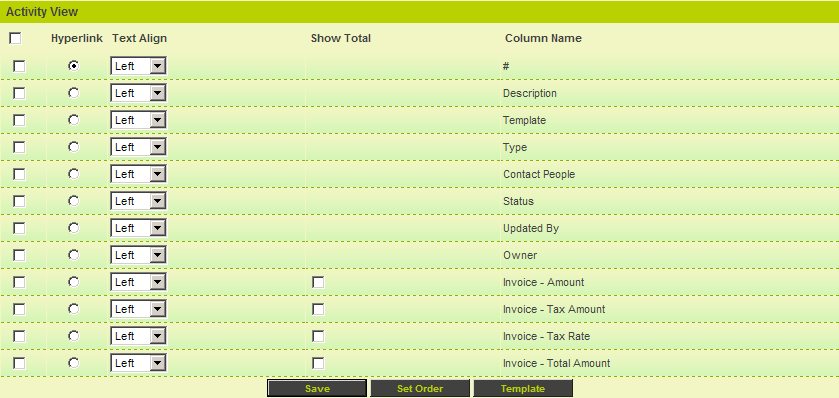
The standard fields that you selected are listed at the top of the list and the custom fields that you created (including the Level 2 type name) are displayed at the bottom of the page.
You use this page as follows:
- The # field displayed at the top of the list will display a record counter for the items displayed.
- Click the check box to the left of each field name to include that field to the List view.
- Click the option button to designate a single field that will provide a drill-down to the Level 1 item.
- Set the Text Align to determine if the data should be left, centred or right aligned in the column.
- For numeric fields you can display a total at the bottom of each page by clicking the Show Total check box.
Once you save the field list you can set the Display order.
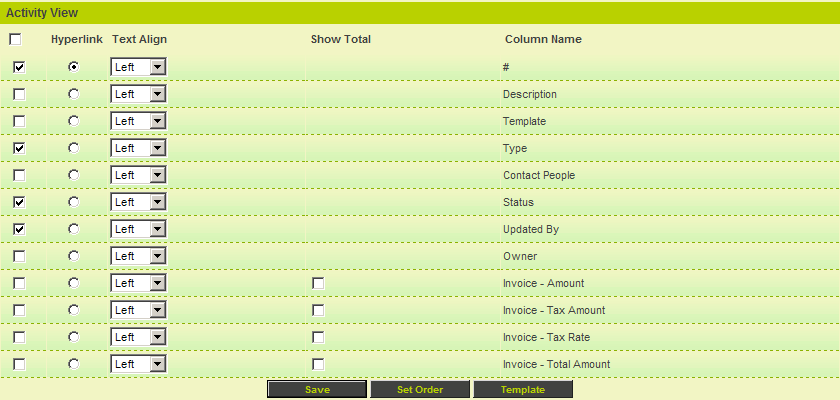
Defining the Activity List View
1. Select the following fields:
2. Click the Save button.
The Set Order and Template buttons are now displayed at the bottom of the page.
Setting the Level 2 List Field Order
Once you have selected the fields to be displayed, you can reorder the fields in the list view and if required create a formatting template specifically for this list view.
1. Click the Set Order button.
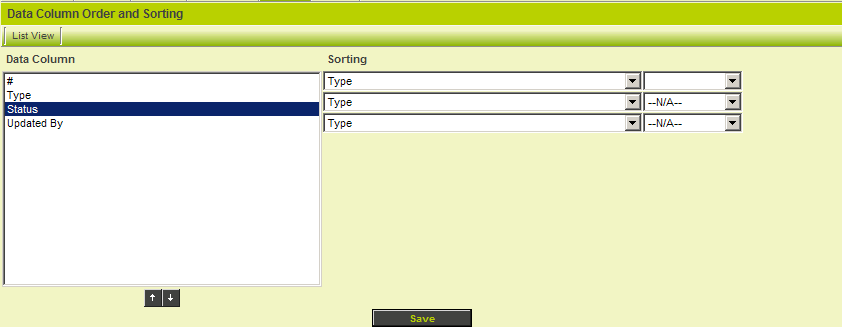
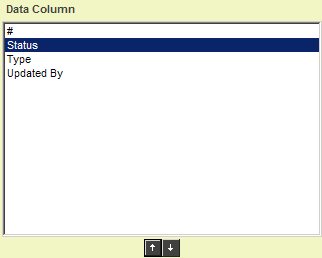
The Data Column Order and Sorting window is displayed.
To change the Display order:
- Click on the required field in the left panel.
- Use the Up and Down arrows to move the field.
- Once complete, click the Save button.
To change the Sort order:
- Choose the first field you wish to order by in the right field combo box.
- Select Ascending or Descending in the Order combo box.
- If required repeat this process for a second and third field.
Setting the Activity List Order
1. Reorder the fields as shown below:
2. Set the Sort order as shown below:
The activity list will be sorted ascending based on the status.
3. Click the Save button.
4. Click the Activities tab.
The list view for the Level 1 item is displayed.
No items are displayed as you have not added any items yet.
Adding Level 2 Items
Now that you have created the Level 2 types you can add some items.
1. Click the Contracts tab.
2. Click the Sales Contract entry.
The Sales Contract is displayed.
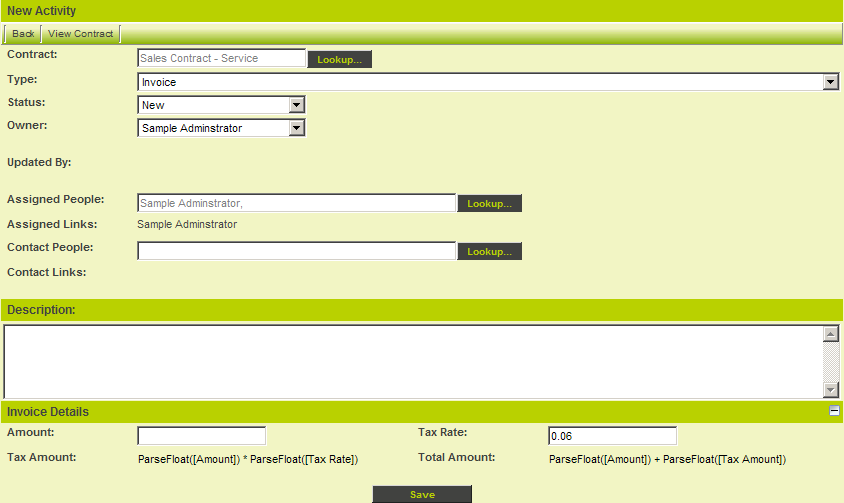
3. Click the New Activity tab.
The Activity window is displayed.
- The type is restricted to the Invoice type item.
- The owner and assigned person are set to the current user.
- The custom fields associated with the invoice item are displayed at the bottom of the page.
- The page is displayed full screen as you indicated this option in the configuration.
4. Enter an invoice amount.
5. Click the Save button.
The Level 2 item is saved and calculated fields are displayed.
6. Click the Activities tab.
The Level 2 activity is displayed.
7. Click the # field to redisplay the item.
Completing the Invoice Level 2 Type
This Level 2 type is not complete. The following items are missing:
- An Invoice date.
- A Web Page View that would create the invoice.
- A Level 2 Status – Paid.
1. Add the Level 2 custom field - Invoice Date.
2. A Display Only Web Page View Field – Invoice – Don’t add any content for the moment.
The final Field List will look as follows:
3. Add the Paid status to the Status List.
Creating the Addendum Item Type
1. Add the following fields to the addendum item.
2. Add an addendum item.

