Converting Fields To Contacts
To convert fields in an application into an actual contact follow the instructions below:
1. Create a standard Company Signup page within SmartSimple. Remember to set (as required):
- The mandatory and optional standard fields.
- The company categories.
- Insert the sample sign-up and confirmation template - required to save the page.
- Click the Activate Page option button.
- Set the Name Check field as appropriate (update profile or create new profile).
- Click the Save button.
Make note of the token reference in the standard URL.
2. Create a standard Contact Signup page within SmartSimple. Remember to set (as required):
- The mandatory and optional standard fields.
- The contact roles.
- Insert the sample sign-up and confirmation template - required to save the page.
- Click the Activate Page option button.
- Set the Email Check field as appropriate (update profile or create new profile).
- Set the Enable Login - if required.
- Click the Save button.
Make note of the token reference in the standard URL.
3. Create a html document to act as the combined signup page.
4. Modify the token references to the two tokens noted in steps 1 and 2.
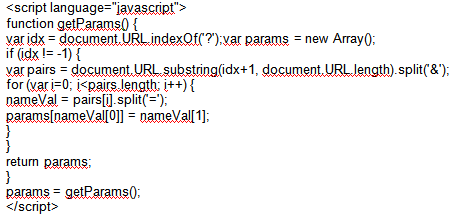
5. Place the following first function in the head of the HTML.
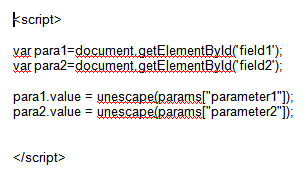
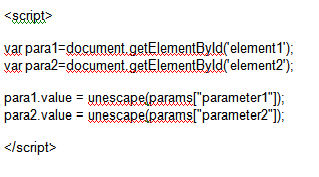
6. Place one of the following second functions within the body just prior to the closing body tag (</body>).
Form Field Population
7. Replace "field1" or "element1" etc. with the actual form or element id name and "parameter1" with the parameter name.
eg.
var para1=document.getElementById('firstname');
<input type="text" value="" id="firstname">
or
var para1=document.getElementById('firstname');
8. Save the page.
9. Create a Smart Folder and upload the modified page to this folder.
10. Select the URL for this file through the File Options.
11. Select the ‘Settings’ option within the UTA that you wish to create the contact from.
12. You will require custom fields to hold information on the ‘Contact’ you wish to create (e.g. First Name, Last Name, Phone Number, etc). If these are not already present then these must be created.
13. Create a custom field of type ‘Read Only – System Variable’. This is the field that will act as you button or link to create the contact on the system. Therefore it should be named appropriately (e.g. “Create Contact”).
14. In the Variables section paste in the following HTML tags . . .
<a href="Sign-Up Page URL?paramenter1=@#Custom Filed Id for parameter 1#@& paramenter1=@#Custom Filed Id for parameter 2#@&oppid=@opportunityid@" target="_blank">click here</a>
15. Modify the HTML so that it references . . .
- the correct URL for the sign-up page in the SmartFolder,
- the correct parameter names as used in step 6
- the correct custom field ids for the corresponding contact information as defined in step 11.
NOTE: You will not need to use the full URL, only the section following on from the web alias.
16. Click Save.


