Template:November2024Upgrade
Overview
Watch this video to get a general overview of the new features in this release.
(Coming Soon)
To watch this video in full screen, please click on the full screen button on the bottom right.
Upgrade Highlights
- A new rich text editor is being introduced for enhanced security. It is optional for this release but will become mandatory in a future upgrade.
- The "Display – Instructions" field has been renamed to "Display – Message" with new styling options for displaying custom messages whenever and wherever needed.
- A new "Special - Button" custom field allows users to easily open system functionality in a modal window, streamlining navigation as well as allowing task completion without losing context.
- The upgrade schedule for 2025 and beyond has been updated with key releases now occurring on the second Thursday of upgrade months (February, June, and October).
Global System Upgrades
The new features listed below are enhancements to the SmartSimple system and will be immediately available to SmartSimple users upon the application of the upgrade to their server:
Major Updates
Upcoming Changes to the Rich Text Editor
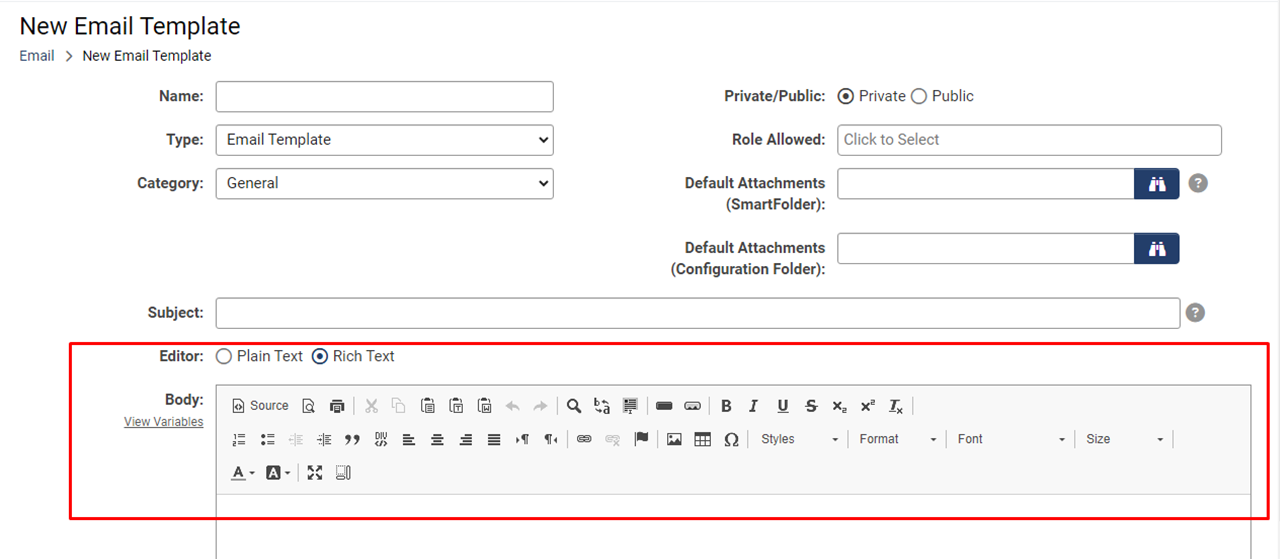
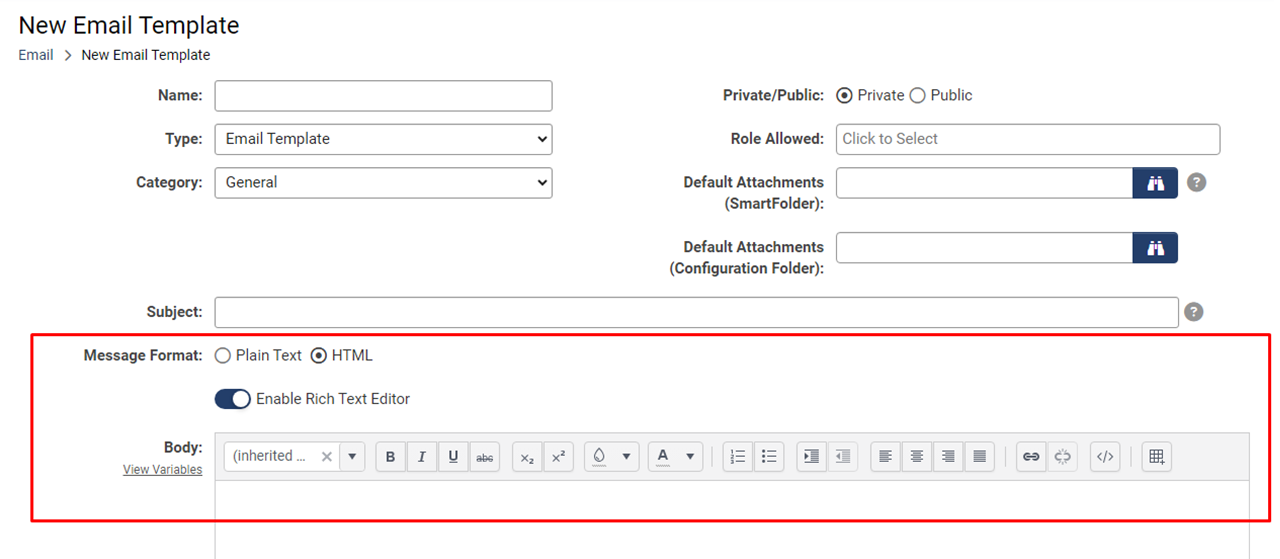
We are introducing a new rich text editor to enhance security. While using the new editor will be optional for this release, it will become mandatory in a future upgrade. The rich text editor is surfaced in the "Special – Rich Text" and "Display – Message" custom fields, as well as in system areas used for emails and other areas of configuration.
Along with visual changes, this new editor will no longer allow customization of which buttons to display.
Several currently available features will be removed in the new version, including:
- Preview, Print
- Cut, Copy, Paste, Paste Text, Paste From Word
- Undo, Redo
- Find, Replace, Select All
- Button, Image Button
- Remove Format, Blockquote, Create Div
- Left to Right / Right to Left text direction
- Anchor, Image, Special Character
- Styles, Format, Font
- Maximize, Show Blocks
To enable the new rich text editor, navigate to Global Settings > System tab.
Note:
- There are some changes to the interface in areas where you can toggle between the plain text editor and the rich text editor, such as when editing email templates or broadcasts.
- The new editor will strip out certain HTML tags, including 'html', 'header', 'script', and 'body' tags from content sources.
Updated Message Styling Options and Field Name Change
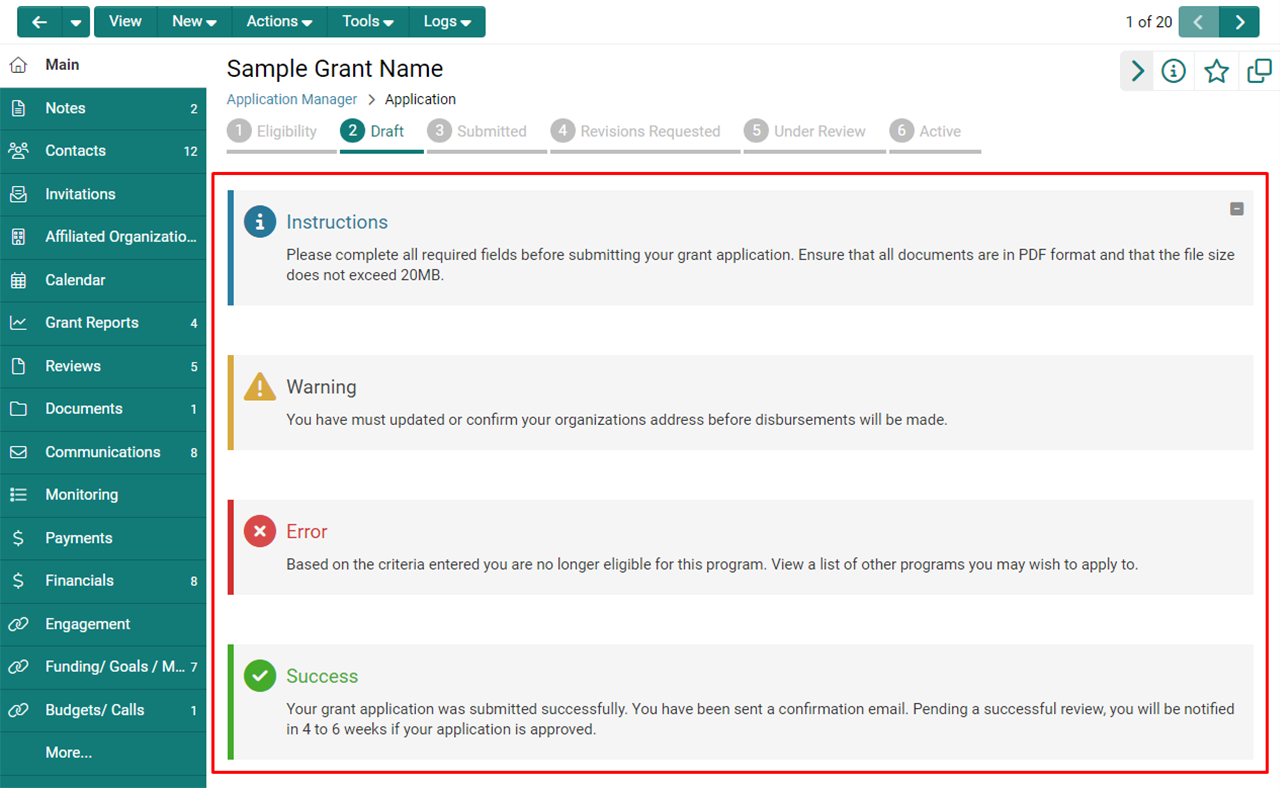
The "Display – Instructions" field was renamed to "Display – Message" and now includes enhanced styling options. These updates make it easier to present styled messages based on your desired logic. You can choose from the following message styles: Instructions (blue), Warning (yellow), Error (red), and Success (green). These new options are available within the custom field settings.
On-Demand System Upgrades
The following features are available immediately with the application of the upgrade, but must first be enabled or configured by a Global Administrator:
Major Updates
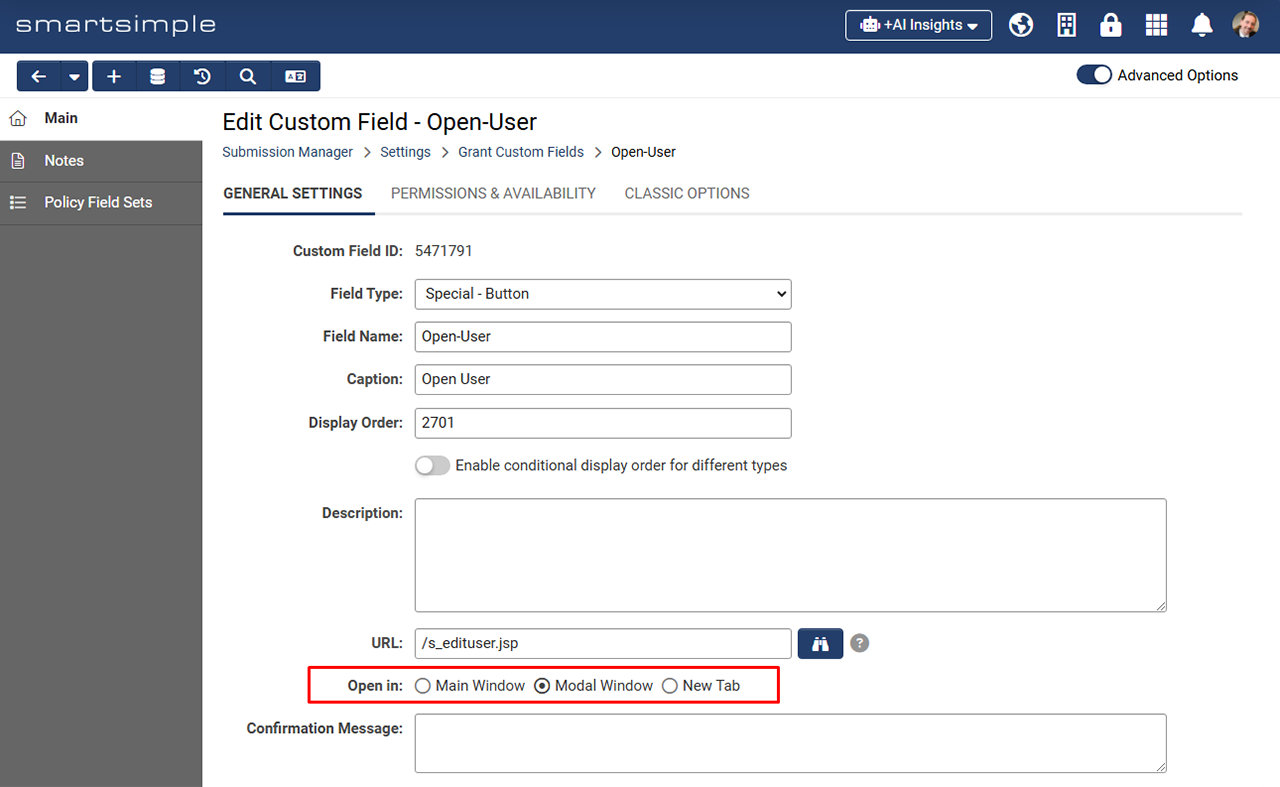
New “Special – Button” Custom Field with Configurable Open Behavior
Introducing the new "Special – Button" custom field, which allows users to create an inline button within an application to launch system functions such as the assignment grid, activity scheduler, or an easy way to edit an organization's profile. This field allows you to choose whether the functionality opens in the main window, a modal window, or a new tab. This approach simplifies access to system features and helps users maintain context, offering a more streamlined solution compared to customizing a browser script button for this purpose. To use this new custom field, go to UTA Configuration Settings > Level 1 tab > Custom Fields > Create or edit a custom field with the Field Type set to "Special - Button". Click the "URL Lookup" button beside the URL field to specify the system object you want the button to open. The Open in field allows you to select the open behavior.
See full wiki article: Custom Field Type: Special - Button
Color Options for Browser Script Buttons
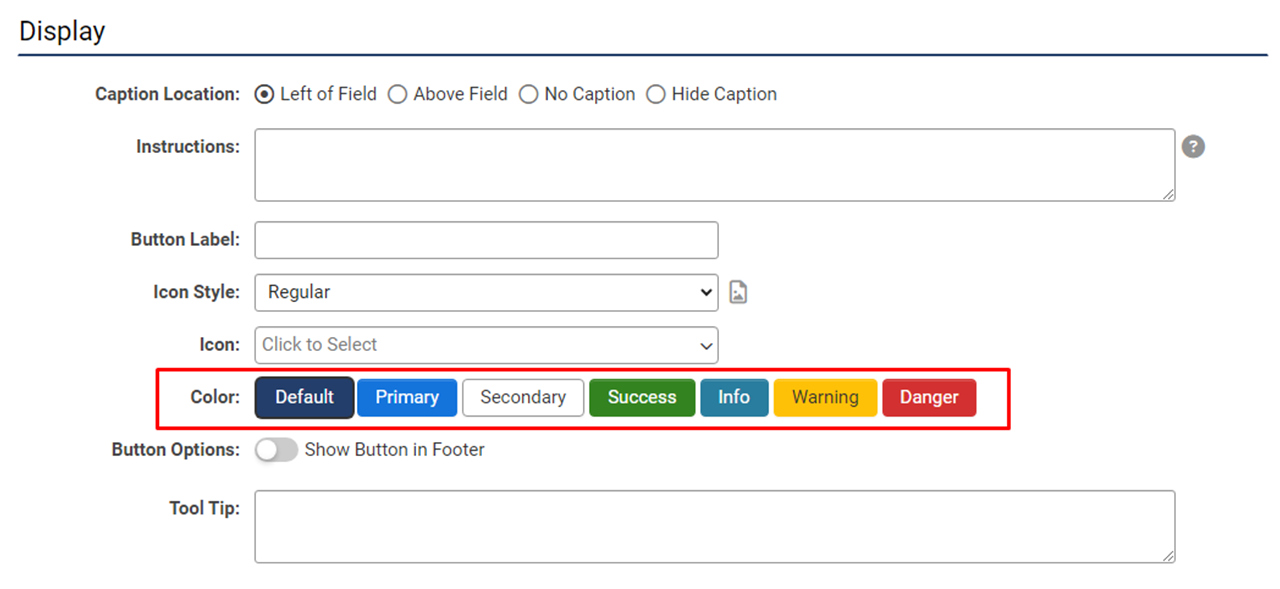
Added the ability to select preset button colors for "Special - Browser Script" custom fields with the Trigger Type set to "On Demand", making them consistent with submit button color options. This feature gives you the ability to differentiate buttons as well as assign them differing visual prominence and semantic meaning.
New Ability to Retain Dynamic Content Options
We’ve introduced a new feature that allows you to retain historical selections for dynamic content, similar to how SSRETIRE functions, but now applicable to dynamic content in "Lookup - Autocomplete Options" and "Select One - Dropdown" custom fields.
To use this feature, follow these steps on the custom field settings page:
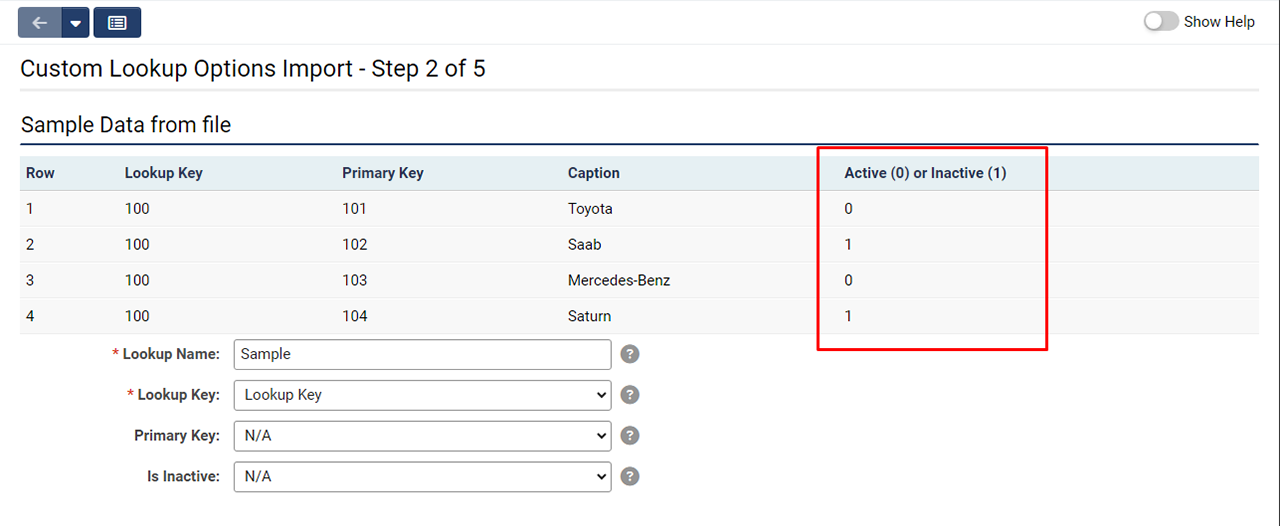
- If your custom field has Enable Dynamic Content and Use Custom Lookup Options toggled on, you can upload a CSV file that contains your desired options to Global Settings > System tab > Custom Lookup Options.
- In the CSV, add a new column to indicate whether an option is active (0) or inactive (1).
- Any option marked as inactive (1) will no longer appear in the lookup or be selectable. However, older records that previously used the inactive value will still retain and display that value.
New Default Status Option for Copy Profiles
We’ve added a Default Status field to copy profiles, allowing users to set a specific status for newly copied records. If no default status is selected, the system will default to the status with Is Default Copy Status enabled. Otherwise, the copied record will inherit the status of the original record.
Minor Updates
New Option to Force Search on a Single Column
We’ve introduced an instance-wide option to improve performance by enforcing searches on a single column for all quick searches. When this setting is enabled, the "All Columns" option will be removed from the scope selector and by default, searches will target the first column in the list view. Users can still select other columns to search if needed. Limiting the search to one column significantly reduces search time across all records.
To enable this feature, go to Global Settings > System tab > Toggle on Limit List View Search Scope to a Single Column to Improve Performance.
Additionally, the "All Columns" option has been removed from list views in the Message Queue for faster search performance.
BYO SMS Credentials
We’ve introduced an integration setting that allows clients to enter their own Vonage credentials for use with Short Message Service (SMS) in the Multi-factor Authentication (MFA) login process. This enables clients to manage their accounts and associated costs directly, rather than paying SmartSimple for this third-party service.
To enter your account details, navigate to Global Settings > Integrations tab > Integration Key Management, and create a new key of the type “Vonage.” Please note that you must still contact SmartSimple to enable SMS notifications in your system, which can be done through a setting found at Global Settings > Communications tab.
New Workflow Option for Notifications
Added a feature to allow users to be notified of workflow acknowledgement tasks through the bell icon in the header, similar to notification broadcasts. To see this option, go to Menu Icon > Workflows > Edit a workflow with an acknowledgement task > Edit the acknowledgement task > Message Template tab > Under Message Type, select "System Notifications". This replaces the previous "Instant Message" type. Now, instead of sending emails to internal staff for approvals, you can utilize the notifications area for a more streamlined process.
Notes for Admins
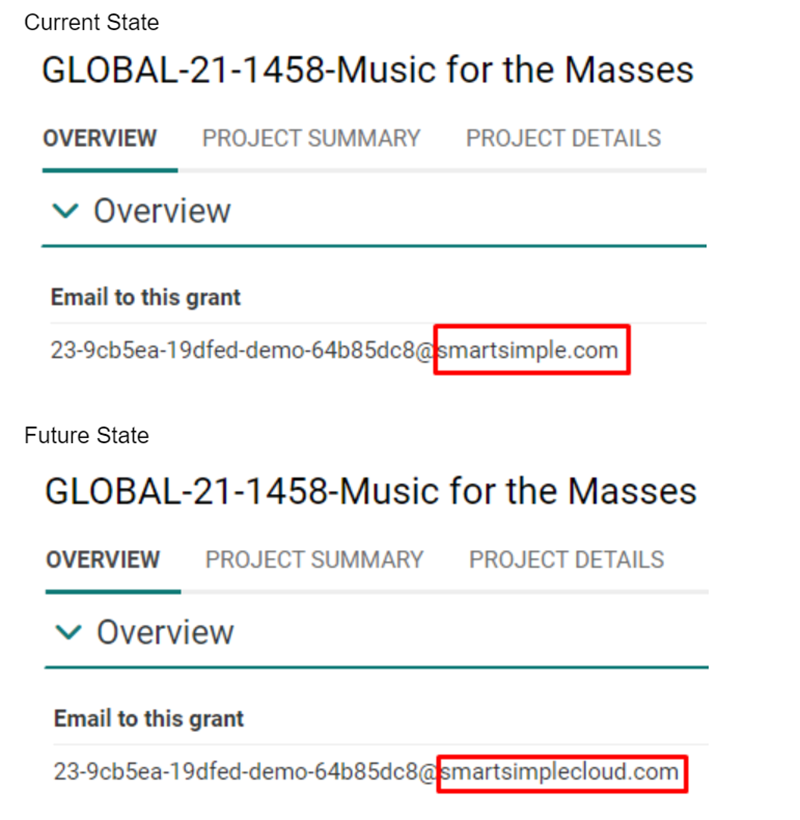
Object Email/Email Anything Domain Name Change
As of October 24th, the email services for the Object Email (Email Anything) feature have transitioned from using the @smartsimple.com domain to the @smartsimplecloud.com domain. If someone replies to an email thread that still contains the old object email domain, you’ll need to update the email address within that thread to the new @smartsimplecloud.com domain. Emails sent to the old domain may receive a bounce back message indicating "550 Invalid Recipient".
Note: This change only applies to object emails. No configuration adjustments are necessary. For instance, do not alter the "From" address located under Global Settings > Communications tab > Email Options and Security. The "From" address domain should remain as @smartsimplemailer.com, @smartsimplemailer.ca, or @smartsimplemailer.eu depending on your geographic region. If you are using an SMTP relay, the "From" address will be set to something prescribed like your corporate domain.
Added Ability to Run Triggered Workflows Asynchronously
Looking to speed up your autoloader, report export and API updated processes? A new option allows workflows triggered by these actions to run asynchronously in batches using concurrent threads to enhance performance. The new toggle is called Run triggered workflow asynchronously to improve performance and can be enabled when workflows don't require immediate sequential execution.
To access the new setting for Reports, go to the desired report > Export tab > Scheduled Export tab. For autoloaders, go to the desired autoloader > Process tab. For API updates go to the desired SmartConnect API function.
Added Option to Delete Files upon Autoloader Completion
We added a new autoloader option called Delete processed and source data files upon autoloader completion. If enabled, files in the processing folder (including encrypted and decrypted files) will be deleted for improved security.
Added Validation for Default "From" Address
Validation has been added to the default "From" address located at Global Settings > Communications tab > Email Options and Security > Toggle on Enable Default From Address > From Address. Only valid email addresses will be accepted.
Added SSO Signing Certificate Expiry Notifications
Added a feature that allows system notifications to alert users before the expiry of SSO signing certificates. These notifications will appear under the notification bell in the system header at designated intervals leading up to the expiration date. To enable these notifications, go to Global Settings > Integrations tab > Integration Key Management > Edit an integration key with the type "Certificate" and category "Keystore." You can then specify which users and roles should receive the expiration alerts.
Updated Session Logs and Message Queue for Improved Performance
To enhance performance related to session logs and the message queue, the display criteria for messages and login details have been reduced from 2 years to 90 days. Messages older than 90 days are available in the Archived tab. Archived messages and login details are still accessed through reports.
You can find the Message Queue by navigating to Menu Icon > Global Settings > Communications tab > Message Queue. To see a user's login details, navigate to the desired user's profile > Logs > Login History.
Updated Field Change History Log to Exclude API Calls
We’ve added a setting to exclude API calls from the field change history log to improve performance, reduce log size, and minimize unnecessary tracking. To enable this feature, navigate to Menu Icon > Global Settings > Integrations tab > SmartConnect API > Create or edit an API function with the action type “Update” > Toggle on Disable Field Change History.
Updated Delegation Notification Emails
We’ve updated the delegation notification email so that users who have opted out of all system emails will still receive a notification when they are delegated to.
Updated Styling of Work with +AI Conversation Starters
Updated the template prompts (conversation starters) of the Work with +AI feature from being displayed in a dropdown menu to being displayed as buttons.
Updated Level 3 Associations in Report Builder
The Report Builder has been updated to distinguish between Level 2 and Level 3 associations. For example, you can now generate a report that returns a list of organizations associated exclusively with Level 3 records where previously it returned associations for level 2s and 3s.
Updated Electronic Signature Screen Interface
We have updated the electronic signature screen, which can be used to send documents for e-signatures, cancel e-signature requests for sent documents, and check the e-signature status of a document. Changes include renaming the submit button to “Send for E-Signature” for improved clarity. To view these updates, navigate to a web page view custom field that has e-signatures enabled. Open the web page view and click the e-signature button to see the new interface.
Updated Advanced Data Table Custom Field
Updated the "Special - Advanced Data Table" custom field for enhanced security, specifically in relation to permissions and the way data is saved and returned.
Updated User Menu Configuration Naming
The user menu configuration item previously labeled "Dropdown" has been renamed to "Titlebar" to better reflect its role within the portal header.
Updated Aggregate Shortcuts
Fixed an issue where aggregate shortcuts linked to a list view with quick load enabled where an incorrect count may have been displayed on the shortcut.
Performance Enhancements
We've implemented changes to offload resource-intensive tasks affecting reports and archiving from the main database, reducing the workload and boosting overall performance.
Deprecated Web Forms
The Web Forms feature was deprecated in 2017, in this upgrade it will no longer be possible to create a web form in systems where web forms are not already in use.
Deprecated Support for Older Excel Formats
Two Excel report export format options (Excel 2000 and 2003) have been deprecated and are no longer supported. While existing reports using these older formats will retain their configurations for backward compatibility, you will no longer be able to select these formats for new report exports. Moving forward, there will be a single export option using the Excel 2007 format which offers improved performance and supports bigger worksheets.
