User Delegation
Contents
Overview
The delegation feature in SmartSimple Cloud allows users to assign delegates who can act on their behalf within the system for a specified period. This is particularly useful during periods when a user will be out of the office, such as for vacation, maternity leave, or other temporary absences. Users can choose a delegate, such as a manager, co-worker, or colleague, to perform their tasks during their absence.
This feature eliminates the need to temporarily modify role permissions or assign other users to specific records. Additionally, this functionality is applicable to all internal or external users as it is enabled by role.
This article will guide you through setting up and utilizing SmartSimple Cloud's user delegation functionality within your system.
Configuration—Essentials
Identifying which users can delegate to other users and users that can be delegated to
To enable delegation for users of your system based on their roles, you must be a Global Administrator. Consider which roles in your system should have access to the User Delegation feature.
- Sign in as a global administrator and go to the Global Settings.
- Navigate to the Security tab and select System Feature Permissions.
- Go to the Features tab to find Delegation settings.
- Configure Delegation - Roles That Can Delegate and Delegation - Roles to Delegate to.
Note that global administrators can only delegate to other global administrators, and internal users can only delegate to other internal users. Additionally, this feature is not limited to internal users. External users, e.g. applicants, reviewers. Once a user is delegated, they will receive an email notification that they have been selected as a delegate. Once they login, the user will see a new icon in the global header that allows them to temporarily emulate another user.
Setting up the delegation
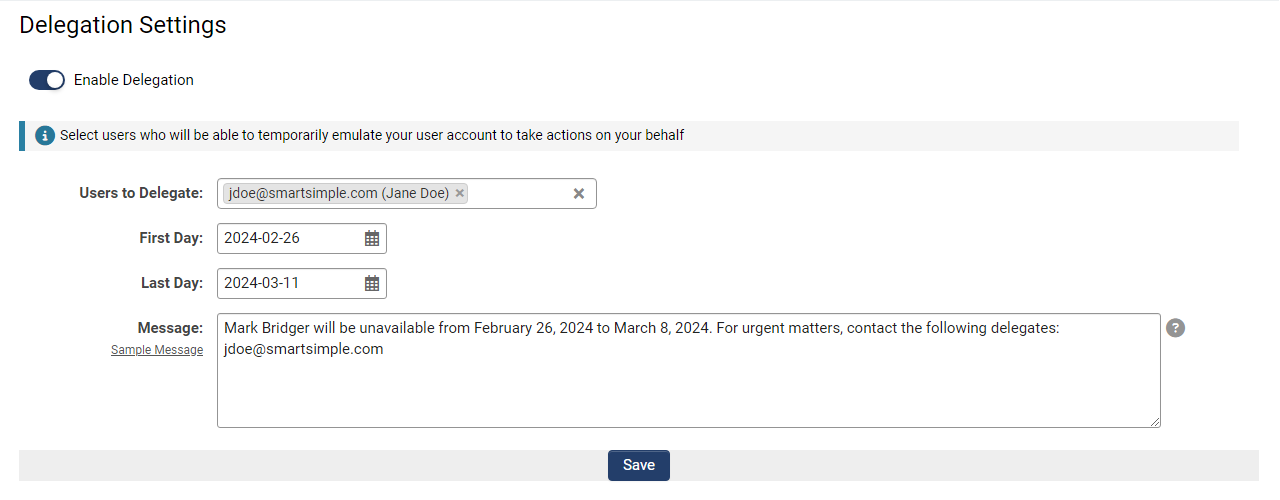
As an example, as a staff member going out of the office, you can delegate another user by following these steps:
- Select the user menu in the top right corner and select Delegation.
- Select the user to delegate to by typing their email and selecting from the autocomplete options.
- Set the delegation period start and end dates.
- Optionally enter a sample message to notify others of your out-of-office status.
- Click Save button to send the email notification and enable delegation.
The delegate can then log in and see the delegation button, which allows them to emulate the user and perform tasks on their behalf. All actions taken by the delegate will be recorded in the audit logs.
Delegate Notification and Emulation
Once a user is delegated, the delegate will receive an email notification. Upon logging in, the delegate will see an icon in the global header to temporarily emulate the user. Below is an example of how this feature works:
Other considerations
- Please note that the delegation functionality cannot be used while in emulation mode.


