Template:July2024Upgrade
Contents
- 1 Overview
- 2 Upgrade Highlights
- 3 Global System Upgrades
- 4 On-Demand System Upgrades
- 5 Notes for Admins
- 5.1 New Support for OAUTH Authentication for SMTP Relay and Migration of Credentials to Integration Keys
- 5.2 Advanced Search and Filters Using Status and Type Criteria
- 5.3 Enhanced Filter List View
- 5.4 SmartCheck Validation List View Enhancements
- 5.5 Improved System Design Summary
- 5.6 Adobe Acrobat Sign migration
- 5.7 Signority Updates
- 5.8 Updated Stripe Integration
- 5.9 Added Ability to Report on Subject Line Data for Notes
- 5.10 New Reauthorization Option for Adobe Sign and DocuSign
- 5.11 Updated Work with +AI Feature
- 5.12 Updated SmartConnect API
- 6 Service Packs
Overview
Watch this video to get a general overview of the new features in this release.
To watch this video in full screen, please click on the full screen button on the bottom right.
Upgrade Highlights
- The new Privacy and Security Policies feature improves configuration efficiency, enhances user experience, facilitates tailored policy creation, and strengthens compliance management to foster greater user trust.
- The Annotations feature has been refined with a new interface, improved process flow, and the ability to mark annotations as resolved, creating a better and more intuitive collaboration experience.
- The new option for AI-powered Natural Language Processing Search lets users enter plain text to generate filter criteria for list views, making it easier to find what you need naturally.
- The new Activity Scheduler feature streamlines bulk creation and scheduling of Level 2 activities with customizable recurrence rules, offering simplified and timely activity management.
- The new Follow Organization feature for following organizations automates notifications to alert users about new opportunities, enhancing user engagement.
- The +AI Insights feature enables users to upload and manage training files for effortless AI model creation.
- To prevent email spoofing, the "From" address in the group email feature is now only selectable from a dropdown menu.
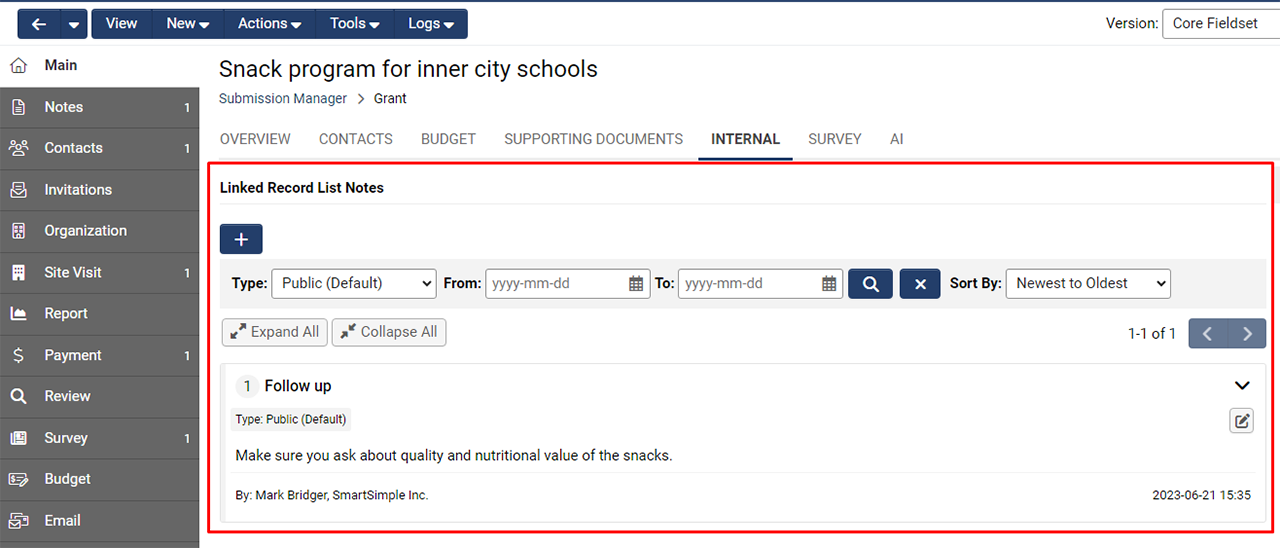
- We've incorporated the capability to display notes within the "Special – Linked Record List" custom field, enhancing user interaction and workflow efficiency.
- The new PDF Text Export feature allows extraction of text from PDF files into a multiline text custom field, facilitating integration with +AI functionalities for tasks like translation and summarization.
Global System Upgrades
The new features listed below are enhancements to the SmartSimple system and will be immediately available to SmartSimple users upon the application of the upgrade to their server:
Major Updates
Improved Annotation Mode Experience
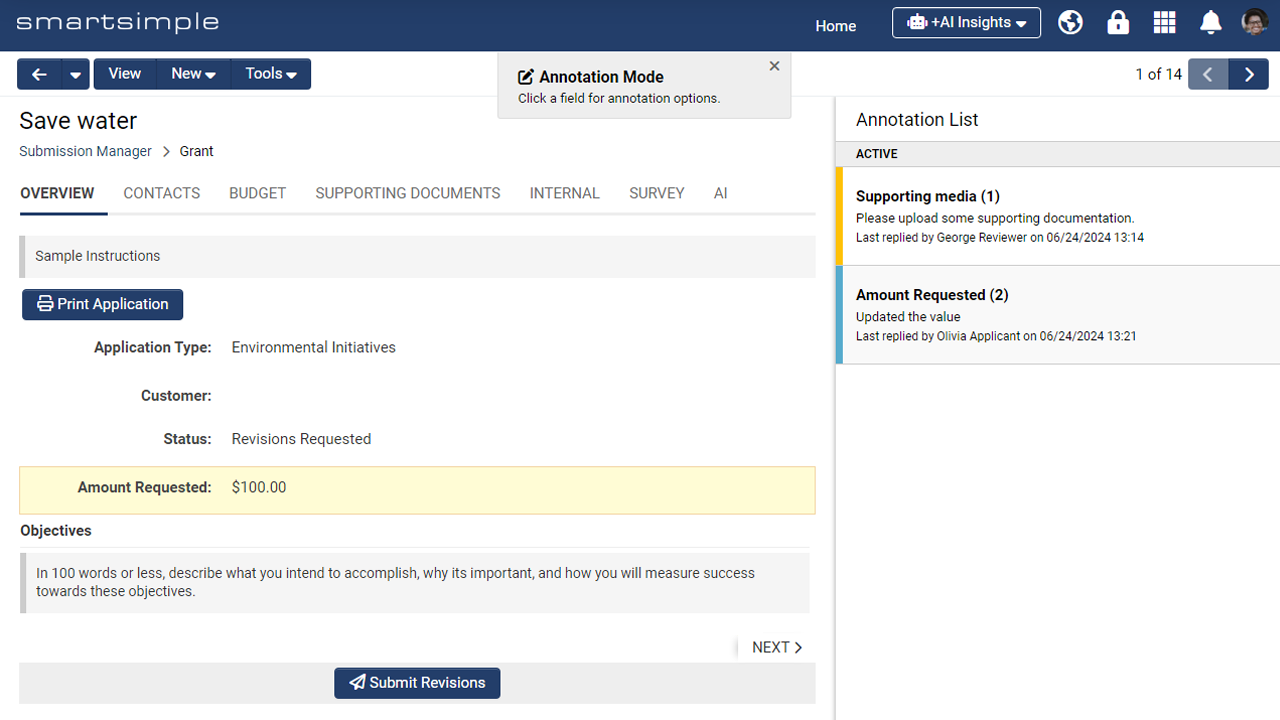
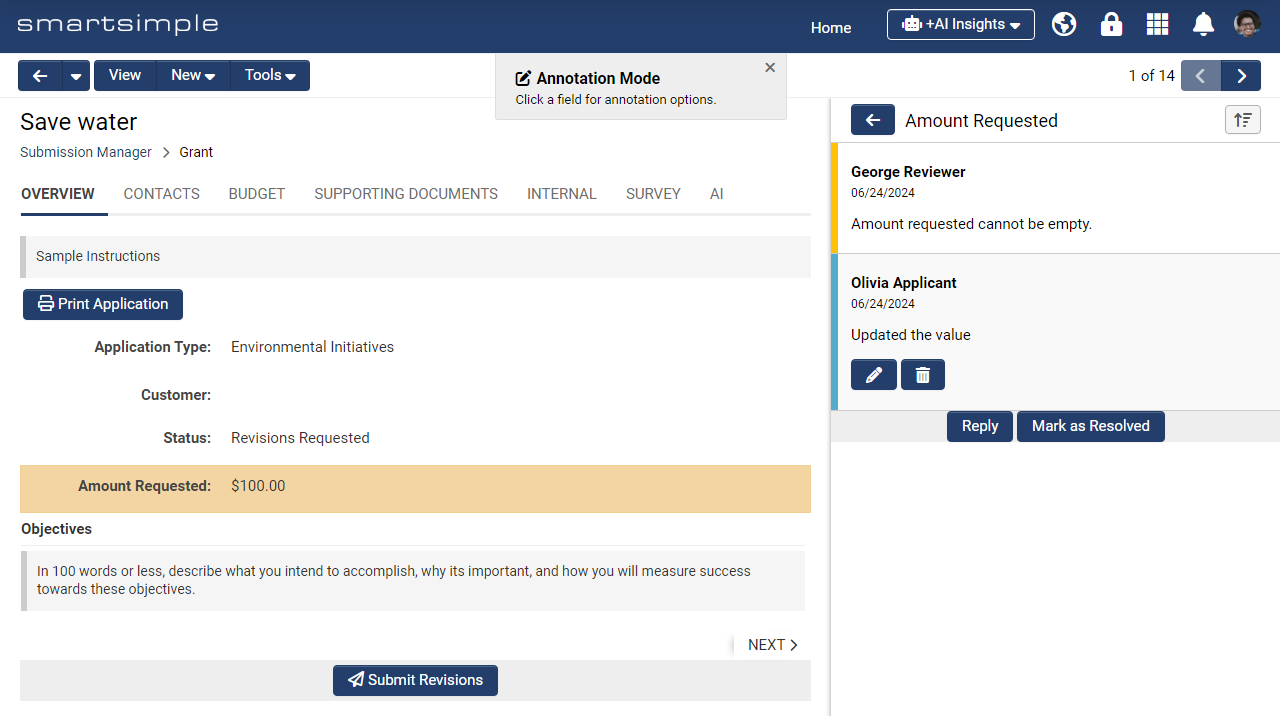
Annotations serve as a collaborative tool allowing users to add notes and responses directly to specific fields within a record. With field-level annotations, users can modify individual fields and respond to comments without affecting the rest of the record. In this upgrade, we refined the interface by hiding the left navigation panel and implementing color-coded messages:
- Blue indicates comments made by you.
- Yellow indicates comments made by others.
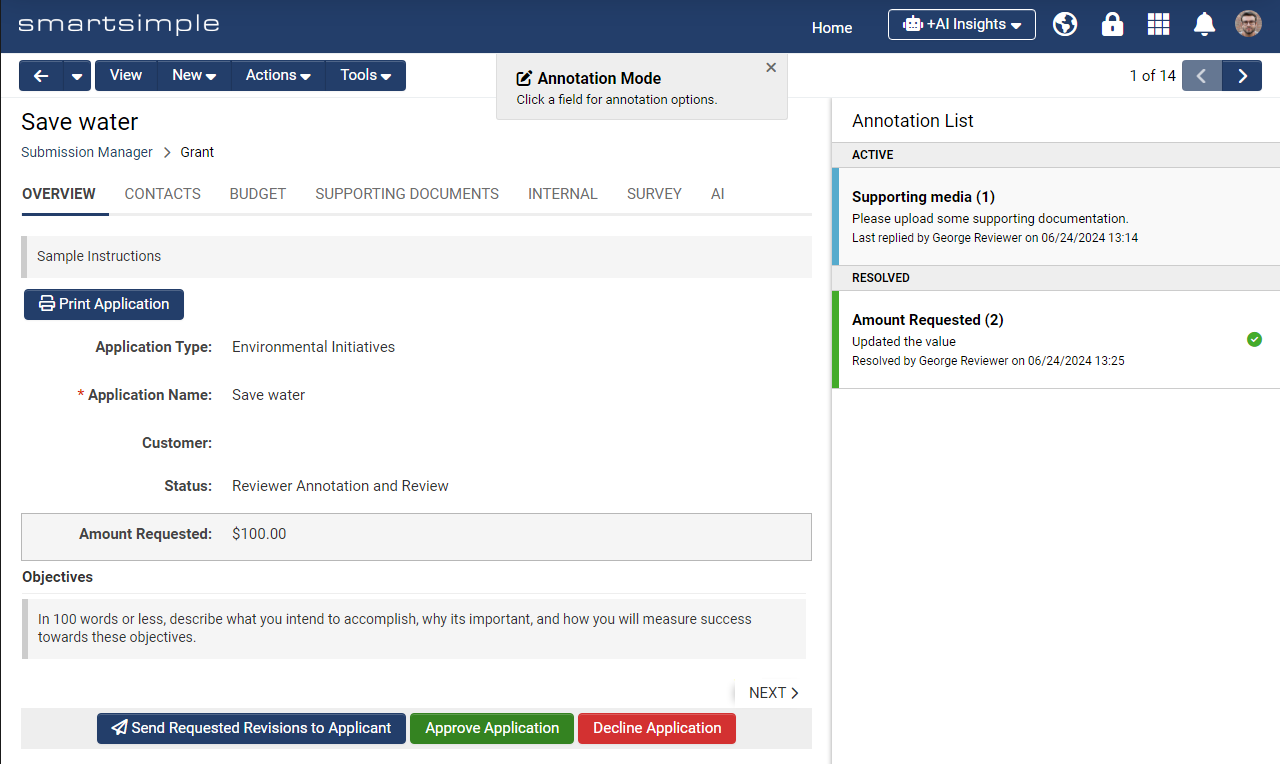
- Green denotes resolved annotation sets.
Additionally, when the Open in Annotation Mode setting is enabled, users will now directly enter annotation mode when changing to the defined status.
Note that as part of this upgrade, users must have the "View and Create" role permission to reply to an annotation. Additionally, adding a comment is now mandatory when a user edits a field value.
Users can easily view the list of annotations in the right column, facilitating navigation to specific annotation fields and drilling into the collaboration conversation. Reply and edit functionalities for unlocked fields are conveniently accessible through a modal window.
Users also have the ability to mark an annotation set as resolved. To set this permission, go to UTA Configuration Settings > Level 1 tab > Statuses > Select the relevant status > Permissions & Availability tab > Enter roles in the Mark as Resolved field.
To learn more, read the revised wiki article on Annotation Mode.
New AI powered Natural Language Search Option
We’ve introduced a new search option where users can enter plain text and have the AI generate filter criteria for list views. To use this feature, click on the “Enable AI assisted search button” (robot icon) and type the desired criteria using natural language to filter the results. For example, you could type “Search for all records with the status ‘Draft’.” Note: only data in the list view will be searched. You may opt to control the visibility of the AI Assisted Search toggle by going to Global Settings > +AI Tab.
Stronger Security Configuration of Web Servers
Updated the Content Security Policy of web servers with a stronger configuration for improved security. One change included in this is that the platform will now begin blocking attempts to include executables such as script libraries sourced directly from external systems. The perceived behavior of this may be an inability of a user's web browser to load or run script content that is being imported directly from an external source. An example error message thrown by a web browser may make reference to the server's Content-Security-Policy which has blocked the loading of a resource. If you encounter any issues due to this change, SmartSimple may be able to make custom but temporary adjustments to your local SmartSimple environment to again allow the inclusion of the affected external resources. A permanent solution to this issue would be to avoid the inclusion of external resources into your SmartSimple system, but instead to store a copy locally within your system and reference the local copy of the resource.
Minor Updates
From Address in Group Email Now a Dropdown
To prevent email spoofing, the From Address field in the group email feature is now a dropdown menu and is no longer accepting free-form text input. Users can select the default From Address if configured, or choose their own email address. If no default email address is set, "donotreply@smartsimplemailer.com" will be available as an option. Users can add additional email addresses to the From Address dropdown by navigating to User Menu > Personal Settings > Enter additional email addresses into the Email From Address field. If you are using an SMTP relay, any additional email addresses must use a domain accepted by your mail server or use a domain such as @smartsimplemailer.com. Otherwise, the email may be blocked or sent to spam.
Asynchronous Loading of List Views
We've updated the loading of list views to be asynchronous, allowing you to interact with certain elements before all list data is fully loaded. Additionally, we've changed how we load shortcut list view aggregate numbers to reduce performance impacts.
Enhanced Virus Scanning
Files uploaded to your SmartSimple system are now subjected to automatic virus scanning. Files larger than 100MB are queued for scanning; you may see a message indicating the scan is in process. During this period, users cannot download or rename files being scanned, and files being scanned are not visible in list views. If a virus is detected, the file is deleted, and a notification triggered. The option to enable real-time virus scanning on custom fields has also been removed. System Administrators can navigate to Menu Icon > Global Settings > Security tab > Click the Virus Infected Files link to see a list of files that were deleted from where, when and who uploaded them.
On-Demand System Upgrades
The following features are available immediately with the application of the upgrade, but must first be enabled or configured by a Global Administrator:
Major Updates
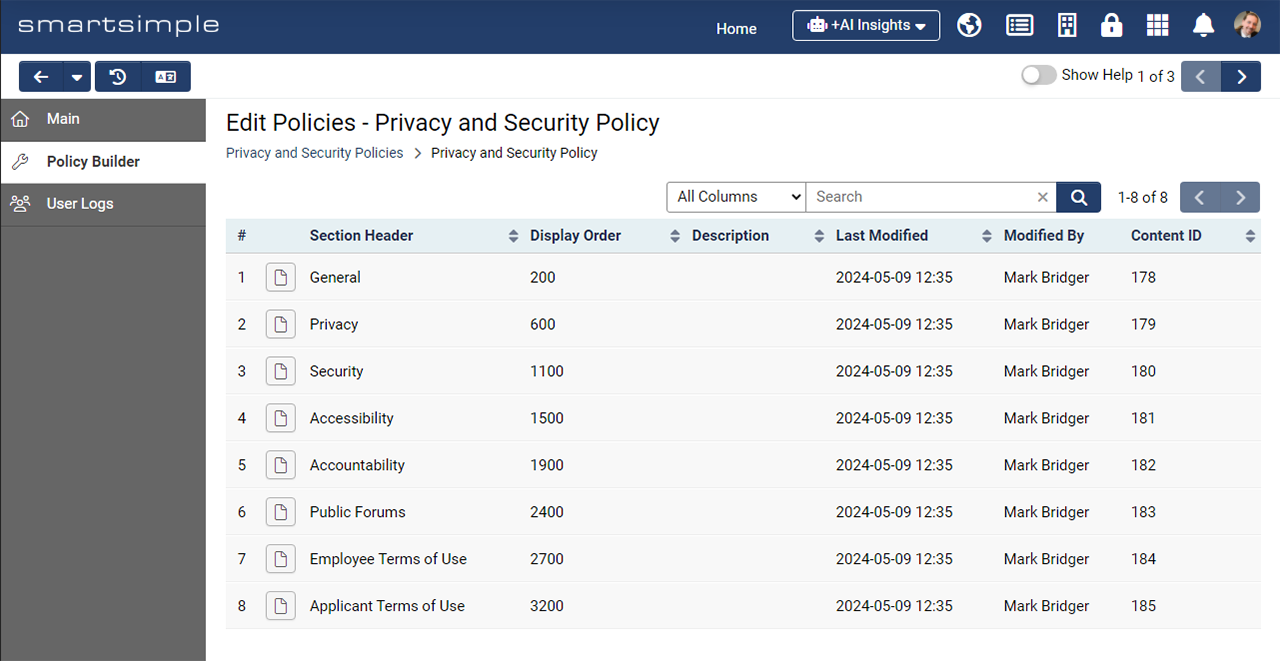
New Privacy and Security Policies Feature
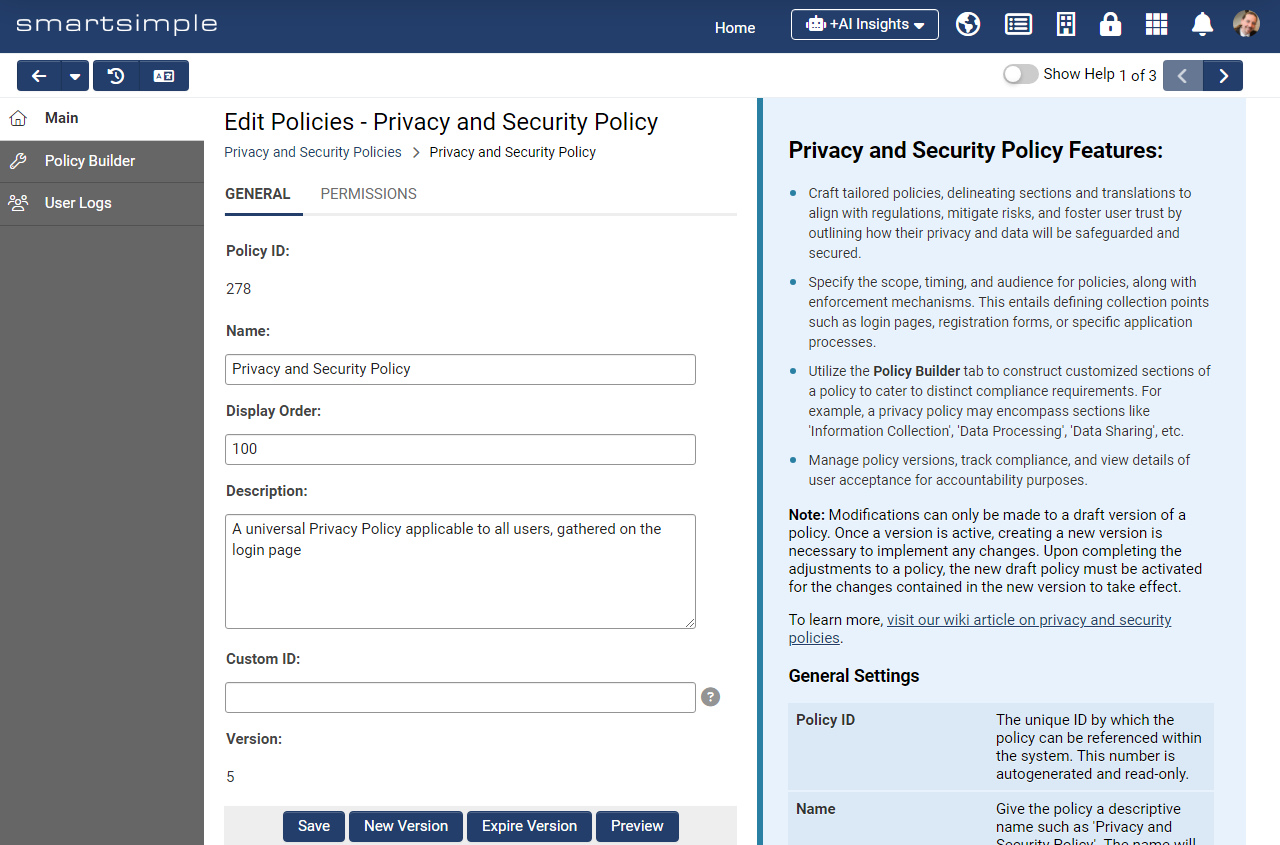
Privacy and security policies are crucial for aligning your system with regulations, mitigating risks, and fostering user trust by detailing how user privacy and data will be protected. Our latest update to this feature simplifies the configuration and enhances the user experience of this compliance checkpoint within your system. Some key features include:
- Tailored Policy Creation: Develop custom policies with distinct sections and translations to meet regulatory requirements, mitigate risks, and build user trust by clearly explaining how privacy and data will be safeguarded.
- Scope, Timing, and Audience Specification: Define the collection points, such as login pages, registration forms, or specific application processes, and outline enforcement mechanisms for each policy.
- Policy Builder: Use this new tool to create customized sections of a policy, addressing specific compliance needs. For example, a privacy policy might include sections like 'Information Collection', 'Data Processing', 'Data Sharing', etc.
- Version Management and Compliance Tracking: Manage different versions of your policies, monitor compliance, and view detailed records of user acceptance for accountability.
To activate the new Privacy and Security Policies feature, system administrators need to navigate to: Menu Icon > Global Settings > Classic Options tab > Disable the classic privacy and security policies.
Note: Existing policies will not be migrated to the new feature and must be rebuilt. Existing policy acceptance information will still be retained.
For more information, visit our wiki article on privacy and security policies.
New Feature to Follow Organizations
Have you ever wished to receive notifications when an organization you're interested in posts new opportunities? We've introduced a feature that allows users to follow organizations, enabling automated alerts for new opportunities as they become available. From the user's perspective, you can follow organizations in bulk by visiting the organization list view and selecting your desired organizations. Alternatively, you can go to a specific organization's record and click the follow button. For system administrators interested in enabling this feature, navigate to Menu Icon > Global Settings > Organization tab > Toggle on Allow users to follow organizations. Additionally, system administrators need to set up a UTA Level 1 workflow with an acknowledgment task to notify followers of organizations. Please ensure that the organization is assigned in the Level 1 Customer field.
New Feature for Creating and Scheduling Activities in Bulk
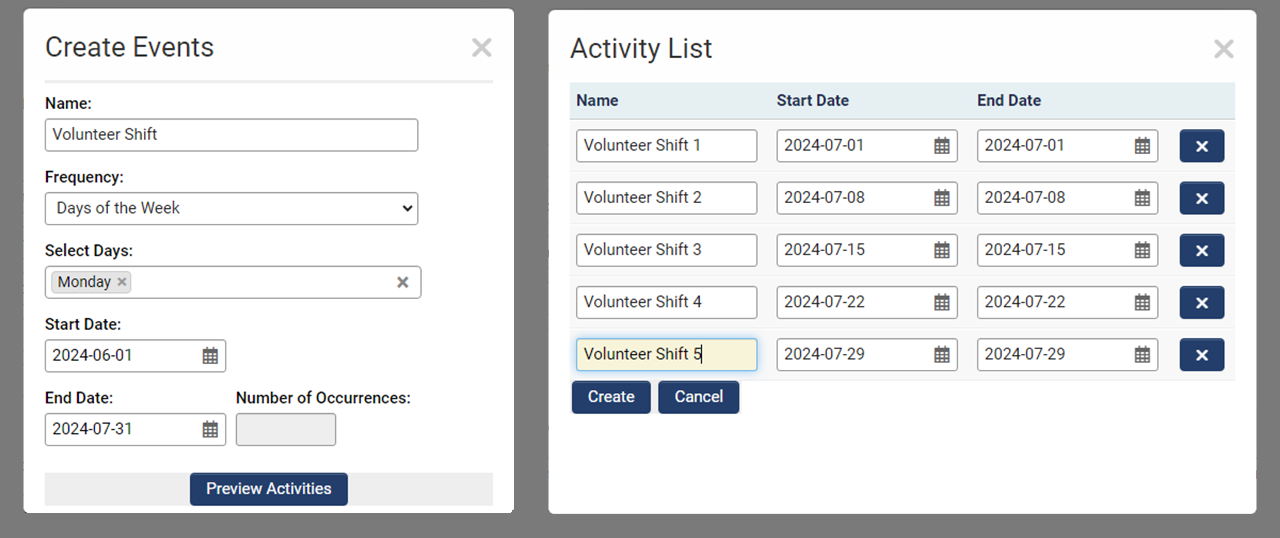
Ever needed to efficiently schedule multiple activities, such as events or shifts, in bulk? We've introduced a customizable wizard that simplifies the creation of Level 2 activities using recurrence rules.
From the user's perspective, navigate to the desired Level 1 record, access the tools dropdown, and select the appropriate Level 2 creation wizard. Alternatively, the wizard can be accessed inline as a button on the record.
Specify your criteria and set recurrence rules, then click Preview to review the bulk activities to be created. Adjust the activities inline as needed, and then click Create to finalize the creation of scheduled activities in bulk.
For System Administrators looking to activate this feature, navigate to the desired Universal Tracking Application > Configuration Settings > Level 2 tab > Click the Activity Scheduler link to configure one or more wizards.
To display a button that launches the activity scheduler on a Level 1 record, create a custom field of the type display text and variables. In the content input, enter @ssGet(ACTSCHEDULER,activity_scheduler_name)@, replacing "activity_scheduler_name" with the name you specified for your activity scheduler.
+AI insights Training Files
With the +AI Insights feature, you can create a custom AI model tailored to your needs. Use the Training Files tab to upload and manage files that can contain data from outside your system. Upload organization or community-related documents such as call guidelines and compliance documentation, enabling users to query the model for better understanding. Additionally, upload your research and project outcomes to facilitate easy sharing and allow the AI to respond to questions about your impact. Users can access Instance and Global level models in the header of your system. System Administrators can configure a +AI Insight model by navigating to Menu Icon > Global Settings > +AI tab
Note: You will need an OpenAI license to use AI features on SmartSimple. Contact your account manager or sales@smartsimple.com for further information on billing and implementation. To learn more about all our AI features, visit the wiki at https://wiki.smartsimple.com/wiki/AI
Minor Updates
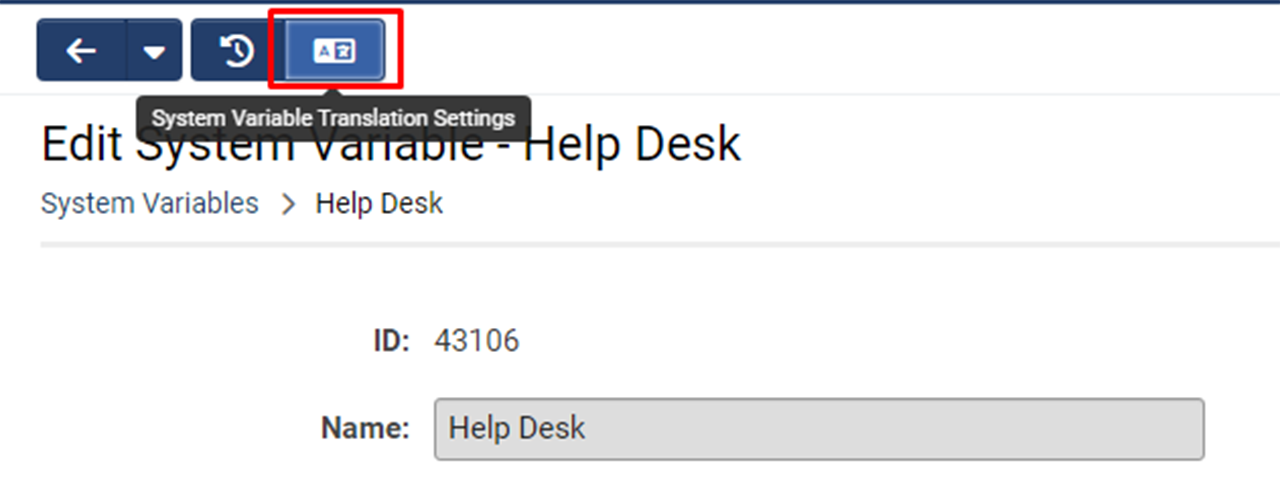
New Language Translations for System Variables
The System Variables feature allows administrators to define a value in one place and display it throughout different areas of the system. This simplifies maintenance, as an administrator can update a value in one location and the change will take effect across the entire system. With this upgrade, you can now specify language translations for system variables. Instead of creating separate variables, you can create a single variable and display different values based on the user's language. If no translation is defined, the system will display the English language value.
New Support for Notes in Linked Record List Custom Field
The "Special – Linked Record List" custom field enables you to view and add related items to a record directly within the interface, eliminating the need to navigate to other areas of the system. This feature simplifies the process of managing organizations, users, activities, and invitations. With this upgrade, you can now view and add notes using this custom field, for an improved user experience.
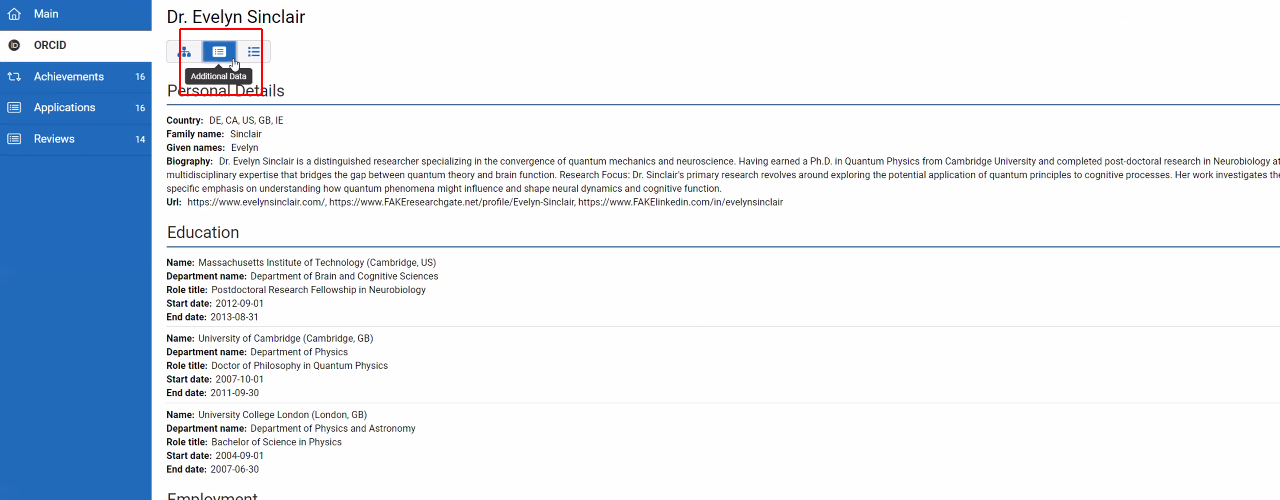
Added Ability to Display Additional ORCID Information on User Profiles
Systems utilizing the ORCID integration to showcase researcher information on user profiles can now display additional information in a new tab. System Administrators can select which new information to display by navigating to the user standard field named "ORCID" and toggling on the additional data they wish to show on user profiles.
If you have implemented the new feature for research clients to acknowledge reviewer contributions to peer review activities by sending participation data from review panels to ORCID profiles (available since May 2024), direct researchers to click the "Re-Import ORCID Data" button on their user profile to display these peer reviews acknowledgments.
New Feature PDF Text Export
We've introduced the capability to extract text from PDF files and store it in a multiline text custom field. Once the data is extracted into this field as plain text, it can be utilized with our +AI features for tasks such as translation, summarization, and manipulation. System Administrators can enable this feature by navigating to the desired "Upload - Multiple Files Storage" custom field, toggling on Enable PDF Text Export, and specifying the multiline text custom field under the "Value Storage" section where the extracted content should be stored.
Added Ability to Change Submit Button Label
We've made it easy to change the submit button label on organization or user sign-up pages to something more specific like “Submit Registration”. Simply navigate to the desired sign-up page under Global Settings > Organization or User tab, and enter your desired value in the Submit Button Label input field. Remember to define translations for all supported user languages.
Notes for Admins
New Support for OAUTH Authentication for SMTP Relay and Migration of Credentials to Integration Keys
Added support for OAUTH 2.0 authentication within the SMTP Relay integration functionality. This will allow you to now configure this alternative authentication method instead of the basic authentication that was previously the only option available. To do this, go to Global Settings > Integrations tab > Integration Key Management > Click the plus icon to create a new Integration Key. In the Type dropdown, you will see two new options under the keystore category: "Basic Authentication" that represents the previously existing method for SMTP relay and the new "OAuth 2.0". The settings for existing configurations of SMTP Relay have been updated and moved. Where previously the authorization credentials were stored in the block of SMTP Relay settings in the Global Settings > Communications tab, these have now been moved into the Integration Keys configuration area to better separate the management of credential secrets versus the integration behavior. After this update, you can find your authentication credentials located in the Integration Keys area as a keystore, and in the Global Settings > Communications tab. You simply need to select the appropriate keystore and authentication mechanism to easily manage this integration.
Advanced Search and Filters Using Status and Type Criteria
The advanced search and filters for “Type” and “Status” standard fields now consider both the type/status caption in the user's language and the type/status name (language independent) when these values are used as search criteria. This ensures more accurate search results across different languages.
Enhanced Filter List View
We have enhanced the filter list view to clearly indicate which filters are designated as configuration-only and thus not visible to end users. You can now easily identify these filters without needing to open each filter. To view the new configuration only indicator column, navigate to the desired Universal Tracking Application > Configuration Settings > Level 1 tab> Click on the Search Filters link to access the updated list of filters, featuring the "Configuration Only" column.
SmartCheck Validation List View Enhancements
We've enhanced the SmartCheck Validation list view by adding columns for “Last Updated”, “Modified By”, “Attached Submit Buttons”, and “ID”. These additions allow you to search based on this information, making it easier to find and troubleshoot SmartCheck Validation.
Improved System Design Summary
We have introduced the ability to include custom fields for organizations and users within the System Design Summary. This summary can be accessed via Menu Icon > Global Settings > System tab and generates a comprehensive document outlining the current system design.
Adobe Acrobat Sign migration
The Adobe Acrobat Sign service for e-signatures will be upgraded from Adobe Acrobat Sign API version 5 to version 6. Clients currently using the service have the option to enable webhooks. To do so, you will need to grant the necessary permissions within your Adobe account and contact the support team for help with the transition.
Signority Updates
We’ve introduced the ability to use the Signority Smart Tags feature by using anchor text within the webpage view, providing more control over the position of signature elements. The e-signature configuration for Signority has also been updated. New clients using this integration must set up an integration key under Global Settings > Integrations tab > Integration Key Management. For existing clients, the integration key will be automatically transitioned. Additionally, a new option has been added to allow the use of a sandbox Signority key for testing and troubleshooting during the implementation process.
Updated Stripe Integration
The Stripe integration for payments has been updated to use the latest version of the Stripe API. You can also now enable the Stripe Connect feature, which streamlines online payment processing across all system-wide Stripe payment methods, including credit card and ACH debit. Enabling this feature removes the need to manually enter Stripe keys for each payment form. Administrators can enable the Stripe Connect feature by navigating to: Menu Icon > Global Settings > Integrations tab > Toggle on Enable Stripe Connect under the “Service Settings” section.
Added Ability to Report on Subject Line Data for Notes
Added the ability to report on the Subject Line of the Notes feature. To enable this feature, navigate to Global Settings > System tab > Toggle on Enable Subject Line for Notes.
New Reauthorization Option for Adobe Sign and DocuSign
If you use Adobe Sign or DocuSign as your e-signature provider, you now have the option to reauthorize (sign out and sign back in). This is useful if you need to change the user account used for authorization, for instance, if your current account lacks the necessary permissions. To access this new feature, navigate to the Menu icon > Global Settings > Integrations tab > Click the "Check Adobe Acrobat Sign/DocuSign Access" button.
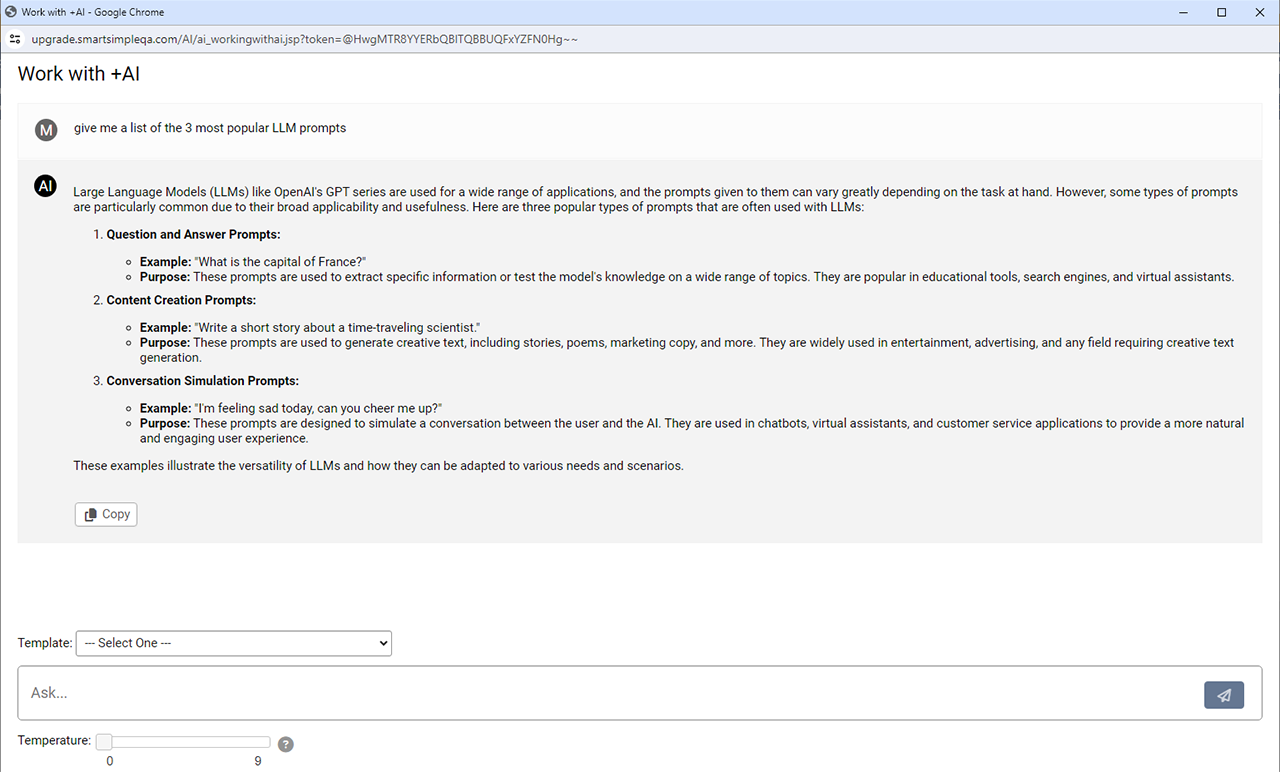
Updated Work with +AI Feature
Updated the Work with +AI interactive interface to support markdown formatting. Responses will now properly render lists, bold text, and other formatting elements.
Updated SmartConnect API
Clients may now manage the inclusion of archived records in SmartConnect API calls. Use the parameter {"includearchive":0} to exclude archived records and improve performance. By default, archived records are included in API calls.
When using the update function via the SmartConnect API, the values sent will now be validated based on the field type. For example:
- Numeric value for a Text Box - Number field
- YYYY-MM-DD format value for a Text Box - Date field
- YYYY-MM-DD HH:mm:ss format value for a Text Box - Date and Time
- XML format data for a Special - Advanced Data Table
- JSON format data for a Special - JSON field
If content is sent with invalid data format, it will be ignored. A new field error node will list the fields that failed validation for record creation and updates.
Service Packs
August 1st 2024 ( 202407.02)
- Due to Google Maps deprecating support for older versions, we have updated the Impact Maps to use new versions of the marker clusters. To ensure your Impact Maps function correctly, you must manually generate the HTML and JSON files after the upgrade is applied. To do this navigate to the desired UTA > Configuration Settings > Level 1, 2, or 3 tab > Impact Maps > Edit the desired map > Click "Generate HTML and JSON files" to recompile the map.
