Assignment Grid
Contents
Overview
The Assignment Grid feature provides a more efficient means of adding Users to UTA records when there is a Consumer/Provider relationship.
It allows restrictions on the type and status of Consumer records that will be listed.
It allows restrictions on the roles of the users to be added and the roles that they can be added with.
It also provides control over how the users can accept or decline the assignments, including buttons used and level two records created.
It also allows up to 3 reminder emails to be sent, and the user to be automatically flipped to a defined role against the Consumer record.
Configuration - Essentials
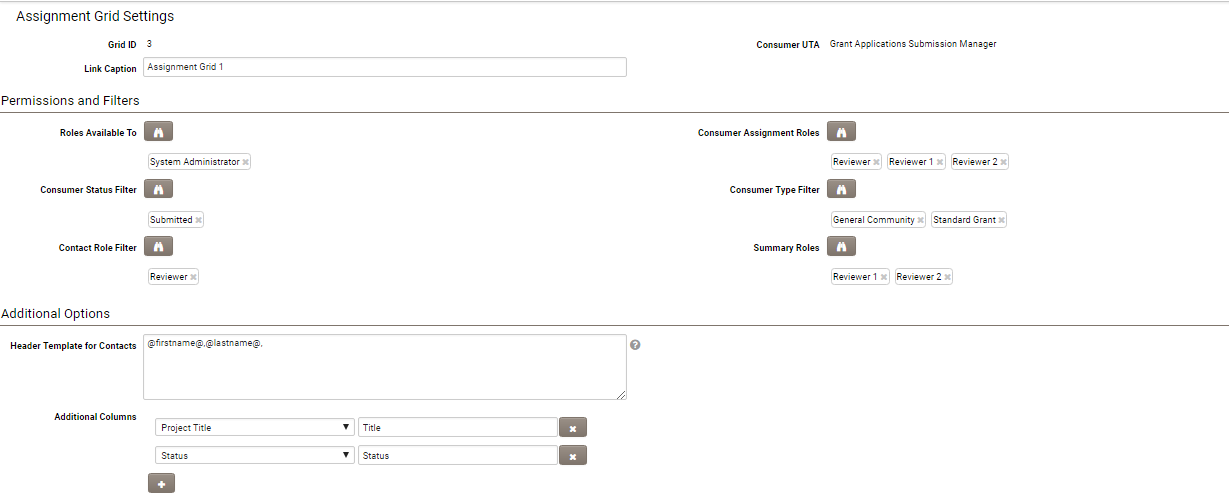
Configure Assignment Grid Settings
The Assignment Grid Settings allows restrictions on the type and status of Consumer records that will be listed.
It allows restrictions on the roles of the users to be added and the roles that they can be added with.
The Assignment Grid Settings are only available to those UTAs configured as Providers.
1. Go to UTA Settings - Connectivity. 2. If UTA is configured as a Provider then there will be an Assignment Grid Settings option. 3. Clicking this will take user to the Assignment Grid Settings list view. 4. Click the New Assignment Grid button at the top of the page. 5. Select the Consumer Application that the Grid will be configured against and click Continue. 6. The Assignment Grid Settings page is displayed with the following options:
- Link Caption: name that will be displayed when selecting Assignment Grid in Provider record.
- Roles Available to: roles that will be able to select Assignment Grid option in Provider record.
- Consumer Assignment Roles: roles associated with the Consumer record contacts section. Used when assigning users to the Consumer record.
- Consumer Status Filter: statuses associated with the Consumer record. Used to control which Consumer records will be available when assigning users.
- Consumer Type Filter: types associated with the Consumer record. Used to control which Consumer records will be available when assigning users.
- Contact Role Filter: roles associated with the Provider record contacts section. Used to control which contacts from Provider record can be assigned to the Consumer record.
- Summary Role: roles associated with the Consumer record contacts section. Used to control the roles that will be referenced in the Summary section.
- Additional Options - Header Template for Contacts: define what should appear in the column header for each individual contact displayed in Assignment Grid
- Additional Columns: use + button to add and define any additional columns to be displayed in Assignment Grid section
7. Populate as required then click Save at the bottom of the page.
Configure Assignment Declaration Buttons
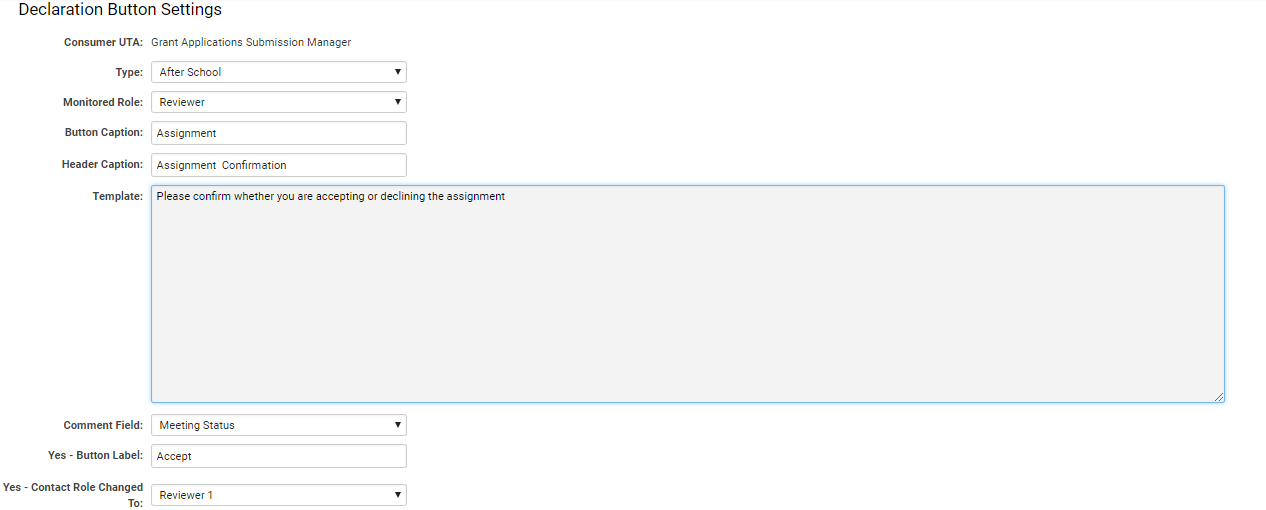
The Assignment Declaration Buttons section provides control over how the users can accept or decline the assignments, including the buttons used and level two records created.
The Assignment Declaration Buttons options are only available to those UTAs configured as Providers.
1. Go to UTA Settings - Connectivity. 2. If UTA is configured as a Provider then there will be an Assignment Declaration Buttons option. 3. Clicking this will take user to the Assignment Declaration Buttons list view. 4. Click the New Declaration Button button at the top of the page. 5. Select the Consumer Application that the Grid will be configured against and click Continue. 6. The Assignment Declaration Buttons page is displayed with the following options:
- Type: drop-down listing the Provider record types that the buttons will be available against.
- Monitored Role: drop-down listing the roles that the buttons can be used in conjunction with. Users assigned to Consumer record in the selected role will be presented with the Declaration buttons.
- Button Caption: caption that will appear on the overall button that opens Declaration section.
- Header Caption: header will appear on the Declaration section.
- Template: descriptive text that will appear against the Declaration section.
- Comment Field: custom field used to store any comments provided by the Contact
- Yes - Button Label: label to appear on button to accept assignment
- Yes - Contact Role Change to: role user is assigned to the Consumer record with after clicking Yes - Button.
- Yes - Comment Fields Mandatory: use toggle to switch on / off is user is required to complete Comment field after clicking Yes - Button.
- Yes - Create Level 2: use toggle to switch on if level 2 record should be created after user clicks Yes - Button.
- Yes - Level 2 Default Type: select level 2 type if level 2 type should be created after user clicks Yes - Button.
- Yes - Level 2 Default Status: select level 2 status if level 2 type should be created after user clicks Yes - Button.
- Yes - Redirect URL: enter URL where user should be redirected to after clicking Yes - Button.
- No - Button Label: label to appear on button to decline assignment
- No - Contact Role Change to: role user is assigned to the Consumer record with after clicking No - Button.
7. Populate as required then click Save at the bottom of the page. 8. Once this is complete then you will need to
Expose Assignment Declaration Buttons
The Declaration Button needs to be exposed to the Reviewer using List Views.
If you configure the list view for the Consumer Record after configuring the Declaration buttons for the Consumer UTA then you will see the following additional options . . .
- Enable Declaration Button: option found under the Properties tab. Toggle on of off as needed
- Declaration Button Application: drop-down listing Provider UTAs found under the Properties tab. Exposed when Enable Declaration Button is switched on.
- Show Declaration Button: found under the Columns tab when selecting columns. Will add the Declaration button to the column in the list view. Exposed when Enable Declaration Button is switched on.
Configure Assignment Reminder Settings
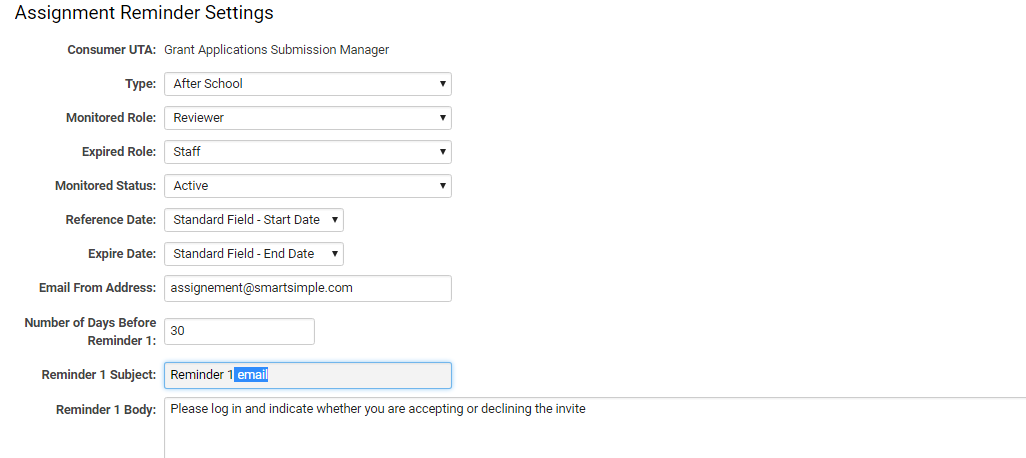
The Assignment Reminder Settings allows up to 3 reminder emails to be sent, and the user to be automatically flipped to a defined role against the Consumer record.
The Assignment Reminder Settings options are only available to those UTAs configured as Providers.
1. Go to UTA Settings - Connectivity. 2. If UTA is configured as a Provider then there will be an Assignment Reminder Settings option. 3. Clicking this will take user to the Assignment Reminder Settings list view. 4. Click the New Reminder Settings button at the top of the page. 5. Select the Consumer Application that the Grid will be configured against and click Continue. 6. The Assignment Reminder Settings page is displayed with the following options:
- Type: drop-down listing the Provider record types that the buttons will be available against.
- Monitored Role: drop-down listing the roles that the buttons can be used in conjunction with. Users assigned to Consumer record in the selected role will be presented with the Declaration buttons.
- Expired Role: drop-down listing roles. User will be assigned to Consumer record in the selected role if they have not declared by the Expired date.
- Monitored Status: statuses associated with the Provider record. Reminders only sent when Provider record has selected status.
- Reference Date:
- Expiry Date: date when user will be flipped to defined role if they have not accepted or declined the assignment request
- Email from Address: email used for reminder emails.
- Number of Days before Reminder 1: number of days prior to the Expiry Date that the first email will be sent
- Reminder 1 Subject: subject used in the first email
- Reminder 1 Body: email body for the first email
- Number of Days before Reminder 2: number of days prior to the Expiry Date that the second email will be sent
- Reminder 2 Subject: subject used in the second email
- Reminder 2 Body: email body for the second email
- Number of Days before Reminder 3: number of days prior to the Expiry Date that the third email will be sent
- Reminder 3 Subject: subject used in the third email
- Reminder 3 Body: email body for the third email
7. Populate as required and click Save.
Using Assignment Grid feature
Assignment Grid
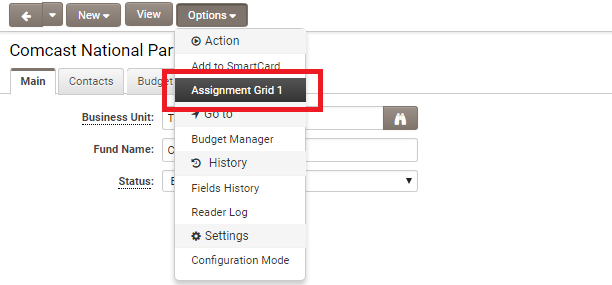
1. The Assignment Grid is accessed from the Level 1 Provider record in Edit mode by clicking on options.
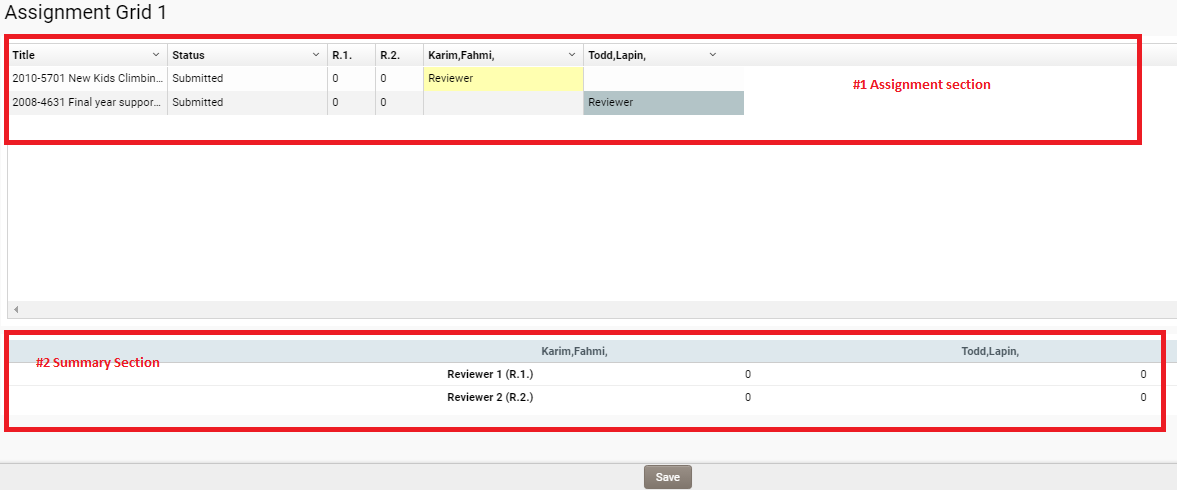
2. The Assignment Grid is comprised of 2 sections.
- Main Assignment section: lists the Consumer records down along the left hand side and the contacts along the top. The Consumer records listed are those with a Type and Status that corresponds to the Consumer Type / Status Filter configured against the Assignment Grid Settings. The contacts listed are those assigned against Provider record with roles that correspond to the Contact Role Filter configured against the Assignment Grid Settings.
- Summary section: summary of the number of assignments for those roles configured against the Summary Role section of the Assignment Grid Settings.
3. Select the relevant role in the intersection between the contact and the consumer role. The roles available are those configured against the Consumer Assignment Roles section of the Assignment Grid Settings.
4. Click Save once all assignments are complete. The users will be automatically added to the Consumer records with the selected roles and they should be able to access the Declaration buttons against the configured list view.
Declaration buttons
1. When the assigned individuals access the relevant list view (i.e. the one configured with the Declaration button settings) then they should see the overall Declaration button.
2. Clicking on this exposes the Declaration screen, with buttons to accept or decline the assignment.
3. When they click on the buttons then there role against the Consumer record will be updated, and a level 2 may be created if appropriate.
