Template:November2023Upgrade
Contents
- 1 Overview
- 2 Global System Upgrades
- 3 On-Demand System Upgrades
- 3.1 Major Updates
- 3.1.1 Added AI Translations for Custom and Standard Fields
- 3.1.2 Added Candid Demographics
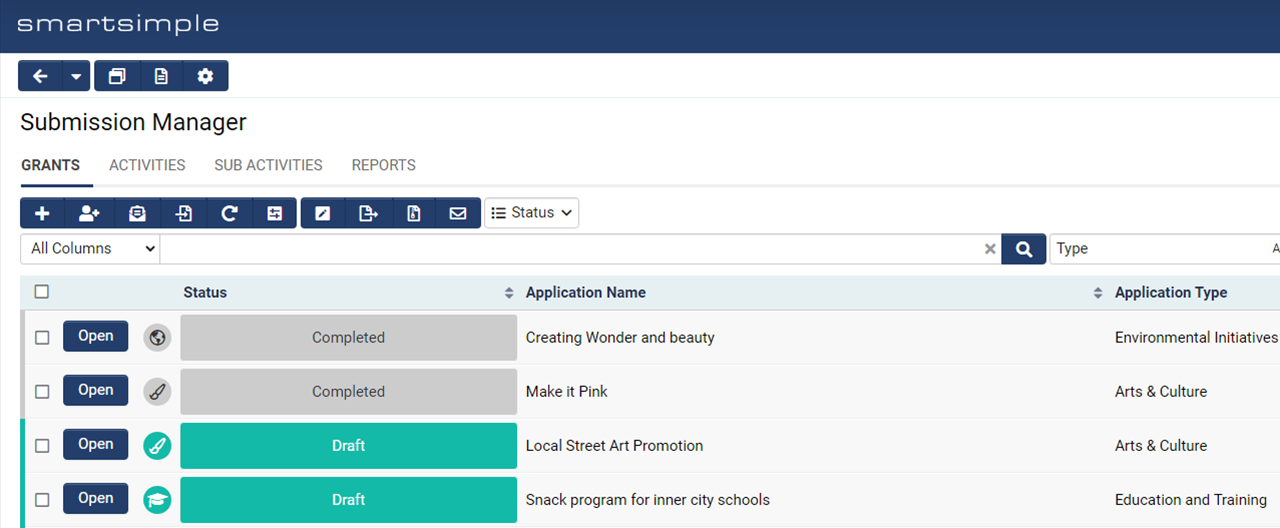
- 3.1.3 Added Ability to Make the Status Column Background the Status Color
- 3.1.4 Added Ability to Set Field Display Order Based on Type
- 3.1.5 Added New JSON Custom Field
- 3.1.6 Added New E-signature Integration with OneSpan
- 3.2 Minor Updates
- 3.2.1 Added Ability to Load List Views Faster
- 3.2.2 Added Option to Only Load Records in a List View After a Search
- 3.2.3 Added Ability to Show Question Set Answers in Sub List Views
- 3.2.4 Added Ability to Trigger a Workflow When an Invitation is Declined
- 3.2.5 Added BCC to Workflow Acknowledgement Tasks
- 3.2.6 Added Ability to View When Users Last Logged In
- 3.2.7 Added Ability to See Which List Views a Custom Field is Referenced In
- 3.2.8 Added Ability to Send Cancelation Emails for Adobe Sign
- 3.2.9 Added Improvements to Consumer Creation buttons
- 3.2.10 Added New File Download Log
- 3.2.11 Added Ability to Specify IP Ranges for Bypassing Secure Session Validation
- 3.1 Major Updates
- 4 Notes for Admins
Overview
Watch this video to get a general overview of the new features in this release.
(Coming Soon)
To watch this video in full screen, please click on the full screen button on the bottom right.
Global System Upgrades
The new features listed below are enhancements to the SmartSimple system and will be immediately available to SmartSimple users upon the application of the upgrade to their server:
Major Updates
Deprecated Password Variables
- Main Article: Password Variables to Set or Reset User Passwords
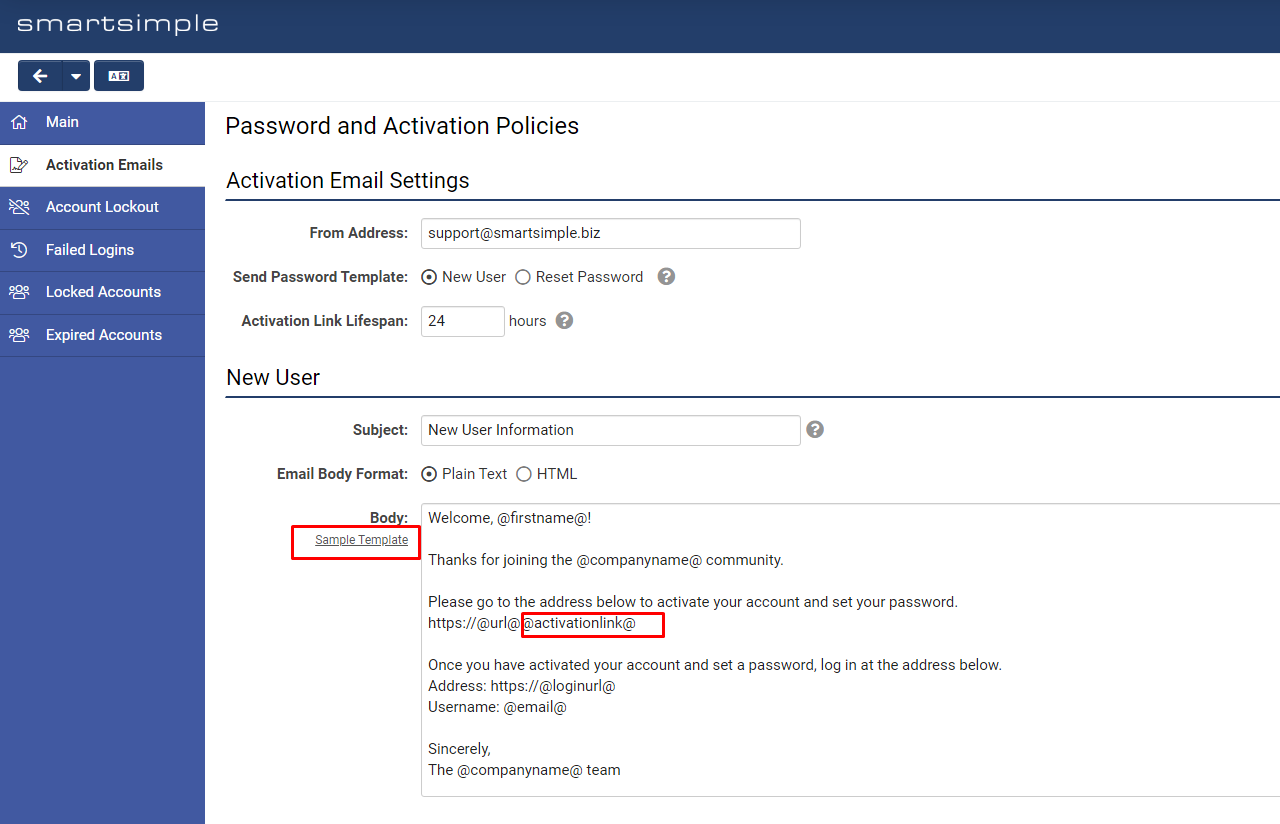
Several password variables will be deprecated for improved security. Instead of using the password variable (@password@) which sends a password in plain text in the email body, all systems will be required to adopt the following activation link variable. This variable will redirect users to a designated page where they can securely set their desired password:
https://@url@@activationlink@
The following variables will be deprecated and will not work after this upgrade: @password@, @checkportalpassword@, @checkactivatedpassword@, @randompassword@, and @passwordresetlink@.
If you would like assistance with transitioning contact our support team.
The easiest way to check for deprecated variables is to navigate to Menu icon > Global Settings > Communications tab > System Email Templates > and then click the Export Emails button. This exports all your system emails into an excel file including the body of the email so you can easily search for the deprecated variables.
More information can be found in our wiki article: Password Variables to Set or Reset User Passwords
Minor Updates
Updated Look of File Uploader
The user interface of the file uploader will change slightly throughout the platform. The toggle setting on the new file uploader will be enabled and the option to switch will be removed from all systems.

Added an AI Chat History Log
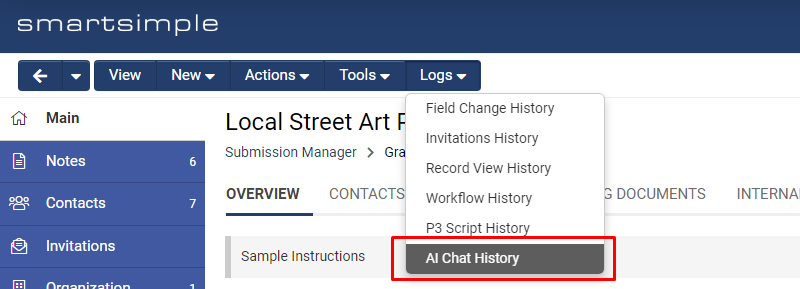
When using the interactive mode of the +AI feature (located under Tools > Work with +AI), the prompts and responses in your conversation with the AI are now logged. This will allow you to easily look at your conversation history after your session has ended. To see the new log, go to the desired record, click the Logs menu and select AI Chat History. Then click on the desired session to view that conversation.
Updated US Census Data
- Main Article: US Census Graphs
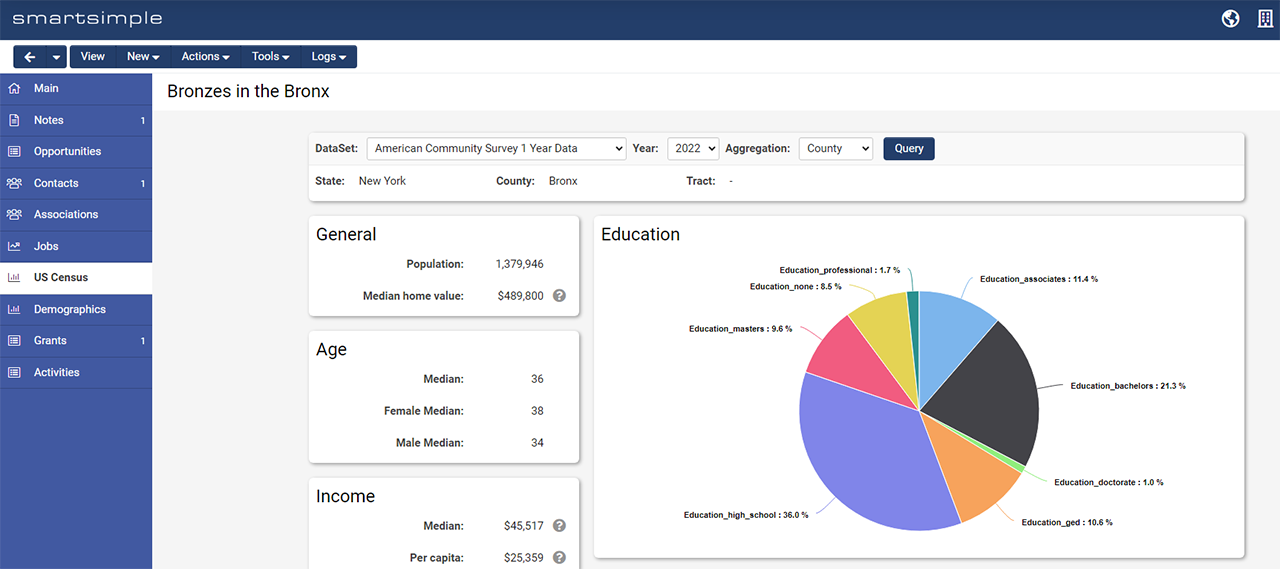
US census data and visualizations for organizations has been updated to include data up to 2022. To learn more, read our wiki article on US census graphs.
Updated Portal Sections with Mixed Record Type List Views
An Open Button option has been added to the List View - Mixed Record Type portal section. After the upgrade, on mobile devices, records will only be row-clickable if the Row Clickable or Open Button options are enabled for these portal sections. Formerly records were always row-clickable on mobile devices for portal sections with list views containing mixed record types.
On-Demand System Upgrades
The following features are available immediately with the application of the upgrade, but must first be enabled or configured by a Global Administrator:
Major Updates
Added AI Translations for Custom and Standard Fields
Added the ability to have the AI translate the custom and standard fields as well as some other interface elements within SmartSimple. For clients running multilingual programs, this is a quick and easy way to translate your system.
To enable this feature, you must have your own OpenAI license and have AI enabled on your system. Navigate to Menu Icon > Global Settings > Integrations tab > Scroll down and toggle on Enable AI Translation. Next, open a record in a language that is missing translations and the AI will work in the background to add translations to those fields and other interface elements. You may still audit and modify the captions that have been translated as usual. If you remove caption translations, the AI will translate captions again.
Added Candid Demographics
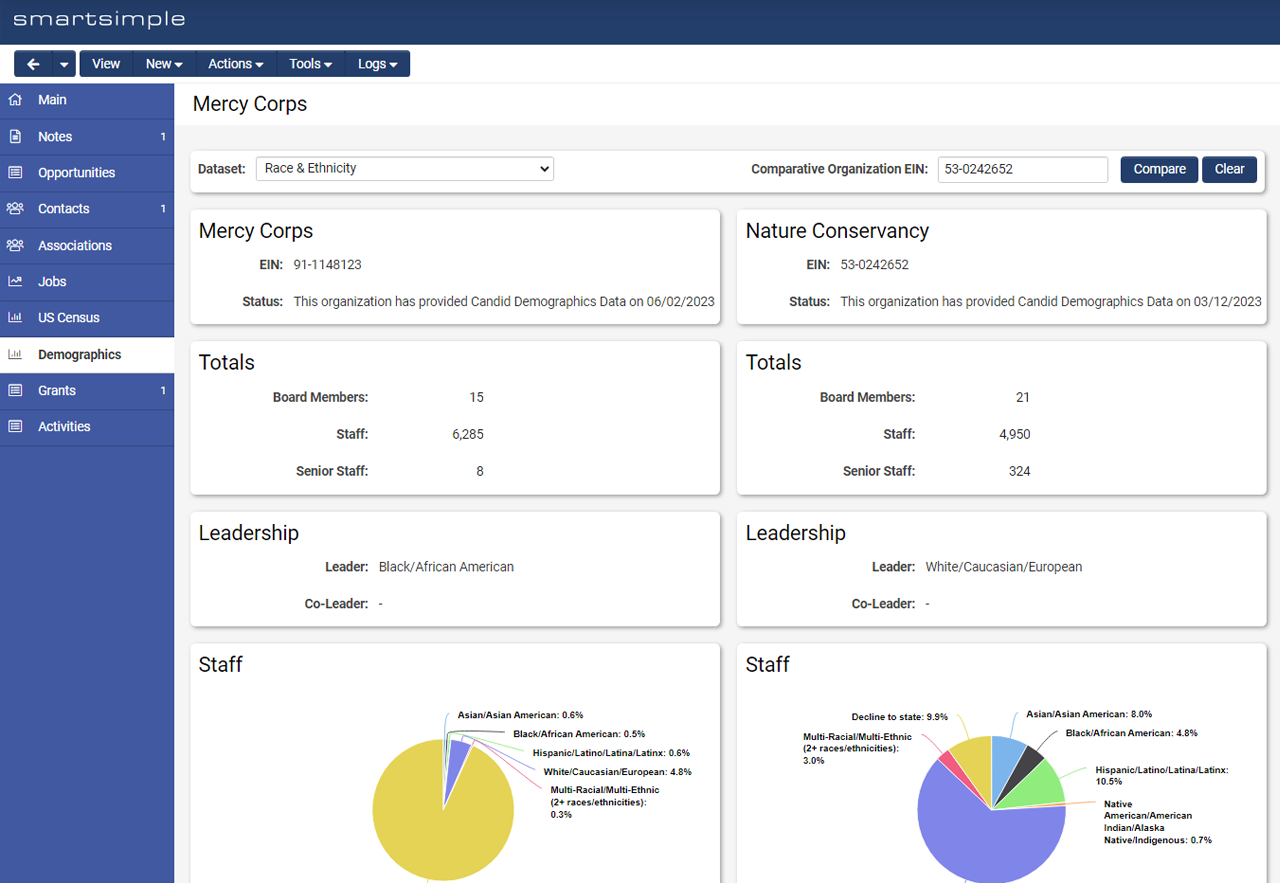
We have added the ability to easily see Candid demographics data for organizations within your system. If you enable this option, a new Demographics tab will appear in the left-hand navigation of the organization record. Organizational information related to race and ethnicity, gender identity, orientation, and disability status as well as information on staff, senior staff, and leadership are also visualized on this tab. You can also do a side-by-side comparison of the current organization with another organization.
To set up this feature, navigate to Global Settings > Integrations tab > Candid Demographics Check. Note: Organizations must have an EIN number in a custom field and it must be mapped on the setting page.
Then go to Menu Icon > Global Settings > Security tab > System Visibility Permissions> Add the roles you want to have access to this tab under Limit Demographics Tab Access.
Then navigate to the desired organization.
Added Ability to Make the Status Column Background the Status Color
We have added the ability change the background color of the status column to match the status color. The text in this column will automatically change to white or black based on what will provide the most contrast. This feature can be enabled at the list view level by navigating to the desired list view settings > Properties tab > Scroll down and toggle on Color Code Status Column.
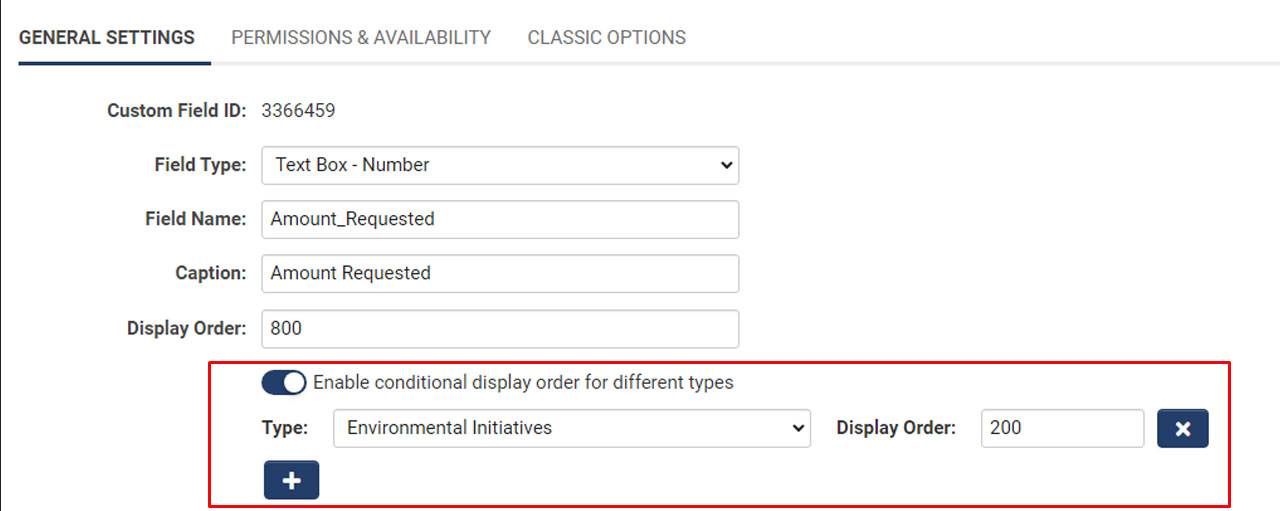
Added Ability to Set Field Display Order Based on Type
You can now specify a different Display Order for a custom field based on the Type. This gives you the ability to use the same field across multiple types of applications and have the field appear in different locations without the need to create multiple fields.
Navigate to any custom field and under Display Order toggle on Enable conditional display order for different types. Lower numbers will appear closer to the top of the record.
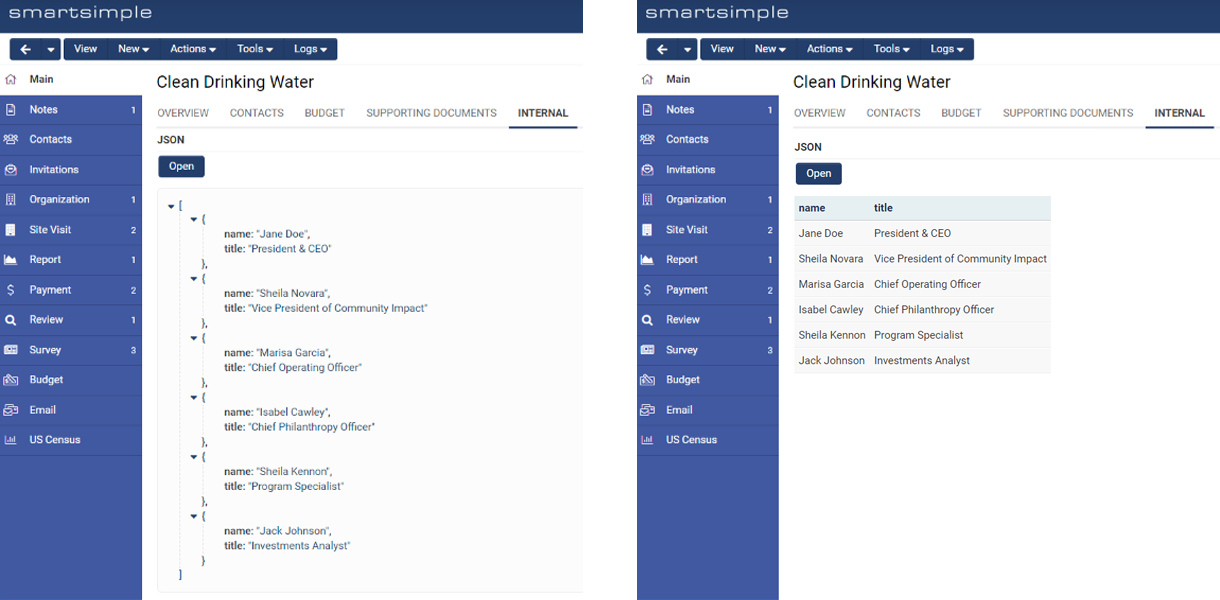
Added New JSON Custom Field
We have added a new JSON custom field. This field may be used to store historical or other data instead of creating many custom fields. The data added can be displayed in a tree or table format.
Added New E-signature Integration with OneSpan
- Main Article: OneSpan Integration
We have added a new electronic signature integration with OneSpan. Now you can use OneSpan as part of your document agreement or approval process. Note: You are required to bring your own OneSpan license. Learn more about this e-signature integration by reading our OneSpan wiki article.
Minor Updates
Added Ability to Load List Views Faster
We added a new option at the UTA level to load list views faster by deactivating the sort function and total record count.
To enable this for a UTA, navigate to Configuration Settings > General tab > Toggle on Enable Quick Load for List Views.
If desired, you can disable quick load on a list view basis. Do this by navigating to the desired list view settings page > Properties tab > Toggle on Disable Quick Load.
Added Option to Only Load Records in a List View After a Search
To improve the loading time of list views containing large record sets, you can now opt to only load records into a list view after a search has been conducted.
To enable this system-wide setting, navigate to Menu icon > Global Settings > System tab > Toggle on Only load records after a list view search.
Added Ability to Show Question Set Answers in Sub List Views
You can now easily see Question Set Builder responses on a Level 2 list view within a Level 1 record (sub list).
To set this feature, edit an existing Level 2 list view and toggle on the new setting called Include in Question Set and then select the desired question set you wish to display on this list view.
On the Level 1 Question Set Builder field, you may choose which responses you want displayed in the Level 2 list view. Response columns will be appended to the end of the list view.
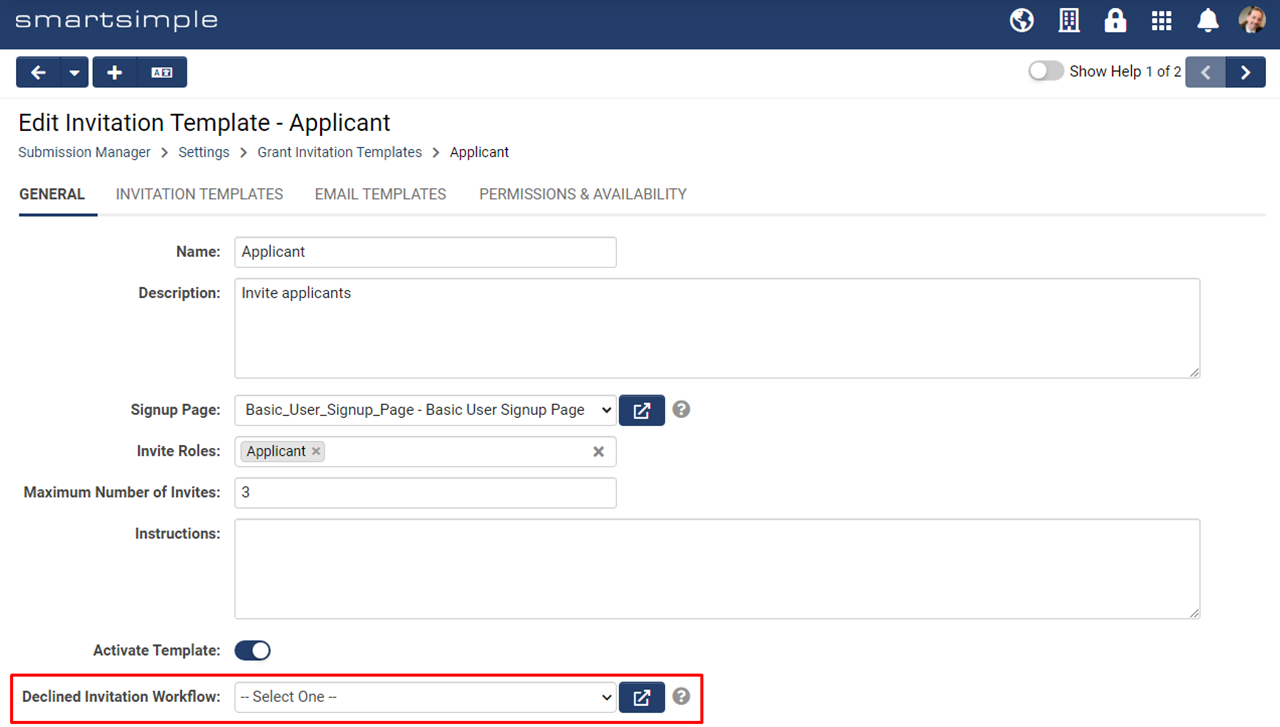
Added Ability to Trigger a Workflow When an Invitation is Declined
We added the ability to trigger a workflow when someone declines an invitation to contribute to a record. To see this setting, go to UTA Settings > Level 1, 2, or 3 tab > Invitation Templates > Edit a template > General tab > Declined Invitation Workflow.
Added BCC to Workflow Acknowledgement Tasks
You can now add a blind carbon copy (BCC) to emails generated from workflow acknowledgement tasks. This will make it easier to send a copy of emails to an internal mailbox without exposing the internal email address to all recipients.
Added Ability to View When Users Last Logged In
We added two ways to easily see when users last logged in. First, in the list view builder you can now add the Last Login Date standard field to a column. Second, in the Advanced Search you can now choose Last Login Date which appears under the Standard Fields heading. Note: This field does not need to be enabled like other User Standards Fields. This field will only show dates that occurred after the upgrade was applied. This field will show either the last time the user logged in or the last time the user was emulated. You can check to see if a user was emulated by going to the user's profile page and clicking Logs > Login History.
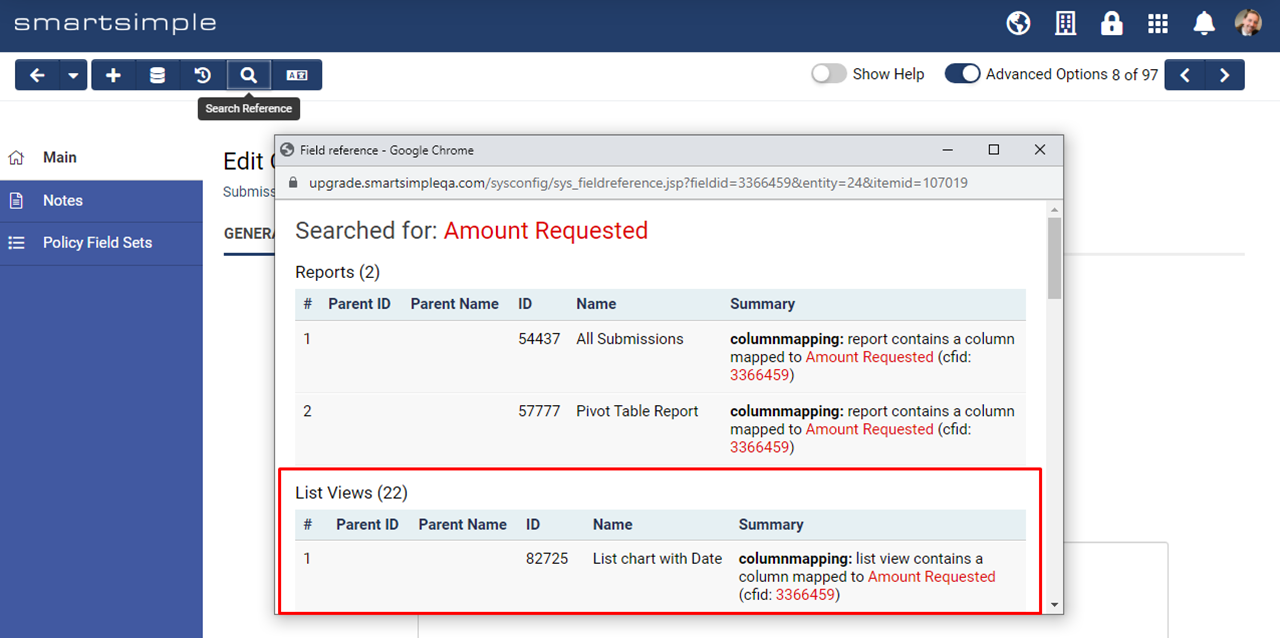
Added Ability to See Which List Views a Custom Field is Referenced In
You can now easily see which list views a custom field is referenced in. Navigate to a custom field settings page and click on the Search Reference button to see where that custom field is in use.
Added Ability to Send Cancelation Emails for Adobe Sign
If you are using Adobe Sign for electronic signatures, a new option has been added to send a cancelation email to signees when the signing process is canceled from within SmartSimple. The process may be canceled from within Smartsimple via the E-signature Queue or the workflow task of E-Signature Cancellation. You can see the new setting called Send Cancellation Email to Signers by navigating to Global Settings > Integrations > Integration Key Management > Edit an Adobe Acrobat Sign setting.
Added Improvements to Consumer Creation buttons
You can now easily disable the consumer creation buttons based on Owner, Person, Branch, and Company. You can also define a message to display to users explaining why they are not able to apply. For example, you could disable the button (button will be grayed out) if a user or organization has already applied once in order prevent users from applying to the same call multiple times.
Added New File Download Log
We added a new optional feature to track file downloads made by users, making it easier to see which users are downloading large amounts of files. You may review the number of files downloaded per user based on a date range or you may create a report to see which specific files were downloaded and by whom. To enable this feature navigate to Menu Icon > Global Settings > Toggle on Enable File Download Tracking. Then click the File Download Log link under System Information. When building a report, choose the data set called File Downloads.
Added Ability to Specify IP Ranges for Bypassing Secure Session Validation
You can now specify a range of IP addresses that will allow users to bypass secure session validation. This setting is located at Menu Icon > Global Settings > Security tab > IP addresses to bypass secure session validation. To enter a range of IP addresses, use a dash (Example: 65.93.203.0-65.93.203.255). To enter IP addresses that follow a certain pattern, use an asterisk (Example: 126.12.*.*).
Notes for Admins
Added Enhanced Security Options for Single Sign-On
You may now pick an encryption certificate for service provider initiated single sign-on (SSO) and the certificate will be displayed in the Service Provider (SP) Metadata. If enabled, incoming assertions will be decrypted using the selected certificate. If you opt to use this feature, you will be required to upload the identity provider (IdP) encryption certificate to Integration Key Management and select the certificate in your SSO setting. This will be used to decrypt incoming assertion.
To see the new settings, navigate to Menu Icon > Global Settings > Integrations tab > Single Sign-On > Edit a configuration > Under Third-Party Identity Provider, select "Service Provider (SP) initiated" for Method.
Added Ability to Report on Data Exchange History
You can now report on the Data Exchange History, making it easier to report on details around package exchanges. Within the Report Builder you can choose the new dataset option called Data Exchange History and add columns for related details such as when the package was sent and received and what the status of the package is.
Updated API to Allow Update and Get/List for Profile Model Field Data
We updated the API to allow update and get/list for Profile Model field data. When updating sf_Profile Model, data should be a jsonobject where the "node" is the profilemodel jsonnode name. This is an example of how to update the Profile Model:
[{"recordid":"87983424","sf_Phone":"416 123 4567", "sf_Profile Model":{"node":"mytest","dataobj":{"1":"one","2":"two","3":"three"}}}]
Updated Question Set Builder Fields to Resolve ID Mismatch Issues
If you have multiple environments and promote changes from development to staging to a live environment using the T2P tool, you will no longer encounter the ID mismatch issue related to the Question Set Builder when moving fields between environments.
