Enabling User Access
Contents
Enabling User Access
If you wish a user to log into SmartSimple you need to enable the login feature.
1. Click the Settings, Roles & Access menu.
There are three access types available:
- Administrative or Portal Interface - Provides access to the system to the extent permitted through the user's membership of specific roles.
- User Centric or Applicant Interface – Only provides access through the User Centric Interface and Applicant Tracking “career sites”.
- No Access – Contact cannot log into the system.
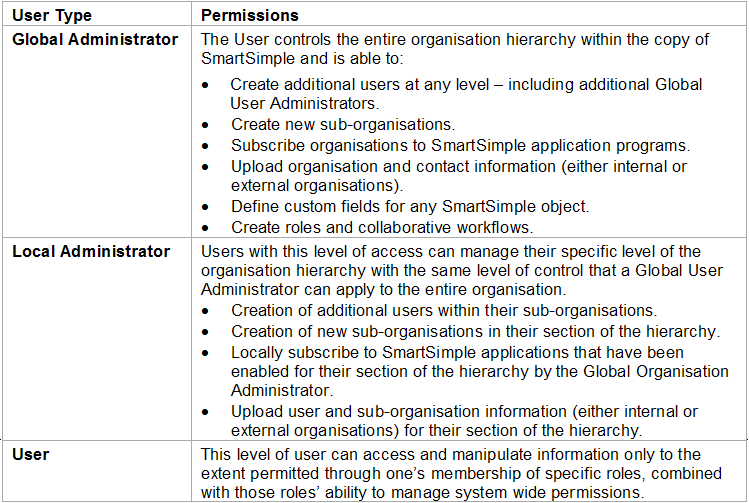
Administrator User Types
The user type fields control the administrative level of access.
The user type field can be set to one of three types:
Setting Login Restrictions
You can restrict a user’s access to a specific workstation by setting the IP address of the workstation in their profile, or alternatively “lock” the user to the next workstation that they use to log into the system.
Setting an Expiry Date
If you only wish a person to have access to the system for a specific period, you can set the expire flag and date the user will no longer be able to access the system.
Setting or Sending a User’s Password
Once you have enabled the user’s access, you have the option to either set a new password or send a new password.
- You can reset a user’s password by clicking the Set Password button in the user profile.
- You can click the Send Password button on the user window. This option will generate and send a new password to the user’s email address.
You will need to use the Send Password feature:
When you first create the user and set the Login status to enable, then the email message will be sent immediately.
If you attempt to enable a user but do not have sufficient licenses, a warning message will be displayed.
You can fix this problem by going to the Configuration, Global Settings, and Licensing tab and increase the number of licenses.
Setting the Access Level
You will now enable this user’s access level.
1. Set the Access Type to Administrative or Portal Interface.
2. Click the Set Password button.
The Set Password window is displayed.
3. Set the password to something you will remember.
4. Click the Submit button.
5. Click the Close button.
In theory, the user could now log into the system, but as you have not set any menu permissions they would not have any access to any features or even the menu.
