Difference between revisions of "List View Overview"
| Line 12: | Line 12: | ||
[[Image:Uta67.png]] | [[Image:Uta67.png]] | ||
| − | + | * ''Standard Fields'' are listed at the top of the list, followed by [[Custom Field]]s. | |
| − | |||
| − | |||
* The '''# field''' displayed at the top of the list will display a record counter for the items displayed. | * The '''# field''' displayed at the top of the list will display a record counter for the items displayed. | ||
* Click the check box to the left of each field name to include that field in the '''List View'''. | * Click the check box to the left of each field name to include that field in the '''List View'''. | ||
Revision as of 10:48, 15 May 2009
The List View allows you to define which Standard and Custom Fields are displayed when viewing a list of records. You can also define the sequence in which the records are displayed.
- Within the Universal Tracking Application you can define the list view for Level 1, Level 2 and Level 3 as well as the Level 1 Accounts and/or Contacts sections on the Settings page.
- Within most other Applications you can set the List View via the Settings page.
- When viewing the list of Contacts you can set the List View by clicking on the Edit View tab:
Defining a List View
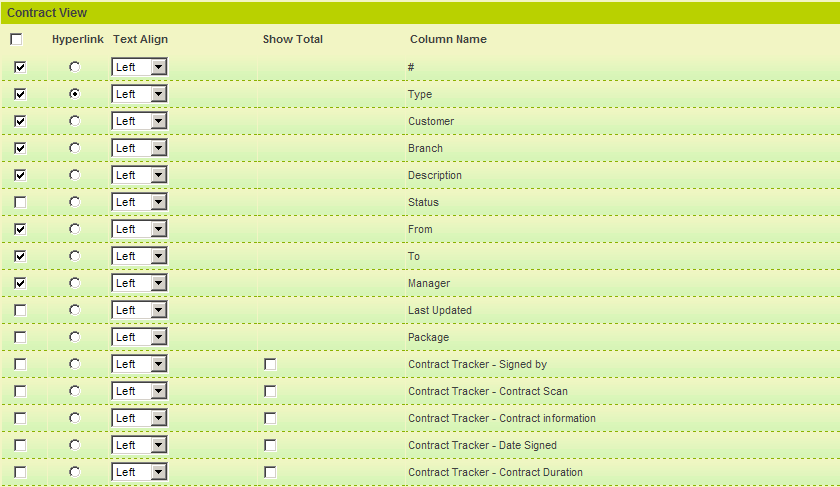
Click into any List View shortcut to display the list of fields available:
- Standard Fields are listed at the top of the list, followed by Custom Fields.
- The # field displayed at the top of the list will display a record counter for the items displayed.
- Click the check box to the left of each field name to include that field in the List View.
- Click the Hyperlink button to designate a single field that will provide a drill-down to the associated record.
- Text Align defines if the data should be left, centred or right aligned in the column.
- For numeric fields, you can display a total at the bottom of each page by clicking the Show Total check box.
- The Total displayed at the bottom of the column will have the same formatting (example: #.##) as specified in the Custom Field that is being totalled. If no formatting is specified, the total will be to 1 decimal place.
Once you save the field list you can set the Display order.
The Set Order and Template buttons are now displayed at the bottom of the page.
Setting the Field Order
Once you have selected the fields to be displayed, you can reorder the fields in the list view and if required create a formatting template specifically for this list view.
1. Click the Set Order button.
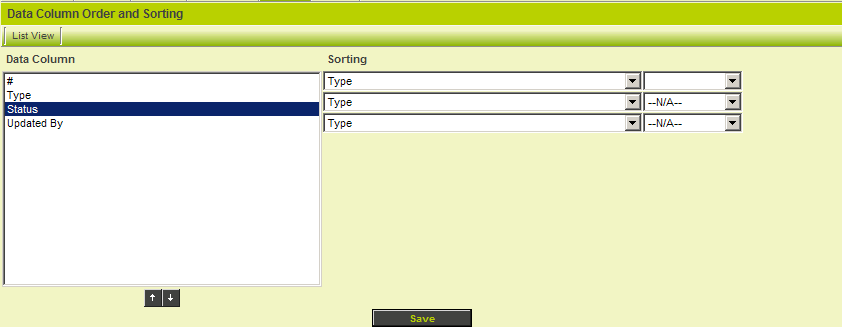
The Data Column Order and Sorting window is displayed.
To change the Display order:
- Click on the required field in the left panel.
- Use the Up and Down arrows to move the field.
- Once complete, click the Save button.
To change the Sort order:
- Choose the first field you wish to order by in the right field combo box.
- Select Ascending or Descending in the Order combo box.
- If required repeat this process for a second and third field.
Setting the Activity List Order
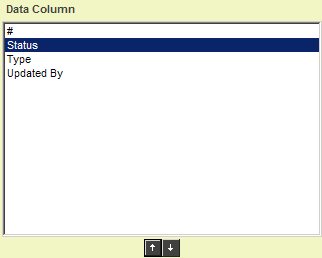
1. Reorder the fields as shown below:
2. Set the Sort order as shown below:
The activity list will be sorted ascending based on the status.
3. Click the Save button.
4. Click the Activities tab.
The list view for the Level 1 item is displayed.
No items are displayed as you have not added any items yet.


