Difference between revisions of "Custom Lookup Options"
Ann Vincent (talk | contribs) m |
Ann Vincent (talk | contribs) m |
||
| Line 42: | Line 42: | ||
[[File:2021-07-ticket-124709-6.png|thumb|none|800px]] | [[File:2021-07-ticket-124709-6.png|thumb|none|800px]] | ||
| − | Based on the expanded Lookup Value data, | + | Based on the expanded '''Lookup Value''' data, we can see that this specific row contains the values for our table columns "Course ID", "University", and "Course". |
Revision as of 11:09, 30 June 2021
Overview
The Custom Lookup Options is a feature that allows you to import custom datasets for lookups and validation based on client-specific needs. For example, you can upload a CSV file whose data can be used as options within a select-type custom field such as Select One – Dropdown, Select One - Radio Button, or Lookup - Autocomplete Options.
Custom lookups can be used to provide large selection sets for your users, such as item inventory codes, code dictionaries, or geographic lookups. You can also easily setup dynamic sub-filtering conditions across multiple fields. For example, you could set up parent and child fields for selecting the country, university, faculty, and courses where the available options for each subsequent field is dependent upon the value of a previous field. This new functionality is advantageous since you don't need any of the data to exist as records in your system (as with the current Enable Dynamic Content option within a custom field) and it will be easier to update the options by importing them rather than editing large amounts of text in the custom field Edit screen.
This article will show you how to import a custom lookup, update a lookup, and the various ways it can later be referenced and used on your instance. You will need to be a Global Administrator to access these settings.
Configuration - Essentials
As an example, let's upload a custom lookup CSV containing university and course information. A sample of this CSV data can be found at the end of this article for reference.
Importing a New Custom Lookup
- Navigate to Global Settings > Custom Lookup Options and click on the Import Custom Lookup Options button represented by an import icon.
- You will now access step 1 one of the Custom Lookup Options Import wizard. Upload a CSV containing your custom data. The first row of the CSV must include column headers. A sample CSV is provided under the Settings Explained section below.
- Give your custom lookup a descriptive name under Lookup Name that will help you remember what it is for. For our example, we will call our lookup "UniversityCourseLookup".
- Select one of the columns for the Lookup Key. The lookup key is a non-unique identifier that is associated with one or more records in the table. In our example, our lookup key is the "University ID" because this number corresponds to the different universities in our dataset.
- The Primary Key is optional. A primary key is a unique identifier that corresponds to a single record in our table. For our example, the primary key is "Course ID" because each row in the table has a uniquely different Course ID that distinguishes it from every other row. Click Next to continue.
- Check over the sample of the uploaded data to ensure it has been processed as intended. Toggle which columns you want to include in the final import. Click Next to proceed.
- The last step will let you review the final changes. Click Next to complete the import process.
Updating an Existing Custom Lookup
- To update an existing custom lookup, import the updated file and be sure to type out the exact name of the lookup you want to update in the Lookup Name field. Specify the lookup key and any primary key needed. Click Next to continue.
- You will see a warning that notifies you that an existing lookup with the same name already exists. All existing records for that lookup will be deleted and re-imported with the new updated data. Click Next to continue and click Yes on the alert pop-up.
- Click Next to finish the import.
Viewing Custom Lookup Data
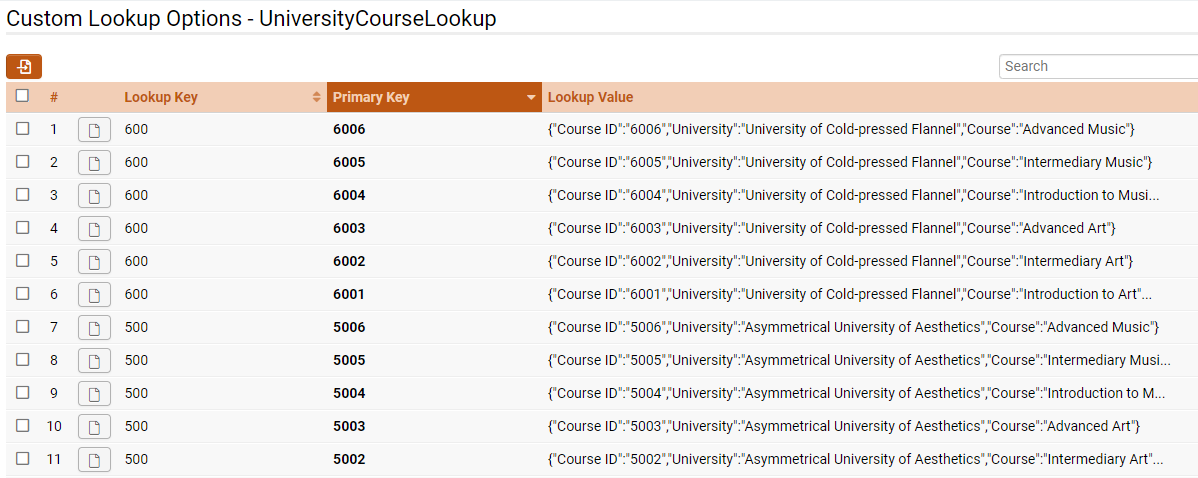
To view the data of any custom lookup, navigate to Global Settings > Custom Lookup Options to see a list of imported lookups. Click the name of the lookup you want to see in more detail. This will allow you to see the uploaded data in a list view format organized by the Lookup Key.
The list of values under Lookup Value form an attribute-value pair of column values for the specified row. To see this data in more detail, click the icon on the far left marked Open on any row.
Based on the expanded Lookup Value data, we can see that this specific row contains the values for our table columns "Course ID", "University", and "Course".
Configuration - Advanced
Setting up Dynamic Dropdown Lists
Custom lookups can be incorporated into dynamic dropdown lists using the parent and child relationship between data. After uploading a CSV for your custom data, you can set up a series of parent and child dropdown lists that can further filter user options based on previous selections.
Parent Dropdowns
To set up a parent dropdown list, create a custom field of type Select One - Dropdown List. In the Pre-Defined Options field, map your dropdown options to the lookup keys you chose for your custom lookup. For example, a custom lookup for course registration may have a lookup key that uses 100 to denote freshman courses, 200 to denote sophomore courses, etc. When the user selects a course year from the parent dropdown, their options for the child dropdown will be filtered.
Child Dropdowns
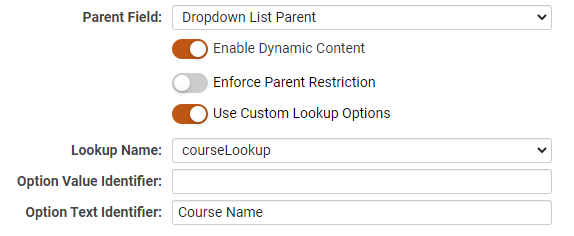
To set up a child dropdown list, create a custom field of type Select One - Dropdown List and set the Parent Field to the parent dropdown list created above. Toggle on Enable Dynamic Content. This will expose the toggle Use Custom Lookup Options. When you toggle this on, you see additional settings to specify the lookup. Under Lookup Name, select the desired custom lookup you imported. Under Option Text Identifier, type the name of the column whose data you want to display in the child dropdown. In this example, we want to show the course name.
Dropdown Relationship
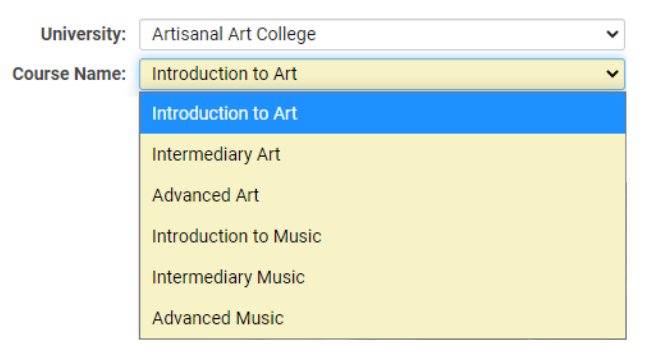
The options within the child dropdown should now change depending on the selections made in the parent dropdown.
Settings Explained
Import Settings
| Option | Description |
|---|---|
| Lookup Name | The Lookup Name is used to identify the set of lookup options. If you want to update an existing custom lookup, ensure the Lookup Name is the same as the existing custom lookup. |
| Lookup Key | The Lookup Key is a non-unique identifier used to return all records with a matching Lookup Name. |
| Primary Key | (Optional) The Primary Key is an optional unique key used to return a single record that matches the Lookup Name and Primary Key value. Records without a matching Primary Key will be imported as new records. |
Dropdown Settings
| Option | Description |
|---|---|
| Option Text Identifier | The name of the column header from your custom dataset whose values you want to display in the dropdown. |
| Option Value Identifier | (Optional) |
Sample CSV
University ID,Course ID,University,Course
0,0,--- Please Select ---,--- Please Select ---
100,1001,Totally Totes College,Introduction to Art
100,1002,Totally Totes College,Intermediary Art
100,1003,Totally Totes College,Advanced Art
100,1004,Totally Totes College,Introduction to Music
100,1005,Totally Totes College,Intermediary Music
100,1006,Totally Totes College,Advanced Music
200,2001,Obviously OBVI College,Introduction to Art
200,2002,Obviously OBVI College,Intermediary Art
200,2003,Obviously OBVI College,Advanced Art
200,2004,Obviously OBVI College,Introduction to Music
200,2005,Obviously OBVI College,Intermediary Music
200,2006,Obviously OBVI College,Advanced Music
300,3001,Artisanal Art College,Introduction to Art
300,3002,Artisanal Art College,Intermediary Art
300,3003,Artisanal Art College,Advanced Art
300,3004,Artisanal Art College,Introduction to Music
300,3005,Artisanal Art College,Intermediary Music
300,3006,Artisanal Art College,Advanced Music
400,4001,Coffee for Me University,Introduction to Art
400,4002,Coffee for Me University,Intermediary Art
400,4003,Coffee for Me University,Advanced Art
400,4004,Coffee for Me University,Introduction to Music
400,4005,Coffee for Me University,Intermediary Music
400,4006,Coffee for Me University,Advanced Music
500,5001,Asymmetrical University of Aesthetics,Introduction to Art
500,5002,Asymmetrical University of Aesthetics,Intermediary Art
500,5003,Asymmetrical University of Aesthetics,Advanced Art
500,5004,Asymmetrical University of Aesthetics,Introduction to Music
500,5005,Asymmetrical University of Aesthetics,Intermediary Music
500,5006,Asymmetrical University of Aesthetics,Advanced Music
600,6001,University of Cold-pressed Flannel,Introduction to Art
600,6002,University of Cold-pressed Flannel,Intermediary Art
600,6003,University of Cold-pressed Flannel,Advanced Art
600,6004,University of Cold-pressed Flannel,Introduction to Music
600,6005,University of Cold-pressed Flannel,Intermediary Music
600,6006,University of Cold-pressed Flannel,Advanced Music


