Difference between revisions of "Stripe Payment Processor"
(→Configure the Stripe Payment form) |
(→Configuring Stripe Payment) |
||
| Line 2: | Line 2: | ||
=Configuring Stripe Payment= | =Configuring Stripe Payment= | ||
| + | The configuration process involves the following steps: | ||
| − | + | * Configure the Stripe Payment Form | |
| − | * Configure the Stripe Payment | + | * Create Custom field for Stripe |
| − | * Create Custom field for Stripe | ||
==Configure the Stripe Payment form== | ==Configure the Stripe Payment form== | ||
| + | * Go to the Settings - '''Connectivity''' tab for the relevant UTA. | ||
| + | * Click on the '''Payment Forms''' settings link. You are presented with a list of all configured Payment Forms. | ||
| + | * Click on the '''New Payment Form''' button. | ||
| + | * You will be presented with the '''New Payment Form''' screen. | ||
| − | + | [[Image:Stripe1.png|900px|border]] | |
| − | |||
| − | |||
| − | |||
| − | |||
| − | [[Image:Stripe1.png|border | ||
* The fields in the form are as follows: | * The fields in the form are as follows: | ||
| − | **Name: name that will appear on the resulting Payment Form page | + | ** Name: name that will appear on the resulting Payment Form page |
| − | **Description: description that will appear on the resulting Payment Form page | + | ** Description: description that will appear on the resulting Payment Form page |
| − | **Product Name: name of the service the user is paying for | + | ** Product Name: name of the service the user is paying for |
| − | **Product Description: description of the service the user is paying for | + | ** Product Description: description of the service the user is paying for |
| − | **Stripe Public Key: public key used for Stripe services, obtained from your company's stripe account | + | ** Stripe Public Key: public key used for Stripe services, obtained from your company's stripe account |
| − | **Stripe Private Key: private key used for Stripe services, obtained from your company's stripe account | + | ** Stripe Private Key: private key used for Stripe services, obtained from your company's stripe account |
| − | **Template: html template of the payment form page. You can use default template. | + | ** Template: html template of the payment form page. You can use default template. |
| − | **Confirmation Page Template: html template of the payment confirmation page. You can use default template. | + | ** Confirmation Page Template: html template of the payment confirmation page. You can use default template. |
| − | **Receipt Default Type: the type of the level 3 | + | ** Receipt Default Type: the type of the level 3 created after stripe payment is finished |
| − | **Receipt Default Status: the status of the level 3 | + | ** Receipt Default Status: the status of the level 3 created after stripe payment is finished |
| − | **Invoice Amount Field: field on the level 2 record where the payment amount will be auto populated from | + | ** Invoice Amount Field: field on the level 2 record where the payment amount will be auto populated from |
| − | **Receipt Amount Field: field on the level 3 where the payment amount be stored | + | ** Receipt Amount Field: field on the level 3 where the payment amount be stored |
| − | **Invoice Partially Paid Status: status applied to the level 2 | + | ** Invoice Partially Paid Status: status applied to the level 2 f the receipt is not for the full amount |
| − | **Invoice Fully Paid Status: status applied to the level 2 if the receipt is for the full amount | + | ** Invoice Fully Paid Status: status applied to the level 2 if the receipt is for the full amount |
| − | **Currency: currency used for the payment | + | ** Currency: currency used for the payment |
| − | **Protect Amount Field: If enabled, the amount field in the payment form will display as read only in currency format | + | ** Protect Amount Field: If enabled, the amount field in the payment form will display as read only in currency format |
| − | * Click Save when the fields have been populated. | + | * Click '''Save''' when the fields have been populated. |
| − | * Return to the list of all configured Payment Forms. The new form should be listed. | + | * Return to the list of all configured Payment Forms. The new form should be listed. |
* Make a note of the Form ID. | * Make a note of the Form ID. | ||
| − | [[Image:Stripe2.png|border | + | [[Image:Stripe2.png|900px|border]] |
| − | |||
| − | |||
| − | The custom field for the Stripe payment should ideally be created as a [[Custom Fields|Custom Field]] on the level 2 record. | + | ==Create Custom field for Stripe== |
| + | The custom field for the Stripe payment should ideally be created as a [[Custom Fields|Custom Field]] on the level 2 record. | ||
| − | The field should be a [[Custom Field Type: Special – Browser Script|Browser script]] with a Trigger Type of '''On Demand''' and the Button field populated appropriately. | + | The field should be a [[Custom Field Type: Special – Browser Script|Browser script]] with a Trigger Type of '''On Demand''' and the Button field populated appropriately. |
| − | The Javascript should be populated with the text below, but with the FORMID value replaced with the Form ID of the relevant Payment Form. | + | The Javascript should be populated with the text below, but with the FORMID value replaced with the Form ID of the relevant Payment Form. |
| − | <pre> | + | <pre>var new_window; |
| − | var new_window; | ||
new_window = window.open('/billing/bc_stripepayment.jsp?token=@pay_encoded_token@&payform=FORMID','Pay Stripe', | new_window = window.open('/billing/bc_stripepayment.jsp?token=@pay_encoded_token@&payform=FORMID','Pay Stripe', | ||
'menubar=no,scrollbars=yes,width=400,height=300,status=no,resizable=yes,top=200,left=200,dependent=yes,alwaysRaised=yes'); | 'menubar=no,scrollbars=yes,width=400,height=300,status=no,resizable=yes,top=200,left=200,dependent=yes,alwaysRaised=yes'); | ||
| Line 59: | Line 56: | ||
</pre> | </pre> | ||
| − | When you then access the relevant level 2 record you should see the field and associated button. | + | When you then access the relevant level 2 record you should see the field and associated button. |
| − | When the button is clicked then the Payment Form should launch, with the option to enter an amount value and to then click to "Pay with Card". | + | When the button is clicked then the Payment Form should launch, with the option to enter an amount value and to then click to "Pay with Card". |
| − | When the "Pay with Card" button is clicked then screen launches to permit secure entry of payment details. | + | When the "Pay with Card" button is clicked then screen launches to permit secure entry of payment details. |
| − | [[Image:Stripe3.png|border | + | [[Image:Stripe3.png|200px|border]] |
[[Category:Integration]] [[Category:External Services]] [[Category:Payments]] | [[Category:Integration]] [[Category:External Services]] [[Category:Payments]] | ||
Latest revision as of 10:37, 13 June 2024
Stripe is a scalable, secure, and flexible online e-payment application. The Stripe integration enables the processing of payments without the need for complex payment gateways, merchant accounts or PCI (Payment Card Industry) compliance. This integration is ideal for clients who have online payment requirements.
Configuring Stripe Payment
The configuration process involves the following steps:
- Configure the Stripe Payment Form
- Create Custom field for Stripe
Configure the Stripe Payment form
- Go to the Settings - Connectivity tab for the relevant UTA.
- Click on the Payment Forms settings link. You are presented with a list of all configured Payment Forms.
- Click on the New Payment Form button.
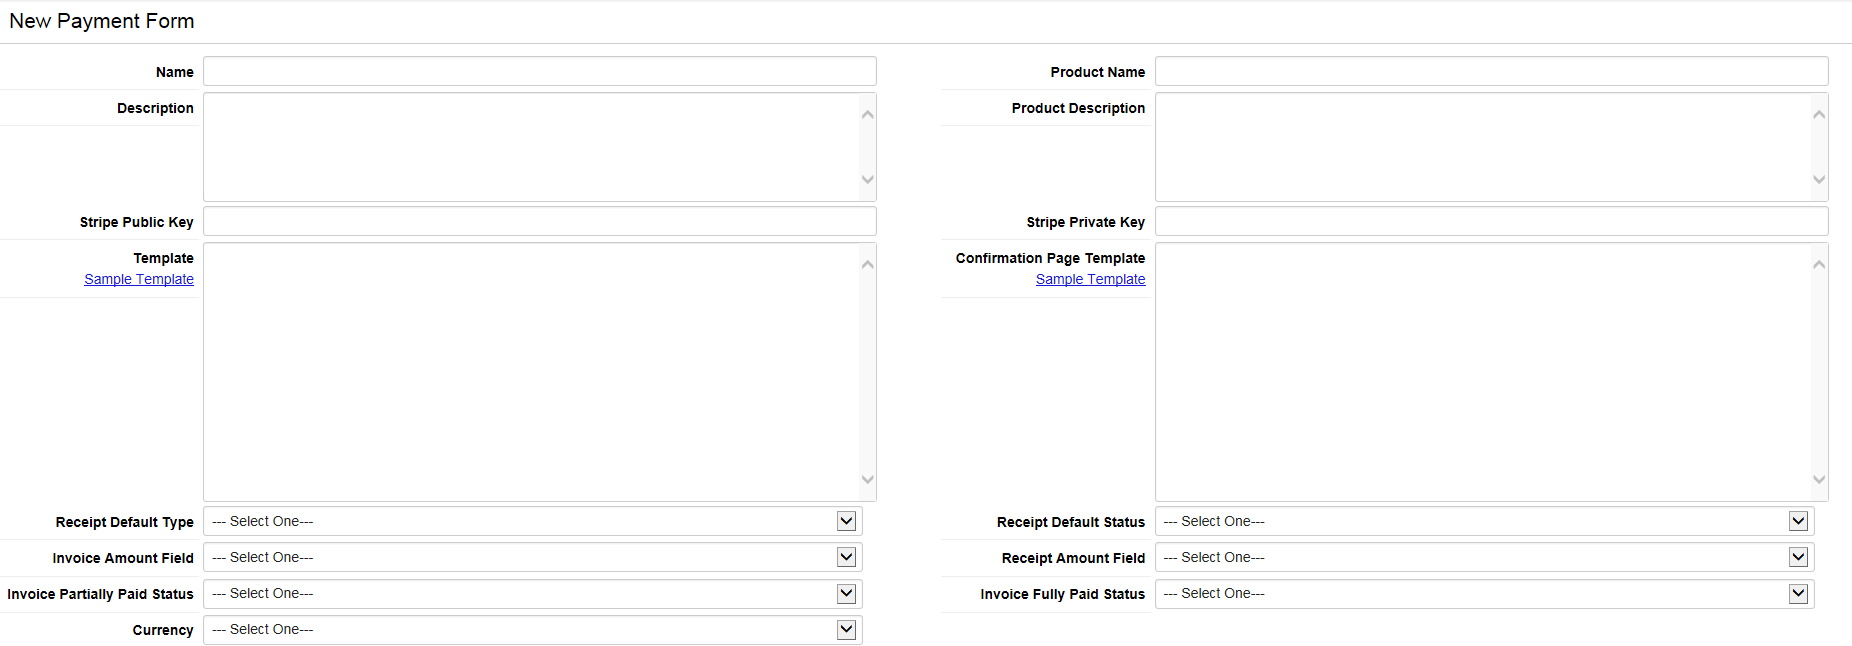
- You will be presented with the New Payment Form screen.
- The fields in the form are as follows:
- Name: name that will appear on the resulting Payment Form page
- Description: description that will appear on the resulting Payment Form page
- Product Name: name of the service the user is paying for
- Product Description: description of the service the user is paying for
- Stripe Public Key: public key used for Stripe services, obtained from your company's stripe account
- Stripe Private Key: private key used for Stripe services, obtained from your company's stripe account
- Template: html template of the payment form page. You can use default template.
- Confirmation Page Template: html template of the payment confirmation page. You can use default template.
- Receipt Default Type: the type of the level 3 created after stripe payment is finished
- Receipt Default Status: the status of the level 3 created after stripe payment is finished
- Invoice Amount Field: field on the level 2 record where the payment amount will be auto populated from
- Receipt Amount Field: field on the level 3 where the payment amount be stored
- Invoice Partially Paid Status: status applied to the level 2 f the receipt is not for the full amount
- Invoice Fully Paid Status: status applied to the level 2 if the receipt is for the full amount
- Currency: currency used for the payment
- Protect Amount Field: If enabled, the amount field in the payment form will display as read only in currency format
- Click Save when the fields have been populated.
- Return to the list of all configured Payment Forms. The new form should be listed.
- Make a note of the Form ID.
Create Custom field for Stripe
The custom field for the Stripe payment should ideally be created as a Custom Field on the level 2 record.
The field should be a Browser script with a Trigger Type of On Demand and the Button field populated appropriately.
The Javascript should be populated with the text below, but with the FORMID value replaced with the Form ID of the relevant Payment Form.
var new_window;
new_window = window.open('/billing/bc_stripepayment.jsp?token=@pay_encoded_token@&payform=FORMID','Pay Stripe',
'menubar=no,scrollbars=yes,width=400,height=300,status=no,resizable=yes,top=200,left=200,dependent=yes,alwaysRaised=yes');
new_window .opener = window;
new_window .focus();
When you then access the relevant level 2 record you should see the field and associated button.
When the button is clicked then the Payment Form should launch, with the option to enter an amount value and to then click to "Pay with Card".
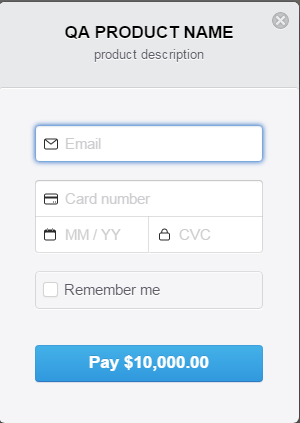
When the "Pay with Card" button is clicked then screen launches to permit secure entry of payment details.


