Difference between revisions of "Working with Resumes"
Julia Decker (talk | contribs) |
(deprecating) |
||
| (7 intermediate revisions by 4 users not shown) | |||
| Line 1: | Line 1: | ||
| − | + | {{Deprecated}} | |
| − | [[ | + | <!-- |
| + | '''[http://www.smartsimple.com/DotOrg/flash/Working_with_Resumes_viewlet_swf.html View It Here]''' | ||
| + | --> | ||
| + | ==Using the Resume Upload Functions of SmartDoc== | ||
| + | |||
| + | The [[SmartDoc for Microsoft Word Overview|SmartDoc for Microsoft Word]] Resume feature allows you to turn Microsoft Word resumes into [[SmartSimple]] Applicant profiles quickly and easily. | ||
| + | |||
| + | From within a Microsoft Word document, you can: | ||
| + | * Automatically search the resume to obtain the applicant’s details. | ||
| + | * Automatically extract the applicant's skills from the resume. | ||
| + | * Instantly check to see if the applicant exists within [[SmartSimple]]. | ||
| + | * Upload and attach the resume to the applicant profile. | ||
| + | * Optionally provide the applicant with access through your company career site. | ||
| + | * Update an existing applicant profile with new information from an updated resume. | ||
| + | |||
| + | ==Importing a Resume== | ||
| + | |||
| + | The following steps describe the typical use of [[SmartDoc for Microsoft Word Overview|SmartDoc]] for resume processing: | ||
| + | |||
| + | 1. Open a '''Resume''' document. | ||
| + | |||
| + | 2. Click the '''Display SmartResume''' button. | ||
| + | |||
| + | [[Image:Resume.png]] | ||
| + | |||
| + | The '''SmartDoc Applicant Profile''' window is displayed: | ||
| + | |||
| + | [[Image:Resume1.png]] | ||
| + | |||
| + | The name and address fields will be extracted from the resume. The first time you use the feature you need to set the following fields: | ||
| + | * '''Resume Upload''' – Upload as '''Original''' or '''Upload as Modified'''. If you are working in a placement agency setting you may be working with a resume watermarked with the agency name. | ||
| + | * '''Store as''' – [[Role]] should be set the specific applicant [[Role|role]] and '''Folder''' should be set the specific applicant folder. You can only set a [[Role|role]] and folder that you are permissioned to use. The system will store both the [[Role|role]] and folder and use these setting until you change them in the future. | ||
| + | * '''Access''' – Set to '''yes''' to provide the applicant with access to the system via a career site and no to disable access. The [[User|user]] will not be provided with a [[Password|password]] but can request one from the career site. | ||
| + | |||
| + | 3. Click the '''Process Profile''' button. | ||
| + | |||
| + | [[Image:Resume2.png]] | ||
| + | |||
| + | * [[SmartDoc for Microsoft Word Overview|SmartDoc]] has automatically extracted the name and address, email and phone number and applicant's skills from the resume. | ||
| + | * Your organization’s specific skills are searched against the resume and listed in the '''Skills''' window. | ||
| + | * The default years of experience for each skill is one year, until you select another unit of time. | ||
| + | |||
| + | ==Editing Skills== | ||
| + | |||
| + | Once the resume has been processed you can view each skill, edit the number of years of experience for that skill or delete the skill. | ||
| + | |||
| + | 1. Double click any skill. | ||
| + | |||
| + | The [[SmartDoc for Microsoft Word Overview|SmartDoc]] Applicant Skills window is displayed. | ||
| + | |||
| + | [[Image:Resume3.png]] | ||
| + | |||
| + | 2. Click in the years of experience to change this value. | ||
| + | |||
| + | [[Image:Resume4.png]] | ||
| + | |||
| + | To remove a skill - click the '''Remove''' button. | ||
| + | |||
| + | [[Image:Resume5.png]] | ||
| + | |||
| + | ==Setting Custom Fields== | ||
| + | |||
| + | If there are any [[Custom Fields|custom fields]] associated with an applicant, these are set by clicking the [[Custom Field|custom field]] name and setting the content. | ||
| + | |||
| + | ==Setting the Folder Location and the Role== | ||
| + | |||
| + | Be sure to set the folder to store the applicant information and the [[Role|role]] you wish to assign to the applicant. | ||
| + | |||
| + | Note: if you have a [[Role|role]] that is not capable of setting any other [[Role|roles]], then the [[Role|role]] list will be blank and you will not be able to upload the applicant profile. | ||
| + | * If you have different [[Role|roles]] for applicants – contractors, full time, etc, you can establish [[Role|roles]] in [[SmartSimple]] to track these "types" of applicants. | ||
| + | * The folder determines where the applicant will be stored in [[SmartSimple]]. | ||
| + | |||
| + | ==Uploading an Applicant Profile== | ||
| + | |||
| + | You are now ready to upload the applicant information to [[SmartSimple]]. | ||
| + | * The applicant details will be created or updated from the current information. | ||
| + | * The applicant skill profile will be created or updated based on the skills listed in your skill list. | ||
| + | * The '''Word''' document resume is attached to the applicant profile. | ||
| + | * A plain text version of the '''Word''' document resume will be stored in the '''applicant details – resume''' tab. | ||
| + | |||
| + | 1. Click the '''Upload Profile''' button. | ||
| + | |||
| + | The applicant information is created or updated and an applicant reference number is displayed. This reference number also happens to be the '''user id''' of the user record created. | ||
| + | |||
| + | [[Image:Resume6.png]] | ||
Latest revision as of 16:23, 19 October 2017
Contents
Using the Resume Upload Functions of SmartDoc
The SmartDoc for Microsoft Word Resume feature allows you to turn Microsoft Word resumes into SmartSimple Applicant profiles quickly and easily.
From within a Microsoft Word document, you can:
- Automatically search the resume to obtain the applicant’s details.
- Automatically extract the applicant's skills from the resume.
- Instantly check to see if the applicant exists within SmartSimple.
- Upload and attach the resume to the applicant profile.
- Optionally provide the applicant with access through your company career site.
- Update an existing applicant profile with new information from an updated resume.
Importing a Resume
The following steps describe the typical use of SmartDoc for resume processing:
1. Open a Resume document.
2. Click the Display SmartResume button.
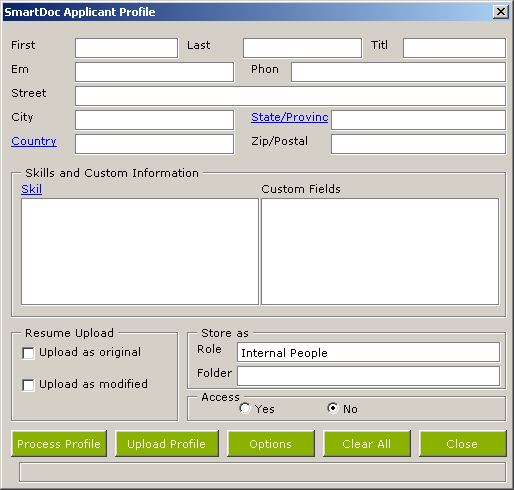
The SmartDoc Applicant Profile window is displayed:
The name and address fields will be extracted from the resume. The first time you use the feature you need to set the following fields:
- Resume Upload – Upload as Original or Upload as Modified. If you are working in a placement agency setting you may be working with a resume watermarked with the agency name.
- Store as – Role should be set the specific applicant role and Folder should be set the specific applicant folder. You can only set a role and folder that you are permissioned to use. The system will store both the role and folder and use these setting until you change them in the future.
- Access – Set to yes to provide the applicant with access to the system via a career site and no to disable access. The user will not be provided with a password but can request one from the career site.
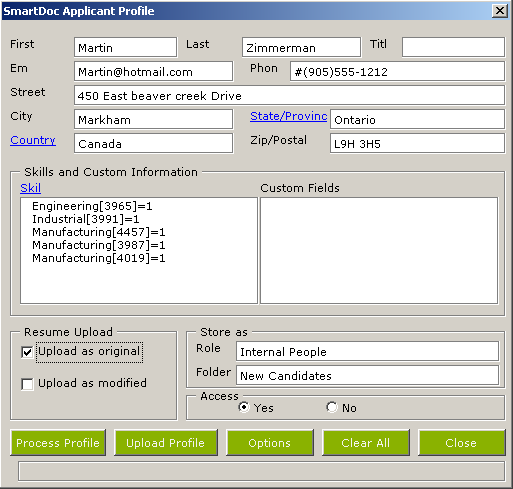
3. Click the Process Profile button.
- SmartDoc has automatically extracted the name and address, email and phone number and applicant's skills from the resume.
- Your organization’s specific skills are searched against the resume and listed in the Skills window.
- The default years of experience for each skill is one year, until you select another unit of time.
Editing Skills
Once the resume has been processed you can view each skill, edit the number of years of experience for that skill or delete the skill.
1. Double click any skill.
The SmartDoc Applicant Skills window is displayed.
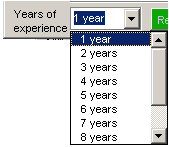
2. Click in the years of experience to change this value.
To remove a skill - click the Remove button.
Setting Custom Fields
If there are any custom fields associated with an applicant, these are set by clicking the custom field name and setting the content.
Setting the Folder Location and the Role
Be sure to set the folder to store the applicant information and the role you wish to assign to the applicant.
Note: if you have a role that is not capable of setting any other roles, then the role list will be blank and you will not be able to upload the applicant profile.
- If you have different roles for applicants – contractors, full time, etc, you can establish roles in SmartSimple to track these "types" of applicants.
- The folder determines where the applicant will be stored in SmartSimple.
Uploading an Applicant Profile
You are now ready to upload the applicant information to SmartSimple.
- The applicant details will be created or updated from the current information.
- The applicant skill profile will be created or updated based on the skills listed in your skill list.
- The Word document resume is attached to the applicant profile.
- A plain text version of the Word document resume will be stored in the applicant details – resume tab.
1. Click the Upload Profile button.
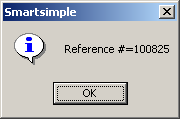
The applicant information is created or updated and an applicant reference number is displayed. This reference number also happens to be the user id of the user record created.


