Difference between revisions of "Common Workflow Tasks for Awarded / Approved Status"
Greg Stanley (talk | contribs) (→Overview) |
Morgan Liik (talk | contribs) (→Configuring A Workflow) |
||
| (78 intermediate revisions by 2 users not shown) | |||
| Line 2: | Line 2: | ||
A [Https://wiki.smartsimple.com/wiki/Workflows Workflow] is a set of repeatable steps used to automate and streamline your business processes within the system (e.g. creating review forms and notifying reviewers via email). | A [Https://wiki.smartsimple.com/wiki/Workflows Workflow] is a set of repeatable steps used to automate and streamline your business processes within the system (e.g. creating review forms and notifying reviewers via email). | ||
| − | + | ==Use case== | |
| − | |||
Once your application hits a specific status, there may be a handful of activities that need to be created or fields that need to be updated in order for the application to move to the next status. By using various workflow tasks, you can have all these tasks completed automatically, simplifying your granting process. | Once your application hits a specific status, there may be a handful of activities that need to be created or fields that need to be updated in order for the application to move to the next status. By using various workflow tasks, you can have all these tasks completed automatically, simplifying your granting process. | ||
| − | + | ===Example=== | |
| − | |||
Once an application is moved to the Approved Status - you want to create a payment activity, a few report activities, send an email to the applicant, and update the Approved Date field. | Once an application is moved to the Approved Status - you want to create a payment activity, a few report activities, send an email to the applicant, and update the Approved Date field. | ||
| Line 13: | Line 11: | ||
=Configuration - Essentials= | =Configuration - Essentials= | ||
| − | + | ==Creating a New Workflow== | |
| − | + | You can create a new workflow by clicking the plus button on the workflows home page. | |
| − | |||
| − | |||
[[File:add_new_wflow.png|thumb|none|800px|Add a new workflow]] | [[File:add_new_wflow.png|thumb|none|800px|Add a new workflow]] | ||
| − | |||
| − | |||
| − | |||
| − | |||
| − | |||
| − | |||
| − | |||
| − | |||
| − | |||
| − | |||
| − | |||
| − | |||
| − | |||
| − | |||
| − | |||
| − | |||
| − | |||
| − | |||
| − | |||
| − | |||
| − | |||
| − | |||
| − | |||
| − | |||
| − | = | + | ===Configuring A Workflow=== |
| − | = | + | :1. Select '''Workflow Type''': The type will dictate which information/fields will be available when creating tasks - You can select different UTA’s, levels, contacts, organizations etc… as your workflow type. |
| − | |||
| + | :2. Name the workflow and add it to a Category | ||
| − | + | ::* Suggested naming convention: UTA, Record Level (1/2/3) - Goal/Status | |
| + | ::: '''EX:''' Submission Manager L1 - Approved Status | ||
| + | :: | ||
| + | ::* Categories are created by your organization. We suggest creating categories based on the UTA and Record Level. | ||
| + | ::: '''EX:''' Submission Manager L1 | ||
| − | * | + | :3. Add a workflow description (optional). |
| + | :::* Include a list of tasks and branching conditions for ease of review later. | ||
| + | :::* Add notes to your workflow if you make changes to it. | ||
| + | :4. Set the '''Trigger-On''' | ||
| + | :::* The trigger dictates what status or action will initiate the workflow. | ||
| + | :::* Depending on the workflow type, you will be selecting from a list of statuses or activities. | ||
| − | + | :::* For our example, we will be triggering our workflow when a record hits the Approved status. | |
| + | [[File:Creating Approved Status Workflow- Workflow Main Set-up Page.png|thumb|none|800px|Creating Approved Status Workflow - Workflow Main Set-up Page]] | ||
| + | <span style="color: #000000;">'''Tip:'''</span> You can build a workflow on your production system first and test it on your backup the following day. Make sure to set the Trigger-On to Deactivate so the workflow won’t run. Once your workflow appears in your backup, you can set the Trigger-On to the correct trigger and test your workflow without worrying about impacting your production environment. | ||
| − | + | =Configuration - Advanced= | |
| − | + | ==Tasks== | |
| − | |||
| − | |||
| + | Navigate to the '''Task tab''' found on the left side of your screen. | ||
| − | + | [[File:Creating-Task.png|thumb|none|800px|Creating a Task]] | |
| − | |||
| − | ''' | + | ===Creating The First Task=== |
| + | # To create a new task, click on the plus sign button found on the top left corner of your screen (highlighted in image above). | ||
| + | # We suggest creating an '''Acknowledgment''' as your first task type. | ||
| + | #* Name this task '''Placeholder.''' | ||
| + | #** This task will not have a function but will indicate that a workflow has started. You will be able to see this task listed in the workflow history log on a specific record. | ||
| + | [[File:Placeholder-Task.png|thumb|none|800px|Placeholder Task]] | ||
| − | + | ===Creating The Remaining Tasks=== | |
| − | + | ====Task 2 – Create Payment Record==== | |
| − | + | :1. '''Task Name:''' Create Payment Record | |
| + | :2. '''Task Type:''' Create New Activity | ||
| − | + | :3. Select the '''activity type''' you want to create and the default status the activity should be created in. | |
| + | [[File:Create-New-Activity-Task.png|thumb|none|800px|Creating a New Activity Task]] | ||
| + | :4. Under the '''scheduling tab''' → configure the activity to meet your requirements. Not all fields listed in this section need to be configured - it will depend on the activity type. | ||
| − | * | + | :::* '''Start Date / End Date:''' Choose the date fields that will determine the start and end date of the activity scheduling period. |
| + | :::* You can set the frequency the activity is scheduled - activities will be created immediately, but the date will take the frequency into account. Note that activities will only be automatically scheduled within the time frame set above. | ||
| + | :::* Select the field from the grant application that contains the grant amount. This value will then be split equally between all payment activities being scheduled. | ||
| + | :::* You can also select the field where the amount of each payment will be stored - note that the total amount will be divided equally between all of the activities. | ||
| + | :::* Select the date field that will store the scheduled activity date. | ||
| + | [[File:Scheduling-tab.png|thumb|none|800px|Scheduling Tab]] | ||
| − | |||
| − | |||
| − | |||
| − | |||
| − | |||
| − | |||
| − | |||
| − | |||
| − | |||
| − | + | '''Note:''' If you do not see a Scheduling Tab → make sure to toggle on advanced options, found near the top right of your screen. | |
| − | + | ====Task 3 - Send Approved Receipt==== | |
| + | :1. '''Task Name: '''Send Approved Receipt | ||
| + | :2. '''Task Type''' : Acknowledgement | ||
| − | + | :3. In this case, you will be using the acknowledgment task to send an email to the applicant. You can specify who the email will be sent to under the Routing section. Select Owner if you want the email to be sent to the applicant. | |
| + | [[File:Task-routing.png|thumb|none|800px|Routing a Task]] | ||
| + | :4. You can configure the email content by navigating to the '''Message Template tab'''. | ||
| + | [[File:Message-Template-Tab.png|thumb|none|800px|Message Tab]] | ||
| − | + | :5. Here you can specify: | |
| − | * | + | :::* Message type (instant message or email). |
| + | :::* Email template (can create from scratch or choose an existing template). | ||
| + | :::* Add a subject to the email template. | ||
| + | :::* We always suggest saving your email as an event. This will store the email as an event on the user profile. | ||
| − | : | + | :6. You can also add attachments to the email template here. |
| − | |||
| − | |||
| − | |||
| − | |||
| − | |||
| − | : | + | :::* To do so you will need to reference a custom field where a document is stored. The format used to reference the field is '''@#Custom Field ID#@''' |
| − | : | + | :::* You can attach multiple documents. They will need to be delimited by semicolons. |
| − | |||
| + | :7. You can use the Variable Syntax helper (found in the configuration mode shortcuts list) to test your email template against a record. | ||
| − | + | :::* Copy the email template and paste it into the helper. This will allow you to confirm that you are populating the correct information in your email template. | |
| − | + | [[File:Creating Approves Status Workflow - Attaching Files to Email.png|thumb|none|800px|Attach a file to an email]] | |
| − | + | ====Task 4 - Create Progress Report==== | |
| + | :1. '''Task Name: '''Create Progress Report | ||
| − | + | :2. '''Task Type:''' Create New Activity | |
| + | :3. Select Progress Report from the activity drop-down and specify the configuration for the new activity under the Scheduling tab (visual example shown in Task 2). | ||
| − | + | ====Task 5 - Create Final Report==== | |
| + | :1. '''Task Name:''' Create Final Report | ||
| − | + | :2. '''Task Type:''' Create New Activity | |
| − | + | :3. Select the Final Report from the activity drop-down. | |
| − | + | :4. In this case you only want to generate a single Final Report, so you will not need to configure any fields under the scheduling tab. | |
| − | |||
| + | ====Task 6- Create Contract==== | ||
| + | :1. '''Task Name:''' Create Contract | ||
| − | '''Task | + | :2. '''Task Type: '''Create New Activity |
| − | + | :3. In this case you only want to generate a single Contract, so you will not need to configure any fields under the scheduling tab. | |
| − | + | :4. You can also generate a contract through the '''Generate PDF task''' - but you will not be able to alter the document once the PDF is created. By creating a contract activity, you are able to make adjustments to the contract's content. | |
| − | |||
| − | : | + | ====Task 7 - Update Approved Date==== |
| − | '''Task | + | :1. '''Task Name:''' Update Approved Date |
| − | + | :2. '''Task Type: '''Update Custom Field Value | |
| − | + | :3. '''Select the field you want to update: '''Date Approved | |
| − | + | :4. You can then enter the updated field value below. | |
| − | * | + | :::*If you want to update the field to the current date - enter the following variable - '''@date(currentdate)@''' |
| − | + | [[File:Update-custom-field-task.png|thumb|none|800px|Update Custom Field Task]] | |
| − | + | ==Connectors== | |
| − | |||
| − | |||
| − | = | ||
Now that you have created all of your workflow tasks, you will need to connect them. This can be done by creating Connectors. Workflows will only run tasks if they have been connected together and have applicable conditions to the current record. | Now that you have created all of your workflow tasks, you will need to connect them. This can be done by creating Connectors. Workflows will only run tasks if they have been connected together and have applicable conditions to the current record. | ||
| + | ===Creating your First Connector=== | ||
| + | : 1. Click the New button on the first row of your workflow tasks. | ||
| + | [[File:Create-new-connector.png|thumb|none|800px|Create a new connector]] | ||
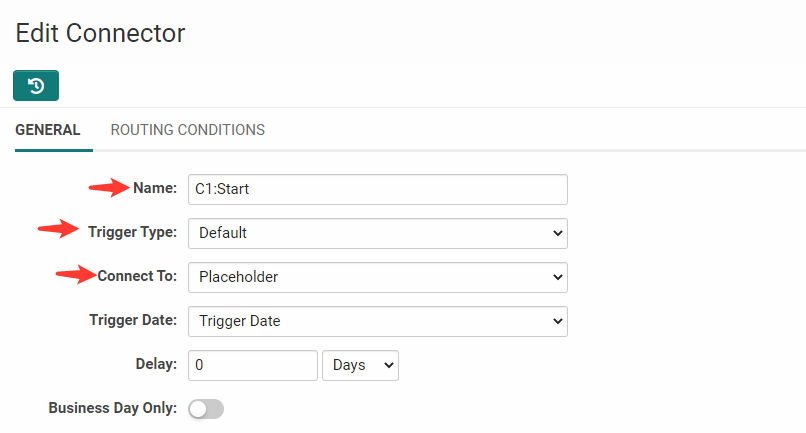
| + | : 2. You can leave the Name and Trigger Type as the default for your starting connector. | ||
| + | : 3. For the Connect To option - select the task you want the workflow to start with - in this case it will be the Placeholder task. | ||
| + | :::* Typically, tasks should be created in the order they will be executed in, but they can be reordered later if need be. | ||
| + | [[File:Start-connector-config.png|thumb|none|800px|Starting connector configuration]] | ||
| − | + | ===Branching Connectors=== | |
| − | |||
| − | |||
| − | |||
| − | |||
| − | |||
| − | |||
| − | |||
| − | |||
| − | |||
| − | |||
| − | |||
| − | |||
| − | |||
| − | |||
Applications that have already been Approved have gone through this workflow before. To make sure a record that has already gone through this workflow does not go through all of the tasks again, you will need to create '''Branching Connectors.''' Branching connectors have specific conditions that will allow you to direct records to different tasks based on that condition. | Applications that have already been Approved have gone through this workflow before. To make sure a record that has already gone through this workflow does not go through all of the tasks again, you will need to create '''Branching Connectors.''' Branching connectors have specific conditions that will allow you to direct records to different tasks based on that condition. | ||
For this example, the condition will be whether the Approved Date field is blank or not blank. | For this example, the condition will be whether the Approved Date field is blank or not blank. | ||
| + | ====Creating Branching Connectors==== | ||
| + | : 1. Create a new connector for the placeholder task by clicking the New button beside Task 1. You will need to create as many connectors as conditions. In this case, you will be creating two connectors for this task. | ||
| + | : 2. Once you have clicked New - Name the connector based on the condition. In this case we want applications that already have a value in the Approved Date Field to jump tasks 2-5 and go directly to task 6 (Update Date Approved). | ||
| + | :::* The name for this connector should indicate the condition - in this case we will be naming it Date Approved Not Blank. | ||
| + | : 3. The connect to option in this case would need to be '''Updated Date Approved.''' | ||
| + | [[File:Branching-connector-one-config.png|thumb|none|800px|Branching connector configuration]] | ||
| − | ''' | + | : 4. Navigate to the '''Routing Conditions tab''' in your connector settings - this is where you can specify which applications will skip certain workflow tasks. |
| + | : 5. You can filter by Type, Status, or custom condition. In this case we want to filter by custom condition - Condition: Approved Date Field is Not Blank. | ||
| + | :::* The custom condition to check if the field if not blank is - '''"@Date Approved@"!="'''" | ||
| − | + | [[File:Branching-connector-one-routing.png|thumb|none|800px|Branching connector routing conditions]] | |
| − | + | : 6. Now you can create a second connector for the placeholder task that routes the applications with a Blank Approved Date Field to task 2 (Create Payment Record). | |
| + | [[File:Branching-connector-two-config.png|thumb|none|800px|Branching connector configuration]] | ||
| − | : | + | : 7. For the routing condition - The custom condition will be that the Approved Date field is blank. |
| − | : | + | :::* The custom condition to check if the field is blank is '''“@Date Approved@”-””''' |
| − | |||
| − | + | [[File:Branching-connector-two-routing.png|thumb|none|800px|Branching connector routing conditions]] | |
| − | + | : 8. Now the placeholder task has two connectors with one routing applications with an existing Approved Date to the Update Approved Date task and the other routing applications with no Approved Date to the Create Payment Record task. | |
| + | [[File:Branching-connector-summary-photo.png|thumb|none|800px|Branching Connectors]] | ||
| − | |||
| − | + | ===Building the Remaining Connectors=== | |
| + | You will need to create connectors for the remaining tasks. This can be done by clicking the New button for each task. | ||
| + | Make sure that you connect the current task to the next task you want it to go to. The default is for the connector to connect to Complete - which will end your workflow. | ||
| + | [[File:Regular-connector-config.png|thumb|none|800px|Connector Configuration]] | ||
| − | + | Once you have created connectors for all of the tasks - connect the final task to Complete. | |
| + | [[File:Complete-connector-config.png|thumb|none|800px|Connector Configuration]] | ||
| − | + | Once you are done creating connectors your workflow should look like this (below). | |
| + | [[File:Full-workflow-photo.png|thumb|none|800px|Connector Configuration]] | ||
| − | + | ==Testing the Workflow== | |
| − | |||
| − | |||
| − | |||
| − | |||
| − | |||
| − | |||
| − | |||
| − | |||
| − | |||
| − | |||
| − | |||
| − | |||
| − | |||
| − | |||
| − | |||
| − | |||
| − | |||
| − | |||
| − | |||
| − | |||
| − | |||
| − | |||
| − | |||
| − | |||
| − | |||
| − | |||
| − | |||
| − | |||
| − | |||
| − | |||
| − | |||
| − | |||
| − | |||
| − | |||
| − | |||
| − | |||
| − | |||
| − | |||
| − | |||
| − | |||
| − | |||
| − | ==Testing | ||
Now that you have built the workflow, you want to make sure that it functions correctly. You can do so by setting a record to the Approved status and checking the workflow history on the record. We would suggest doing this in your backup system so it does not impact your production environment. | Now that you have built the workflow, you want to make sure that it functions correctly. You can do so by setting a record to the Approved status and checking the workflow history on the record. We would suggest doing this in your backup system so it does not impact your production environment. | ||
| + | :1. Take a test record and move the status to Approved then click submit. | ||
| + | [[File:Approved-status-test-record.png|thumb|none|800px|Testing your workflow]] | ||
| − | + | :2. Navigate to the Logs drop down near the top left of the screen and select the Workflow History option. | |
| − | |||
| − | |||
| − | |||
| − | |||
| − | |||
| − | |||
| − | |||
| − | |||
| − | + | [[File:Workflow-history-log-location.png|thumb|none|800px|Testing your workflow]] | |
| − | + | :3. You will be able to see a list of completed workflow tasks from your workflow here. Make sure the task status is completed for each of your tasks. | |
| − | + | [[File:Workflow-history-log.png|thumb|none|800px|Testing your workflow]] | |
| − | |||
{| class="wikitable" | {| class="wikitable" | ||
| Line 302: | Line 247: | ||
||Generate a pdf of an application after it has been submitted. | ||Generate a pdf of an application after it has been submitted. | ||
|} | |} | ||
| − | |||
| − | |||
| − | |||
| − | |||
| − | |||
| − | |||
| − | |||
| − | |||
| − | |||
| − | |||
| − | |||
| − | |||
| − | |||
| − | |||
| − | |||
| − | |||
| − | |||
| − | |||
| − | |||
| − | |||
| − | |||
| − | |||
| − | |||
| − | |||
| − | |||
| − | |||
| − | |||
| − | |||
| − | |||
| − | |||
| − | |||
| − | |||
| − | |||
| − | |||
| − | |||
| − | |||
| − | |||
| − | |||
| − | |||
| − | |||
| − | |||
| − | |||
| − | |||
| − | |||
| − | |||
| − | |||
| − | |||
| − | |||
| − | |||
| − | |||
| − | |||
| − | |||
| − | |||
| − | |||
| − | |||
| − | |||
| − | |||
| − | |||
| − | |||
| − | |||
| − | |||
| − | |||
| − | |||
| − | |||
| − | |||
| − | |||
| − | |||
| − | |||
| − | |||
| − | |||
| − | |||
| − | |||
| − | |||
| − | |||
| − | |||
| − | |||
| − | |||
| − | |||
| − | |||
| − | |||
| − | |||
| − | |||
| − | |||
Latest revision as of 13:26, 20 May 2022
Contents
Overview
A Workflow is a set of repeatable steps used to automate and streamline your business processes within the system (e.g. creating review forms and notifying reviewers via email).
Use case
Once your application hits a specific status, there may be a handful of activities that need to be created or fields that need to be updated in order for the application to move to the next status. By using various workflow tasks, you can have all these tasks completed automatically, simplifying your granting process.
Example
Once an application is moved to the Approved Status - you want to create a payment activity, a few report activities, send an email to the applicant, and update the Approved Date field.
Some applications may have already been in the Approved Status but were sent back for review or updates. In this case, you don't want applications that have already gone through the Approved Status workflow to repeat the tasks listed above once their status is updated to Approved again. In this case, you will configure the workflow to bypass the create new activity and email tasks and only update the Approved Date field.
Configuration - Essentials
Creating a New Workflow
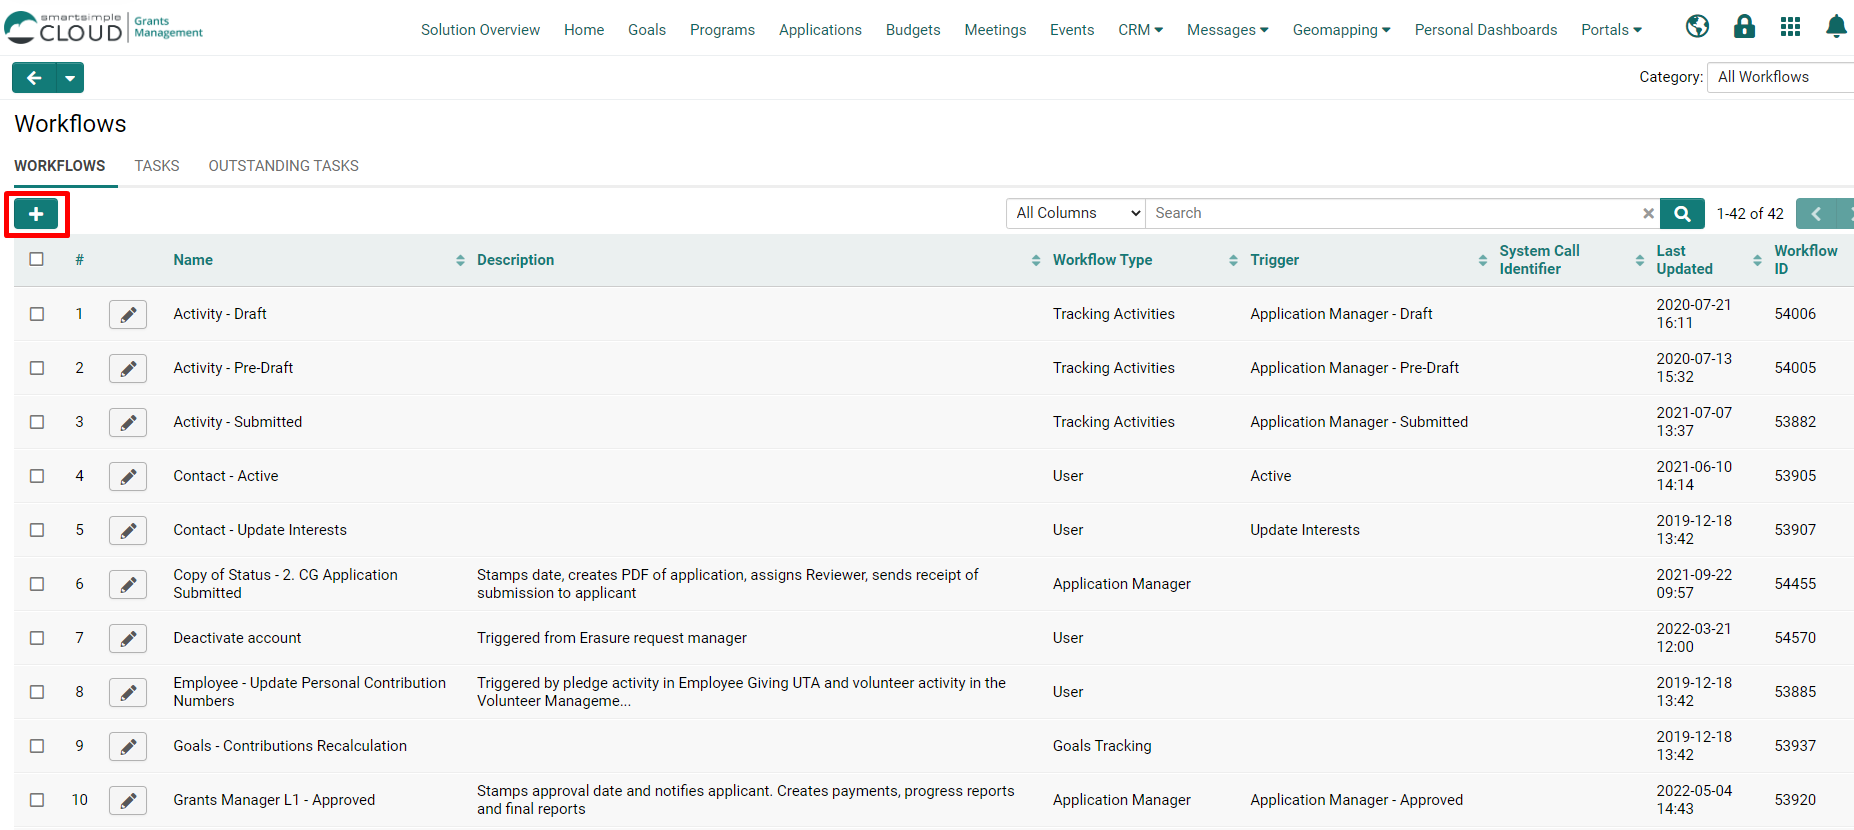
You can create a new workflow by clicking the plus button on the workflows home page.
Configuring A Workflow
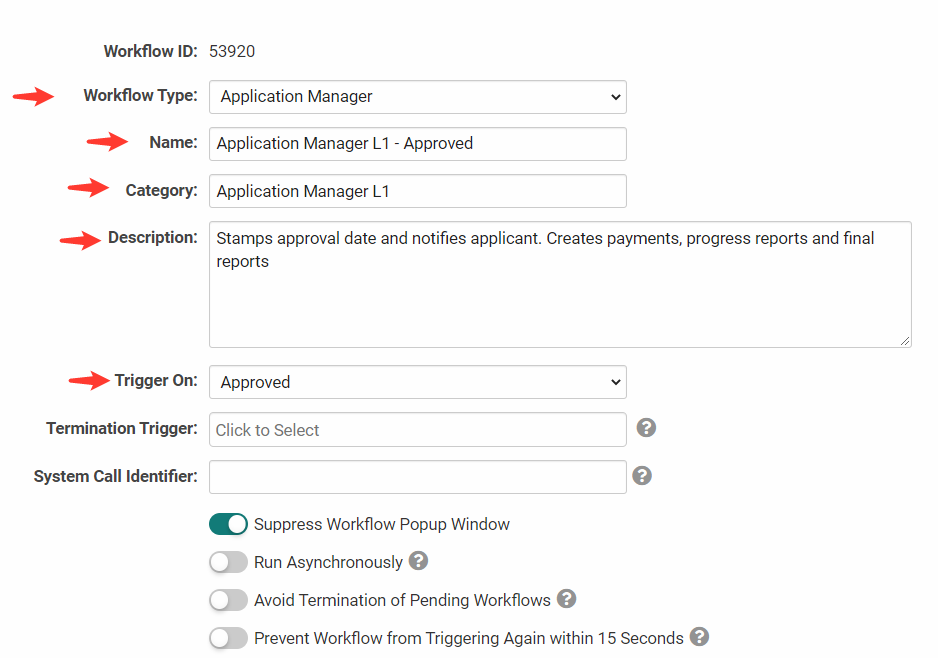
- 1. Select Workflow Type: The type will dictate which information/fields will be available when creating tasks - You can select different UTA’s, levels, contacts, organizations etc… as your workflow type.
- 2. Name the workflow and add it to a Category
- Suggested naming convention: UTA, Record Level (1/2/3) - Goal/Status
- EX: Submission Manager L1 - Approved Status
-
- Categories are created by your organization. We suggest creating categories based on the UTA and Record Level.
- EX: Submission Manager L1
- 3. Add a workflow description (optional).
- Include a list of tasks and branching conditions for ease of review later.
- Add notes to your workflow if you make changes to it.
- 4. Set the Trigger-On
- The trigger dictates what status or action will initiate the workflow.
- Depending on the workflow type, you will be selecting from a list of statuses or activities.
- For our example, we will be triggering our workflow when a record hits the Approved status.
Tip: You can build a workflow on your production system first and test it on your backup the following day. Make sure to set the Trigger-On to Deactivate so the workflow won’t run. Once your workflow appears in your backup, you can set the Trigger-On to the correct trigger and test your workflow without worrying about impacting your production environment.
Configuration - Advanced
Tasks
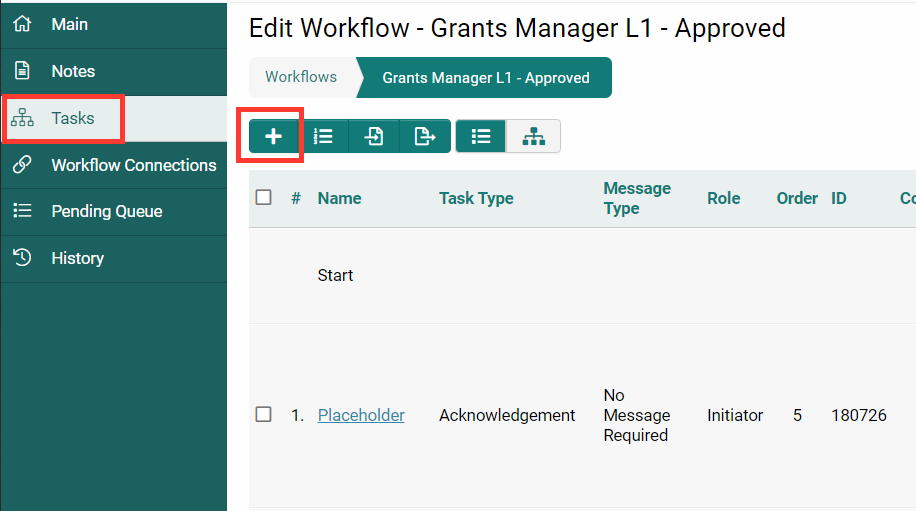
Navigate to the Task tab found on the left side of your screen.
Creating The First Task
- To create a new task, click on the plus sign button found on the top left corner of your screen (highlighted in image above).
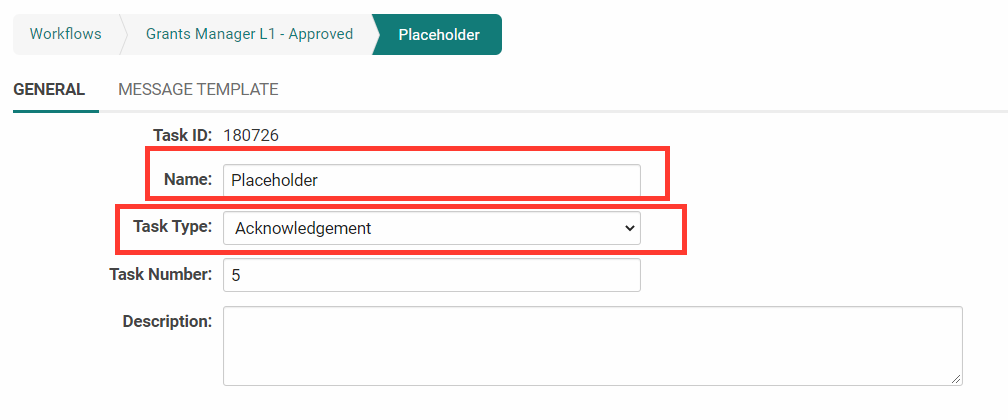
- We suggest creating an Acknowledgment as your first task type.
- Name this task Placeholder.
- This task will not have a function but will indicate that a workflow has started. You will be able to see this task listed in the workflow history log on a specific record.
- Name this task Placeholder.
Creating The Remaining Tasks
Task 2 – Create Payment Record
- 1. Task Name: Create Payment Record
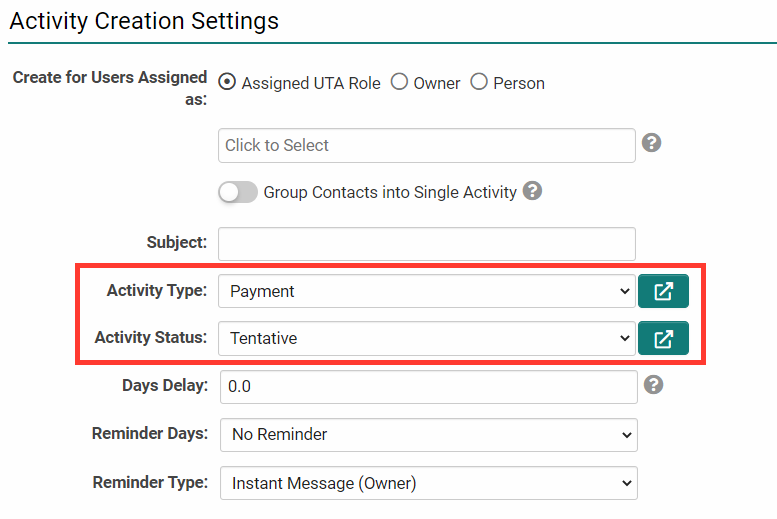
- 2. Task Type: Create New Activity
- 3. Select the activity type you want to create and the default status the activity should be created in.
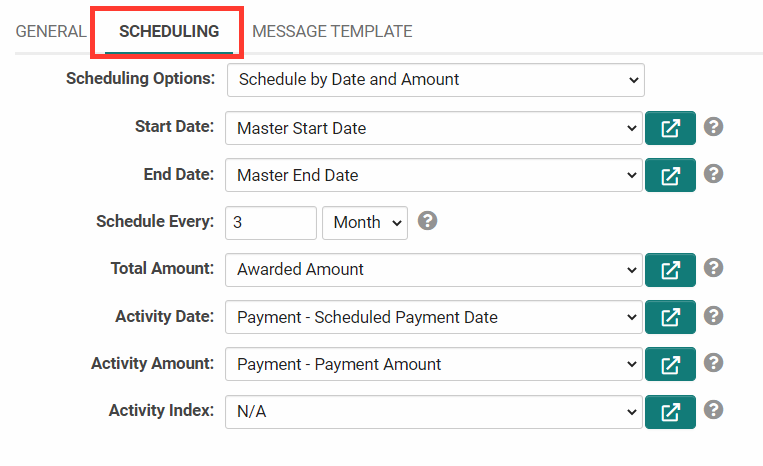
- 4. Under the scheduling tab → configure the activity to meet your requirements. Not all fields listed in this section need to be configured - it will depend on the activity type.
- Start Date / End Date: Choose the date fields that will determine the start and end date of the activity scheduling period.
- You can set the frequency the activity is scheduled - activities will be created immediately, but the date will take the frequency into account. Note that activities will only be automatically scheduled within the time frame set above.
- Select the field from the grant application that contains the grant amount. This value will then be split equally between all payment activities being scheduled.
- You can also select the field where the amount of each payment will be stored - note that the total amount will be divided equally between all of the activities.
- Select the date field that will store the scheduled activity date.
Note: If you do not see a Scheduling Tab → make sure to toggle on advanced options, found near the top right of your screen.
Task 3 - Send Approved Receipt
- 1. Task Name: Send Approved Receipt
- 2. Task Type : Acknowledgement
- 3. In this case, you will be using the acknowledgment task to send an email to the applicant. You can specify who the email will be sent to under the Routing section. Select Owner if you want the email to be sent to the applicant.
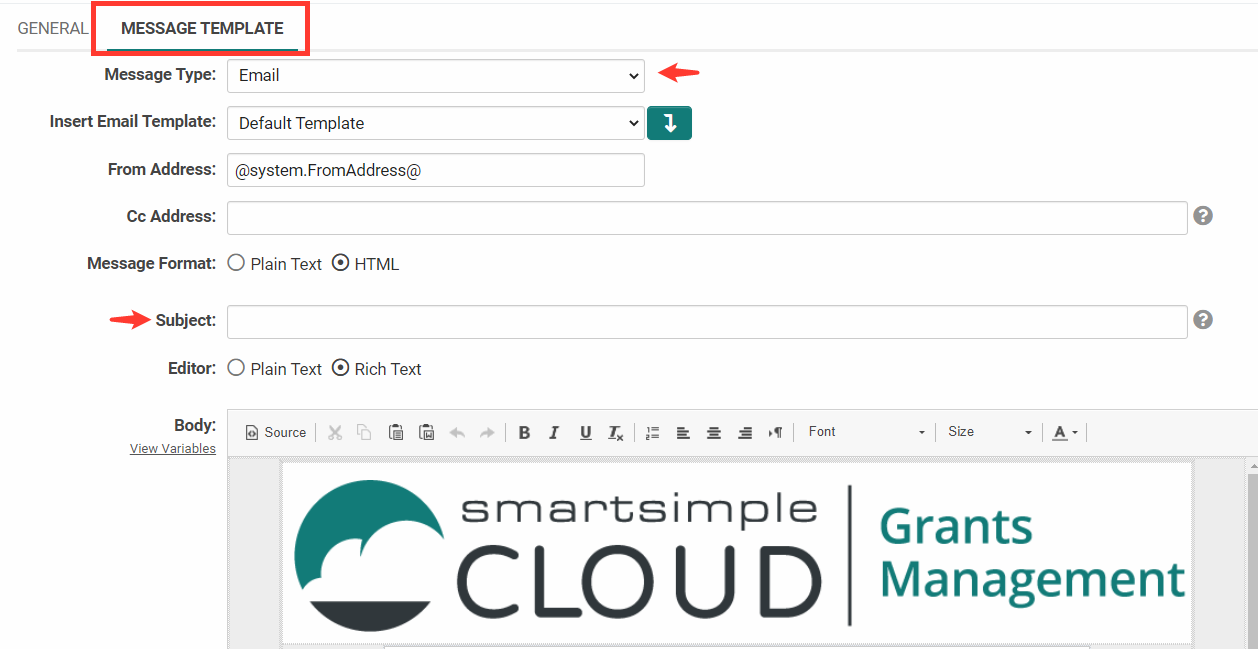
- 4. You can configure the email content by navigating to the Message Template tab.
- 5. Here you can specify:
- Message type (instant message or email).
- Email template (can create from scratch or choose an existing template).
- Add a subject to the email template.
- We always suggest saving your email as an event. This will store the email as an event on the user profile.
- 6. You can also add attachments to the email template here.
- To do so you will need to reference a custom field where a document is stored. The format used to reference the field is @#Custom Field ID#@
- You can attach multiple documents. They will need to be delimited by semicolons.
- 7. You can use the Variable Syntax helper (found in the configuration mode shortcuts list) to test your email template against a record.
- Copy the email template and paste it into the helper. This will allow you to confirm that you are populating the correct information in your email template.
Task 4 - Create Progress Report
- 1. Task Name: Create Progress Report
- 2. Task Type: Create New Activity
- 3. Select Progress Report from the activity drop-down and specify the configuration for the new activity under the Scheduling tab (visual example shown in Task 2).
Task 5 - Create Final Report
- 1. Task Name: Create Final Report
- 2. Task Type: Create New Activity
- 3. Select the Final Report from the activity drop-down.
- 4. In this case you only want to generate a single Final Report, so you will not need to configure any fields under the scheduling tab.
Task 6- Create Contract
- 1. Task Name: Create Contract
- 2. Task Type: Create New Activity
- 3. In this case you only want to generate a single Contract, so you will not need to configure any fields under the scheduling tab.
- 4. You can also generate a contract through the Generate PDF task - but you will not be able to alter the document once the PDF is created. By creating a contract activity, you are able to make adjustments to the contract's content.
Task 7 - Update Approved Date
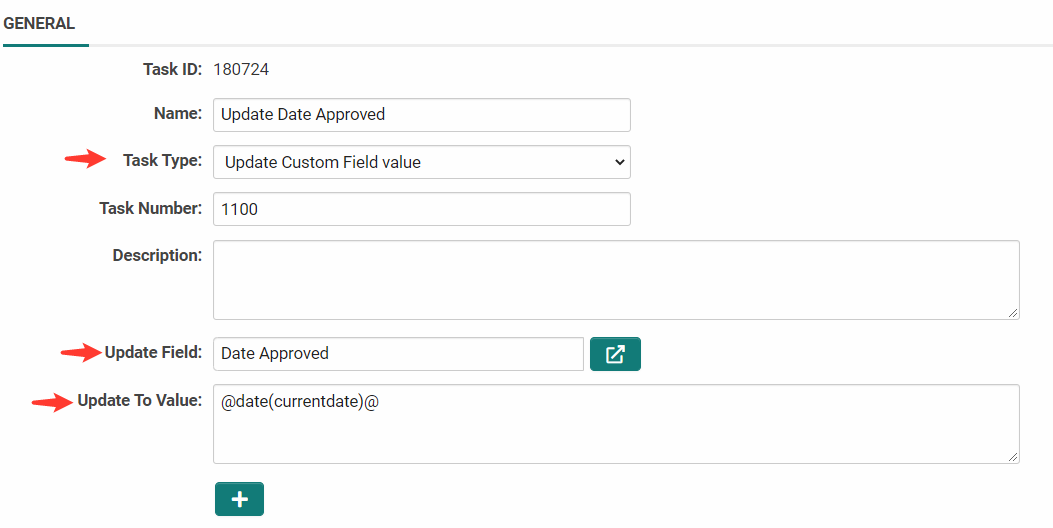
- 1. Task Name: Update Approved Date
- 2. Task Type: Update Custom Field Value
- 3. Select the field you want to update: Date Approved
- 4. You can then enter the updated field value below.
- If you want to update the field to the current date - enter the following variable - @date(currentdate)@
Connectors
Now that you have created all of your workflow tasks, you will need to connect them. This can be done by creating Connectors. Workflows will only run tasks if they have been connected together and have applicable conditions to the current record.
Creating your First Connector
- 1. Click the New button on the first row of your workflow tasks.
- 2. You can leave the Name and Trigger Type as the default for your starting connector.
- 3. For the Connect To option - select the task you want the workflow to start with - in this case it will be the Placeholder task.
- Typically, tasks should be created in the order they will be executed in, but they can be reordered later if need be.
Branching Connectors
Applications that have already been Approved have gone through this workflow before. To make sure a record that has already gone through this workflow does not go through all of the tasks again, you will need to create Branching Connectors. Branching connectors have specific conditions that will allow you to direct records to different tasks based on that condition.
For this example, the condition will be whether the Approved Date field is blank or not blank.
Creating Branching Connectors
- 1. Create a new connector for the placeholder task by clicking the New button beside Task 1. You will need to create as many connectors as conditions. In this case, you will be creating two connectors for this task.
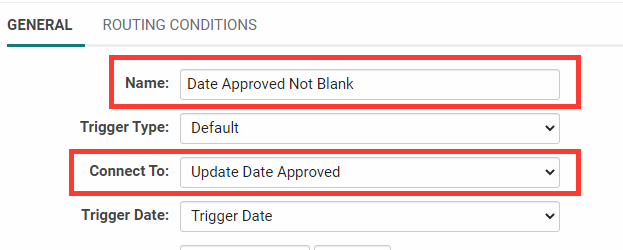
- 2. Once you have clicked New - Name the connector based on the condition. In this case we want applications that already have a value in the Approved Date Field to jump tasks 2-5 and go directly to task 6 (Update Date Approved).
- The name for this connector should indicate the condition - in this case we will be naming it Date Approved Not Blank.
- 3. The connect to option in this case would need to be Updated Date Approved.
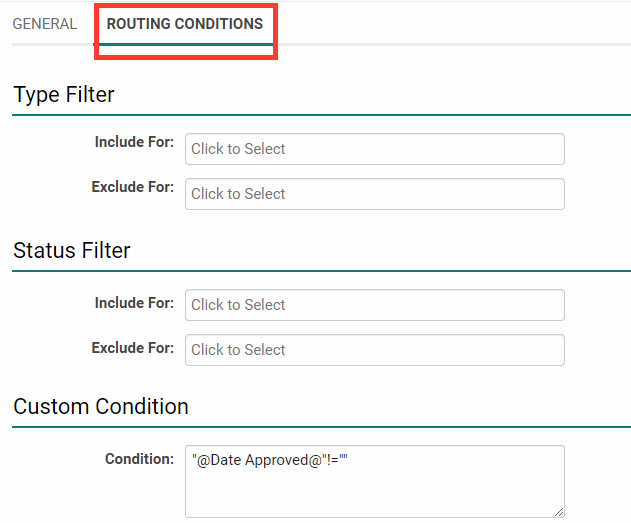
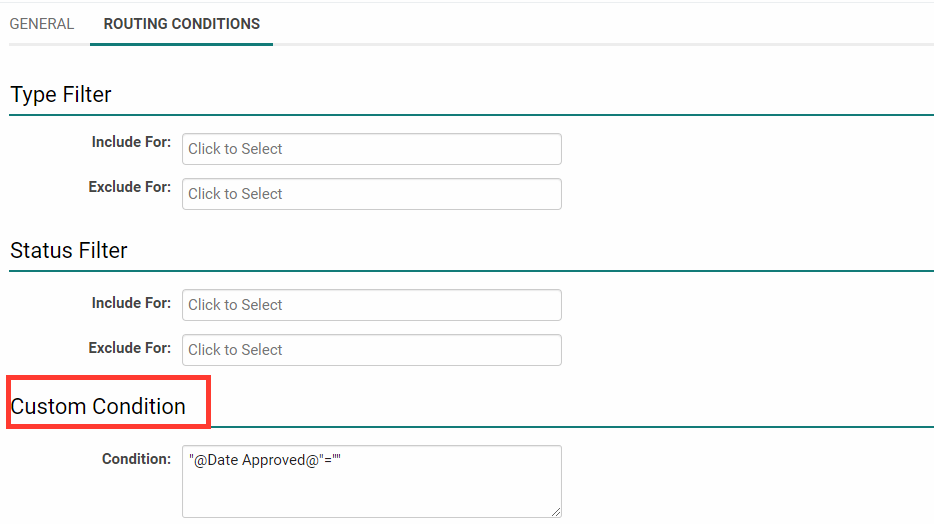
- 4. Navigate to the Routing Conditions tab in your connector settings - this is where you can specify which applications will skip certain workflow tasks.
- 5. You can filter by Type, Status, or custom condition. In this case we want to filter by custom condition - Condition: Approved Date Field is Not Blank.
- The custom condition to check if the field if not blank is - "@Date Approved@"!=""
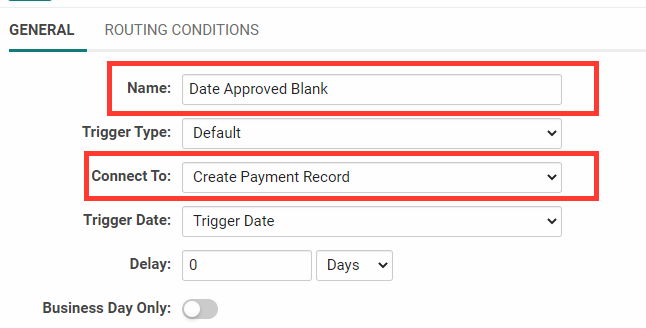
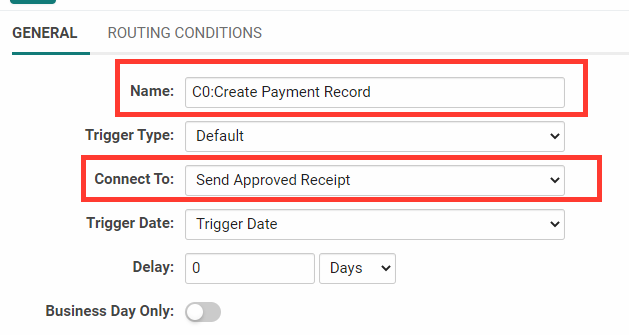
- 6. Now you can create a second connector for the placeholder task that routes the applications with a Blank Approved Date Field to task 2 (Create Payment Record).
- 7. For the routing condition - The custom condition will be that the Approved Date field is blank.
- The custom condition to check if the field is blank is “@Date Approved@”-””
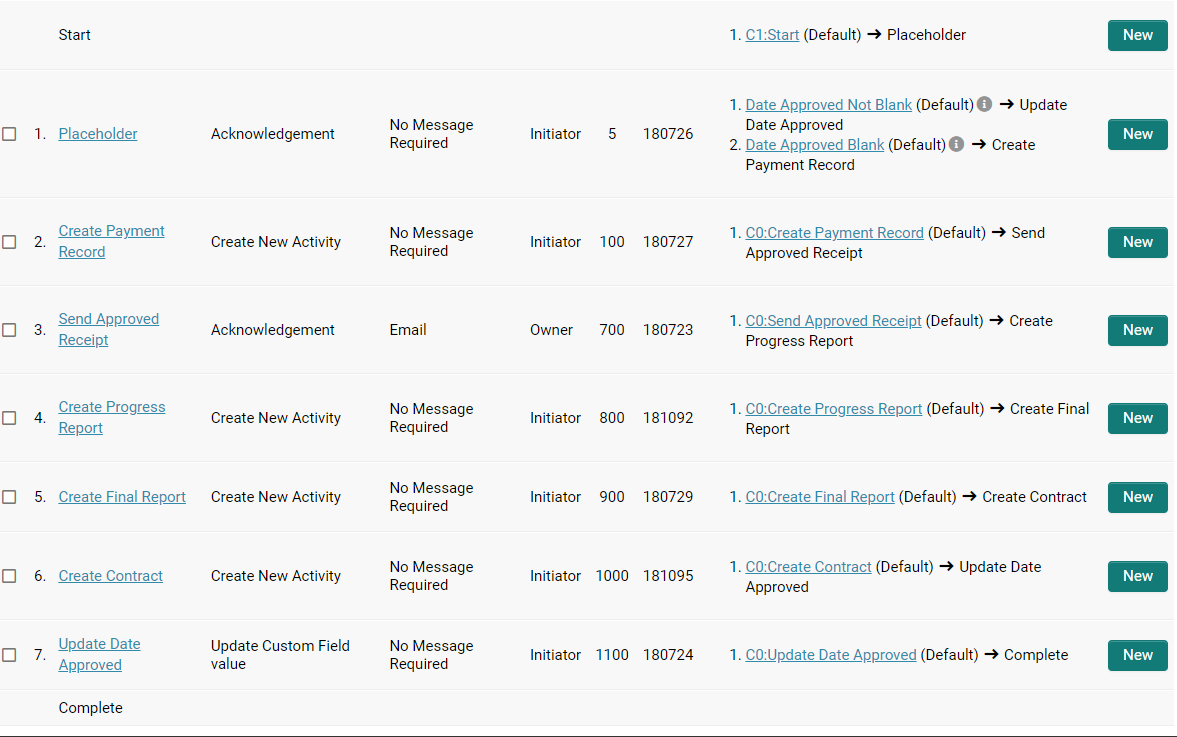
- 8. Now the placeholder task has two connectors with one routing applications with an existing Approved Date to the Update Approved Date task and the other routing applications with no Approved Date to the Create Payment Record task.
Building the Remaining Connectors
You will need to create connectors for the remaining tasks. This can be done by clicking the New button for each task.
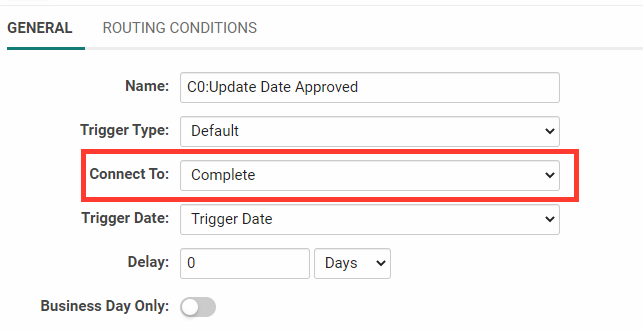
Make sure that you connect the current task to the next task you want it to go to. The default is for the connector to connect to Complete - which will end your workflow.
Once you have created connectors for all of the tasks - connect the final task to Complete.
Once you are done creating connectors your workflow should look like this (below).
Testing the Workflow
Now that you have built the workflow, you want to make sure that it functions correctly. You can do so by setting a record to the Approved status and checking the workflow history on the record. We would suggest doing this in your backup system so it does not impact your production environment.
- 1. Take a test record and move the status to Approved then click submit.
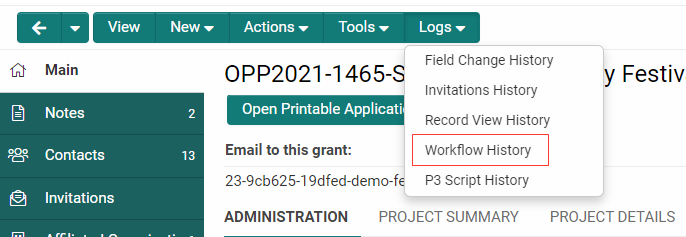
- 2. Navigate to the Logs drop down near the top left of the screen and select the Workflow History option.
- 3. You will be able to see a list of completed workflow tasks from your workflow here. Make sure the task status is completed for each of your tasks.
| Task Type | Description | Example |
|---|---|---|
| Acknowledgment | This Task will allow you to send messages to users in SmartSimple. | Sending an email to an applicant. |
| Update Custom Field Value | This Task will allow you to update the value of one or multiple custom fields. | Update the Approved Date field on a record to the current date. |
| Update Standard Field Value | This Task will allow you to update the value of one or multiple standard fields. | Update the Application Name field. |
| Create New Activity | This Task will allow you to generate a new L2 record associated with your L1 record. | Generate a Progress Report activity for a grant application. |
| Generate PDF File | This Task will allow you to generate a pdf of a record. | Generate a pdf of an application after it has been submitted. |
