Difference between revisions of "Display order"
(→Custom Fields: edited correct 100-incremental for display order) |
|||
| (10 intermediate revisions by the same user not shown) | |||
| Line 10: | Line 10: | ||
===The "Re-Order" Button=== | ===The "Re-Order" Button=== | ||
| − | Clicking on the Re-Order button will | + | Clicking on the Re-Order button will default the display order with the starting number of 100 and incremented by 100 for all subsequent fields. The new starting number can be changed manually by the user and will then be incremented by 100 against that initial number. |
| + | |||
| + | [[Image:053019_EF_ListViewsReorder.png]] | ||
| + | |||
| + | '''Best practice '''is incremented by 100 so that fields can be fitted in between each other. | ||
| + | |||
| + | <pre> Ideally, no two fields should have the same display order number, as that will render display order on the page unpredictable. </pre> | ||
| + | |||
| + | ====Drag and Drop Re-Order Fields==== | ||
| + | In the configuration list view of custom fields, you may now drag and drop single fields or groups of fields in order to re-order them. | ||
| + | |||
| + | 1. Go to the 9-square menu icon on the top right of your page. | ||
| + | |||
| + | [[File:052919_MenuIcon.png]] | ||
| + | |||
| + | 2. Under the heading '''Applications,''' click the [[application]] you want to change the list views for. In this example, the application is called '''Budget Manager'''. | ||
| + | |||
| + | 3. Click the '''gear''' icon to go into '''Configuration Settings.''' | ||
| + | |||
| + | 4. Go to the second tab. In this example, this tab is titled '''Budget''', but your tab may be labelled differently depending on which application you are looking at. | ||
| + | |||
| + | 5. Under the heading '''General Settings,''' select [[:Category:Custom Fields|'''Custom Fields''']]. | ||
| + | |||
| + | [[File:053019_EF_ListViewsCustomFields.png|300px]] | ||
| + | |||
| + | 6. Once you are in the '''Custom Fields''' page for your application, select the '''numbered list''' icon to display '''Re-order Mode.''' | ||
| + | |||
| + | [[File:EnableReorderIcon.png]] | ||
| + | |||
| + | 7. You are now able to drag and drop rows to change the order. At the bottom right of your screen, a pop-up with specific instructions will appear. | ||
| + | |||
| + | [[File:ReorderDragandDropInstructions.png|300px]] | ||
==[[Types]]== | ==[[Types]]== | ||
| Line 21: | Line 52: | ||
* [[Custom Fields – General Information]] | * [[Custom Fields – General Information]] | ||
* [[Changing the Column Display Order in a Report]] (disambiguation) | * [[Changing the Column Display Order in a Report]] (disambiguation) | ||
| + | * [[Configuration mode]] | ||
| + | * [[:Category:Custom Fields]] | ||
| + | * [[List View Overview]] | ||
[[Category:List Views]][[Category:Custom Fields]] | [[Category:List Views]][[Category:Custom Fields]] | ||
Latest revision as of 14:49, 5 July 2019
Display orders can be set for different components of the SmartSimple interface.
Contents
List Views
- The display order set in the list view configuration page will determine the order in which multiple list views are displayed for users with multiple roles or multiple personal list views.
- The list views will be displayed in the "List View" dropdown in lowest-highest order of "Display Order." The available list view with the lowest display order will be displayed by default.
Custom Fields
The display order set in a specific custom field will determine its placement on the page, relative to the display orders of all other visible custom fields.
The "Re-Order" Button
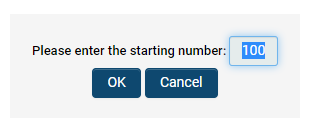
Clicking on the Re-Order button will default the display order with the starting number of 100 and incremented by 100 for all subsequent fields. The new starting number can be changed manually by the user and will then be incremented by 100 against that initial number.
Best practice is incremented by 100 so that fields can be fitted in between each other.
Ideally, no two fields should have the same display order number, as that will render display order on the page unpredictable.
Drag and Drop Re-Order Fields
In the configuration list view of custom fields, you may now drag and drop single fields or groups of fields in order to re-order them.
1. Go to the 9-square menu icon on the top right of your page.
2. Under the heading Applications, click the application you want to change the list views for. In this example, the application is called Budget Manager.
3. Click the gear icon to go into Configuration Settings.
4. Go to the second tab. In this example, this tab is titled Budget, but your tab may be labelled differently depending on which application you are looking at.
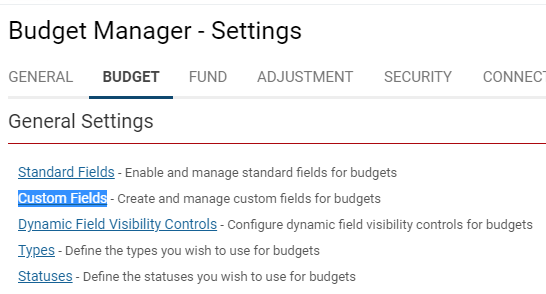
5. Under the heading General Settings, select Custom Fields.
6. Once you are in the Custom Fields page for your application, select the numbered list icon to display Re-order Mode.
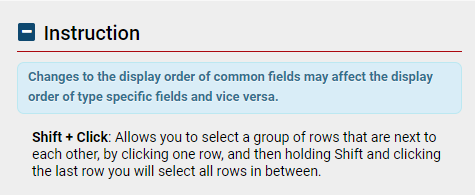
7. You are now able to drag and drop rows to change the order. At the bottom right of your screen, a pop-up with specific instructions will appear.
Types
The display order set for a specific Level 2 or Level 3 Type will determine its order in the combo box when selecting the Type for a record, relative to the display orders of all other Types.
The "Re-Order" Button
Clicking on the Re-Order button will prompt the user to enter a new starting number. The display orders for all types in the UTA will be reset, starting with the new starting number and incremented by 100 for all subsequent Types.


