Difference between revisions of "Validating a Form before Submission"
From SmartWiki
Julia Decker (talk | contribs) |
Julia Decker (talk | contribs) |
||
| Line 11: | Line 11: | ||
The HCAI fields are displayed in the left column and the information extracted from the referral/case assessment and activities are displayed on the right. | The HCAI fields are displayed in the left column and the information extracted from the referral/case assessment and activities are displayed on the right. | ||
| − | There are | + | There are three types of values displayed in the right column. |
* '''Blank''' – no value – mapping is not set for this field. | * '''Blank''' – no value – mapping is not set for this field. | ||
Latest revision as of 16:00, 9 January 2008
When first using the HCAI integration features it is important to validate that the information is correct. You can determine the accuracy of the data by using the Preview feature.
1. Click the Preview button.
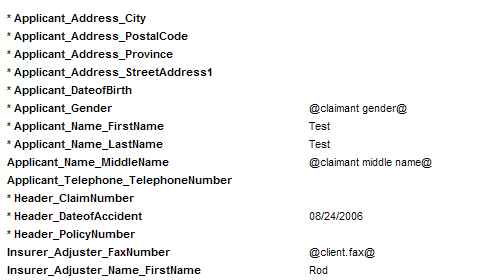
The Preview window is displayed.
The HCAI fields are displayed in the left column and the information extracted from the referral/case assessment and activities are displayed on the right.
There are three types of values displayed in the right column.
- Blank – no value – mapping is not set for this field.
- Field name - @field name@ - mapping is set for this field but value is not found in underlying data.
- Value – mapping is set and value is found in underlying data.
Before you can successfully submit HCAI data all the mandatory fields must be completed.
2. Close the preview window.
