Difference between revisions of "Field Revision Annotations"
Ann Vincent (talk | contribs) m |
|||
| (73 intermediate revisions by 6 users not shown) | |||
| Line 1: | Line 1: | ||
| − | {{ | + | {{Annotation Mode}} |
| − | + | [[Category:Annotations]] | |
| − | |||
| − | |||
| − | |||
| − | |||
| − | |||
| − | |||
| − | |||
| − | |||
| − | |||
| − | |||
| − | [[ | ||
| − | |||
| − | |||
| − | |||
| − | |||
| − | |||
| − | |||
| − | |||
| − | |||
| − | |||
| − | |||
| − | |||
| − | |||
| − | |||
| − | |||
| − | |||
| − | |||
| − | |||
| − | |||
| − | |||
| − | |||
| − | |||
| − | |||
| − | |||
| − | |||
| − | |||
| − | |||
| − | |||
| − | |||
| − | |||
| − | |||
| − | |||
| − | |||
| − | |||
| − | |||
| − | |||
| − | |||
| − | |||
| − | |||
| − | |||
| − | |||
| − | |||
| − | |||
| − | |||
| − | |||
Latest revision as of 09:11, 28 June 2024
Contents
- 1 Overview
- 1.1 How Annotations Work
- 1.1.1 1. Applicant Submits Application
- 1.1.2 2. Program Manager Assigns a Reviewer
- 1.1.3 3. Reviewer Conducts Initial Review and Creates Annotations
- 1.1.4 4. Applicant Reviews Annotations, Modifies Values, and Adds Clarifications
- 1.1.5 5. Reviewer Conducts a Subsequent Review and Marks Annotations as Resolved
- 1.1.6 6. Exiting Annotation Mode
- 1.1 How Annotations Work
- 2 Configuration
Overview
Annotations are a collaborative tool that enables users to add notes and responses directly to specific fields within a record. By using field-level annotations, users can modify particular fields and respond to comments without altering the rest of the record. This article will guide you through utilizing and configuring the annotation collaboration feature as part of an application review process.
Note:
- You must be a Global Administrator to configure this feature.
- The interface and recommended configuration practices for the annotations feature have been updated as part of the July 2024 upgrade.
- You can only edit the values of a single field at a time using the annotations feature. Validation will only run on the field being modified. Therefore, if you are using dynamic field visibility controls or need to run full validation on the entire form, you may need to exit annotation mode and go to an unlocked status to achieve this.
How Annotations Work
Let's walk through how the annotation feature can be configured as part of an application process involving an applicant, a program manager, and a reviewer.
1. Applicant Submits Application
The applicant enters the required information into a form and submits it.
2. Program Manager Assigns a Reviewer
The program manager assigns a reviewer to the application and advances the application to the next stage.
3. Reviewer Conducts Initial Review and Creates Annotations
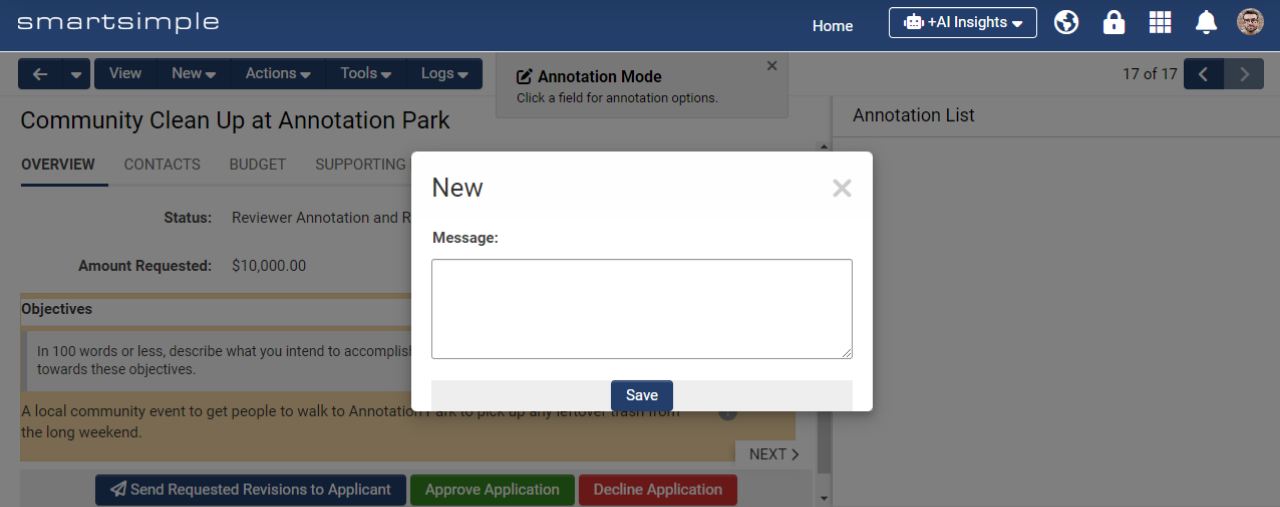
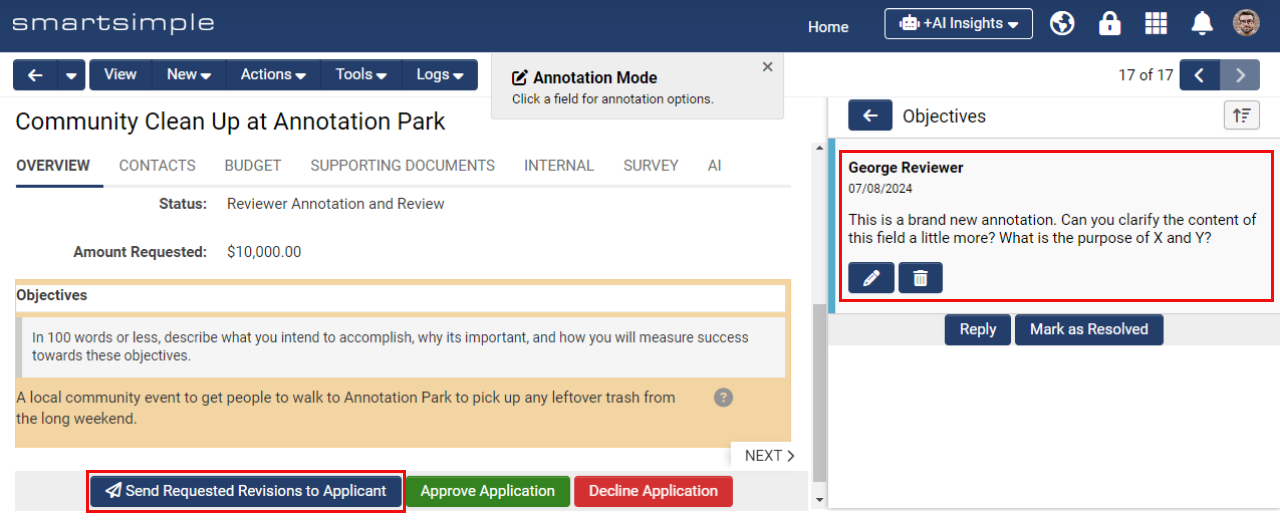
The reviewer is notified of their assignment to review the application. In this scenario, the application is not yet ready to be approved or rejected, prompting the reviewer to make field-level suggestions (annotations) for changes or clarifications. The reviewer hovers over and left-clicks the desired field to open a new annotation window. Here, they enter a message asking the applicant to change or clarify something related to this field, and then the reviewer saves the annotation.
This process is repeated for all fields requiring changes or clarifications. Once all annotations are added, the reviewer clicks the annotation submission button to send the record back to the applicant.
4. Applicant Reviews Annotations, Modifies Values, and Adds Clarifications
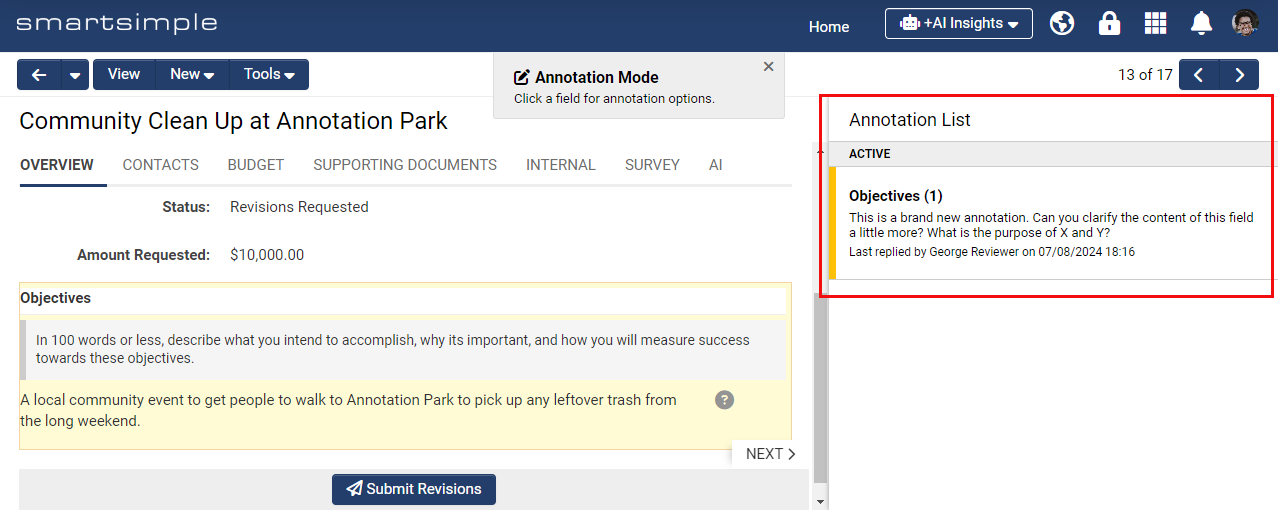
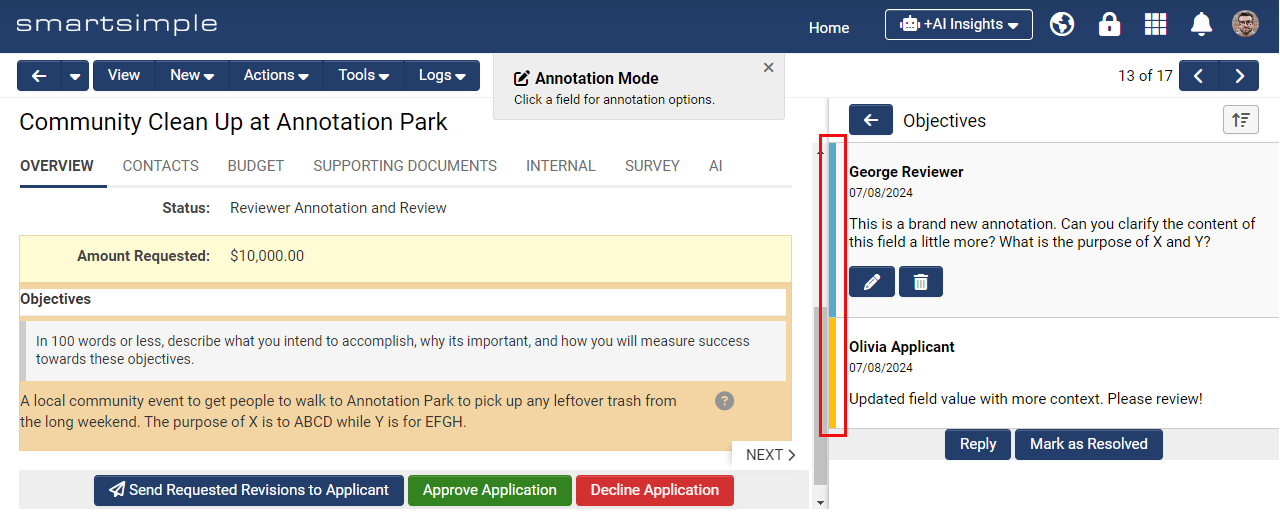
The applicant is notified that action is required on their application. The applicant navigates to their application, which opens in Annotation Mode. In Annotation Mode, fields without annotations are locked. The applicant sees a list of annotations in the right panel and can click on any annotation to engage in a specific field-level discussion.
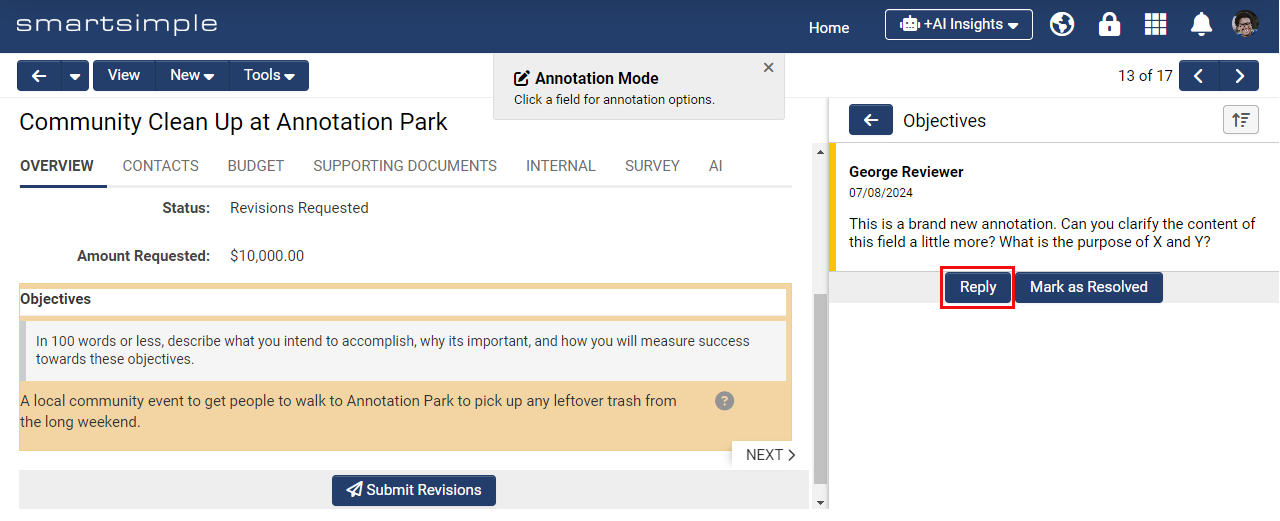
When focused on an annotation, the applicant can click the Reply button to open a modal window, where they can modify the field value and add a clarifying message.
Annotations from other users (such as the reviewer) are highlighted in yellow, indicating they may require a response, while annotations you create (as an applicant) are highlighted in blue.
After responding and modifying field values, the applicant clicks the annotation submission button to move the status forward, triggering a workflow that notifies the reviewer of the changes made.
5. Reviewer Conducts a Subsequent Review and Marks Annotations as Resolved
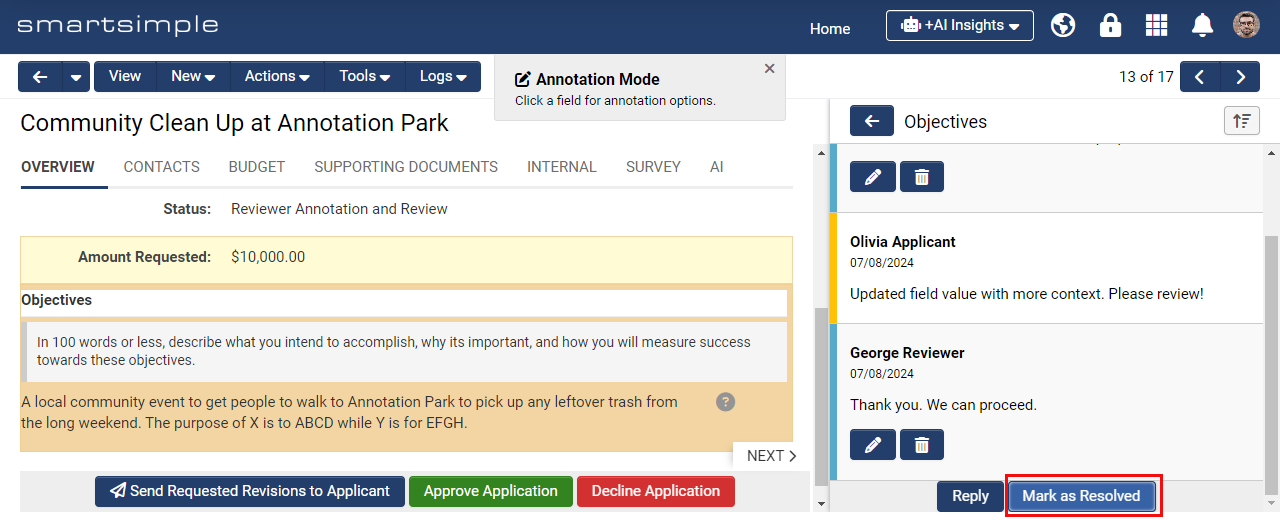
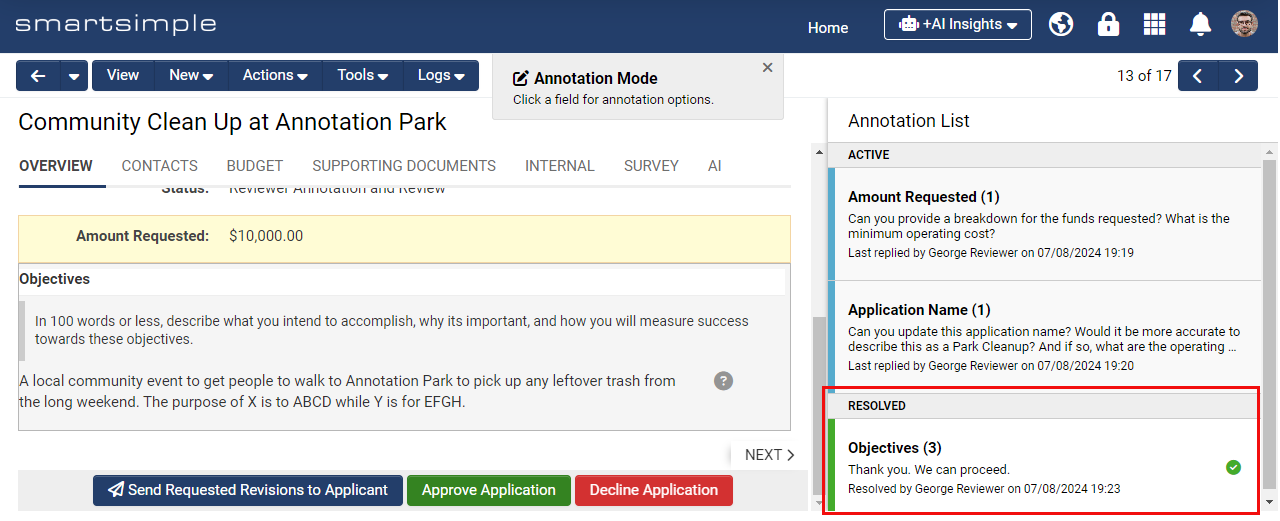
The reviewer is notified that action is required and navigates to the application. The reviewer evaluates the changes and the applicant's replies. If no further changes or clarifications are needed, the reviewer marks each field-level annotation as resolved.
Resolved annotations are indicated with a green check mark, showing no further action is required.
If all outstanding changes are addressed, the reviewer advances the application using the annotation submission button.
6. Exiting Annotation Mode
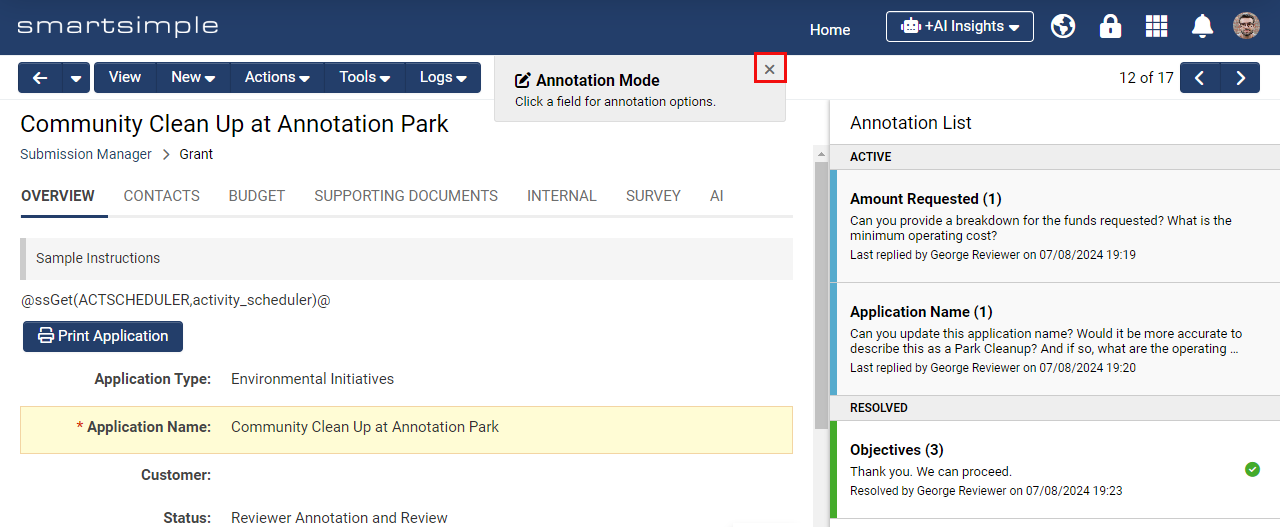
Users can exit Annotation Mode by clicking the close icon (“X”) in the gray box. This may be necessary to access the left navigation or other record-related elements not visible in Annotation Mode.
Note: Fields found under the "More" tab of the left navigation do not support annotations.
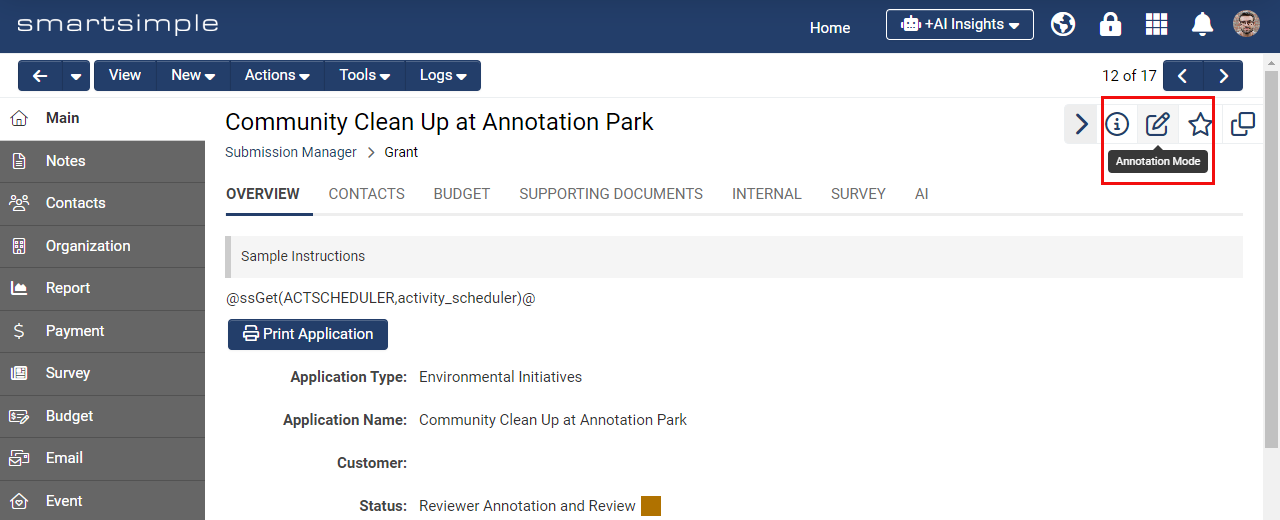
To re-enter Annotation Mode, click the Annotation Mode toggle located in the high visibility area at the top right of the record.
Configuration
Below is an explanation of how a Global Administrator could configure the annotations feature to work as described in the scenario above.
User Roles
You will need two roles: a role for the applicant and a role for the person doing the reviewing. Depending on your business process, you may already have two roles you can use or you may wish to create two new roles. If you are creating new roles, you may create these as system or UTA (association) roles depending upon your business process. To create new roles, navigate to the Menu Icon > Roles and Security > User Roles > Click the New Role button (represented by a plus sign). Typically roles created would be called “Applicant” and “Reviewer” or “Internal Staff”.
Annotation Types
Annotation types determine who can make annotations and when. Usually, there are two annotation types: one for the applicant and another for an internal staff member or designated reviewer.
Creating a "Reviewer" Annotation Type
- Navigate to Menu Icon > Global Settings > System tab > Annotation Types.
- Click the New Type button (represented by a plus sign).
- Create an annotation type with the name and caption of either “Reviewer Annotation” or “Staff Annotation” depending on your process and preferred terminology.
- Enter a description that states the purpose of this annotation type. For example, you could enter “Used to create field-level annotations by reviewers requesting changes from the applicant”.
- Navigate to the Permissions & Availability tab.
- For the Allow View field, select both the applicant and reviewer roles. This way both applicants and reviewers will be able to see both types of annotations on a record.
- For the Allow Create field, only select the reviewer role so only a reviewer can create the "Reviewer" type of annotation.
Create an "Applicant" Annotation Type
- Navigate to Menu Icon > Global Settings > System tab > Annotation Types.
- Click the New Type button (looks like a plus sign).
- Create a type with the name and caption of “Applicant Annotation”.
- Enter a description the states the purpose of this annotation type. For example, you could enter “Used to create field-level annotations by the applicant, responding to change requests from a reviewer”.
- Navigate to the Permissions & Availability tab.
- For the Allow View field, select both the applicant and reviewer roles. This way both applicants and reviewers will be able to see both types of annotations on a record.
- For the Allow Create field, select just the applicant role. So only an applicant can create the applicant type of annotation.
Setting up Statuses for Annotations
Status are used to control what happens at different stages of a process such as bringing the user directly into annotation mode and notifying a user that they need to change values on their application. To achieve the above scenario, we are using many statuses within our desired universal tracking application.
Statuses are created by going to the desired Universal Tracking Application > Configuration Settings > Select the desired tab (such as “Level 1 Grant”) > Statuses > Click the New Status button (represented by a plus sign). Enter the desired information and define the availability, permissions, and then click Save.
Below is an explanation of each status and how it was configured:
| Name | Description | Configuration Steps |
| Draft | The grant application is being filled in by the applicant. |
|
| Submitted | The applicant has submitted the application and can no longer edit it. |
|
| Reviewer Assigned and Notified | The reviewer has been notified that the application is ready for review. |
|
| Reviewer Annotation and Creation | The reviewer adds annotations to the grant application, requesting changes and clarifications. They also review the applicant's annotations. |
|
| Revisions Requested | The applicant is notified. They must change values, reply to annotations, and provide clarity to issues raised. |
|
| Applicant Revisions Submitted | The reviewer is notified that the applicant has made the requested changes and provided clarity. |
|
| Approved | The grant application has been approved. |
|
| Declined | The grant application has been declined. |
|
Status Settings Explained
These settings are found at UTA > Configuration Settings > Level 1 tab > Statuses > Select a Status.
Lock On Status
Prevents users from editing the application record and hides any Save and Submit Buttons configured to appear on this status.
Override Lock
Allows a user role to edit a locked record and see the submit and save buttons configured to appear at this status.
Availability
Controls which types of applications will have access to this status
Annotation System Role and Annotation Association Role Permissions
Depending on the business requirements you may choose to use Annotation System Roles (Example: anyone with the system reviewer role has permissions) or Annotation Association Role Permissions (Example: anyone attached to the record as a contact in the UTA role of reviewer has permissions).
View
Who can see the annotations
View and Create
Who can create new annotation threads and reply to existing annotations
Edit Field
Who can edit the value of the field being annotated and reply to existing annotation threads
Mark as Resolved
Controls who can see the "Mark as Resolved" and "Mark as Unresolved" buttons. These buttons are typically accessible to users assigned to the role of reviewing the application.
Open in Annotation Mode
Who can see the record in annotation mode by default
Anonymize Creator
Hides the name of the person who added the annotation
Workflow Notifications
At multiple stages in the process notifications will automatically be sent to the reviewer and applicant letting them know that action is required on an application.
To accomplish this a workflow is set up by navigating to Menu Icon > Workflows.
- Click the “New Workflow” button (looks like a plus sign).
- Select the desired UTA for the Workflow Object field.
- Select the desired Level 1 status for the Trigger On field. Then click Save.
- Setup a task with the Task Type of “Acknowledgement” and choose the message type of “Email”.
- In the email message, you may wish to include both the name of the application and a link to the application.
Submit Buttons and Annotation Submission Buttons
Submit buttons move a record between statuses that are not locked. A user role can also be given permission to override a locked status to see submit buttons.
Annotation submission buttons are intended for use only in Annotation Mode when the record is locked where other submit and save buttons are hidden.
Both types of submission buttons are configured by navigating to the desired UTA > Configuration Settings > Click on the desired Level 1, 2, or 3 tab > Submit and Save Buttons.
We created the following submit buttons for our scenario:
| Name | Description | Type | Configuration Steps |
| Submit | Applicant submits and this locks the application to the applicant. | Submit |
|
| Begin Review Process | A reviewer is assigned who will approve, decline or annotate the application | Submit |
|
| Move to Reviewer Annotation and Review | Record moved to reviewer annotation and review after the reviewer was assigned and notified. | Submit |
|
| Send Requested Revisions to Applicant | Sends requested revisions to the applicant. | Submit Annotation |
|
| Submit Revisions | Sends revisions from applicant to reviewer. | Submit Annotation |
|
| Approve Application | The reviewer approves the application (no more changes are required). | Submit Annotation |
|
| Decline Application | The reviewer declines the application. | Submit Annotation |
|
