Difference between revisions of "Accessing the UTA Settings Tab"
| (6 intermediate revisions by 2 users not shown) | |||
| Line 6: | Line 6: | ||
{{ConfigurationMenu}}<br><br> | {{ConfigurationMenu}}<br><br> | ||
2. Under "Permission Settings," click on the link for [[Manager Permissions]].<br> | 2. Under "Permission Settings," click on the link for [[Manager Permissions]].<br> | ||
| − | 3. | + | 3. Click on the [[Manager Permissions - UTA Permissions|UTA Permissions]] tab.<br> |
4. For each [[UTA]] in your copy of SmartSimple, there will be a set of permissions. Click on the Permission that consists of the name of your UTA. | 4. For each [[UTA]] in your copy of SmartSimple, there will be a set of permissions. Click on the Permission that consists of the name of your UTA. | ||
| − | For example, if you wanted to enable the Settings tab for a UTA entitled "Grants Manager," | + | <pre style="white-space: pre-wrap; white-space: -moz-pre-wrap; white-space: -pre-wrap; white-space: -o-pre-wrap; word-wrap: break-word;">For example, if you wanted to enable the Settings tab for a UTA entitled "Grants Manager," you would click on the Permission named "Grants Manager," which would be directly above the Permission entitled "Grants Manager - View Activity Only."</pre>5. On the right hand panel, select the [[roles]] for which you want the UTA Settings tab to be available.<br> |
| − | |||
| − | |||
| − | 5. On the right hand panel, select the [[roles]] for which you want the UTA Settings tab to be available.<br> | ||
6. Scroll to the bottom of the page and click "Save." | 6. Scroll to the bottom of the page and click "Save." | ||
| + | The Settings tab will now be visible for the selected roles as the rightmost [[Tabs#Menu_Bar_Tabs|Menu Bar Tab]] in the selected UTA. | ||
| + | :[[Image:MenuBarTabs.png]] | ||
| + | ''Settings Tab in Classic Mode'' | ||
| − | + | ||
| + | :[[Image:MenuBarSettingsIcon.png]] | ||
| + | ''Settings Icon in Arcadia Mode'' | ||
==See Also== | ==See Also== | ||
* [[UTA Settings Page]] | * [[UTA Settings Page]] | ||
| − | [[Category:Universal Tracking Application]] | + | [[Category:Universal Tracking Application]][[Category:UTA Settings]] |
Latest revision as of 10:14, 21 January 2016
System administrators grant access to the Settings tab for each UTA using Manager Permissions.
The following are steps to add the Settings tab to a specific UTA:
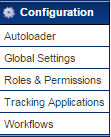
1. On the left menu bar, under the Configuration heading, click on Roles & Permissions.
Configuration Menu
Shown above the Classic Interface view.
Shown above the Arcadia Interface view.
2. Under "Permission Settings," click on the link for Manager Permissions.
3. Click on the UTA Permissions tab.
4. For each UTA in your copy of SmartSimple, there will be a set of permissions. Click on the Permission that consists of the name of your UTA.
For example, if you wanted to enable the Settings tab for a UTA entitled "Grants Manager," you would click on the Permission named "Grants Manager," which would be directly above the Permission entitled "Grants Manager - View Activity Only."5. On the right hand panel, select the roles for which you want the UTA Settings tab to be available.
6. Scroll to the bottom of the page and click "Save." The Settings tab will now be visible for the selected roles as the rightmost Menu Bar Tab in the selected UTA.
Settings Tab in Classic Mode
Settings Icon in Arcadia Mode
