Difference between revisions of "User Groups"
From SmartWiki
| Line 22: | Line 22: | ||
:* Click on the + next to the user you wish to add: | :* Click on the + next to the user you wish to add: | ||
::[[Image:GpUS.png]] | ::[[Image:GpUS.png]] | ||
| − | :* Click OK | + | :* Click '''OK''' |
| − | :* | + | :* If you wish to add the selected users to the group with a specified role choose it from the '''Add as Role''' combo box (optional) |
:* Click '''Save''' | :* Click '''Save''' | ||
Revision as of 12:25, 20 May 2010
The User Group feature can be used to create groups of users to facilitate managing a number of contacts as a group rather than individually.
There are 2 ways Groups can be used:
- The Select One - User Group custom field can be used to allow you to select a User Group to be associated with a record (Level 1, Level 2, Level 3, Company, etc). The details of that group can then be referenced and/or displayed. For example using a Read Only - System Variables field.
- A User Group can be added to the contacts section to a Level 1 record. Each member of the group will be assigned directly to the Level 1 record, either using the Role they have in the User Group, or with a role selected when the User Group is added to the Level 1 record.
Creating User Groups
To create a new User Group:
- Click New
- Enter the Group Name and Description
- Click Save
Adding Users
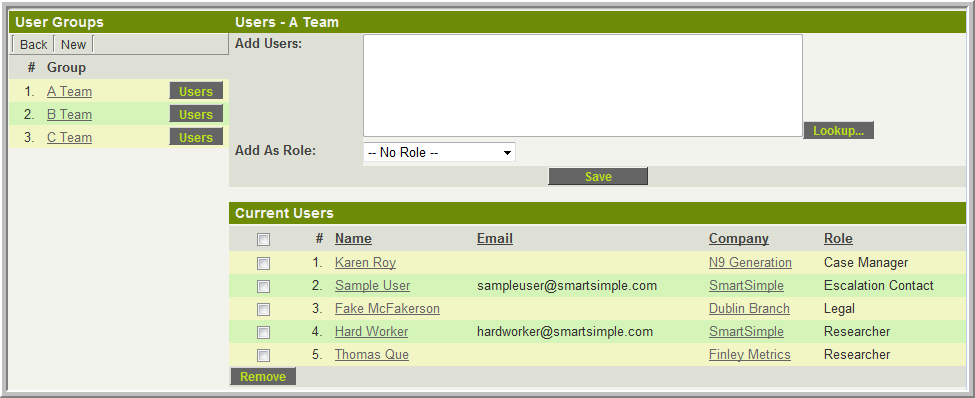
To add users:
- Click the Users button next to the appropriate User Group
- Click the Lookup button
- Use the search options at the top to locate the user(s) you wish to add
- Click on the + next to the user you wish to add:
- Click OK
- If you wish to add the selected users to the group with a specified role choose it from the Add as Role combo box (optional)
- Click Save


