Difference between revisions of "Updating Funding Data in ORCID"
(→Import ORCID record to User Profile) |
|||
| Line 276: | Line 276: | ||
==See Also== | ==See Also== | ||
[[ORCID Research Database Integration - Why?]] | [[ORCID Research Database Integration - Why?]] | ||
| + | |||
| + | |||
[[Category:Integration]] | [[Category:Integration]] | ||
| + | |||
| + | [[Category:ORCID]] | ||
Revision as of 04:03, 24 July 2024
Contents
Overview
ORCID is an independent non-profit organization that provides a persistent identifier – an ORCID iD – that distinguishes individual researchers and a mechanism for linking research outputs and activities to the user’s specific ORCID iD. ORCID is integrated into many systems used by publishers, funders, institutions, and other research-related services. Learn more at ORCID.org
SmartSimpleCloud supports functionality that can authenticate ORCID iDs and update ORCID records using the ORCID API. SmartSimpleCloud is using the 3.0 version of the API for the ORCID integration. By collecting a user’s authenticated ORCID iD, this allows import of a user’s ORCID record to their profile. The ORCID integration can also be configured to add and update funding records on the user's ORCID record. This functionality will be of particular interest and advantage to researchers and research-based foundations using SmartSimpleCloud.
ORCID offers a Public API that allows organizations to connect their systems to the ORCID registry. The Public API can be used to collect authenticated ORCID iDs. ORCID Membership allows access to the Member API, which facilitates registration, and information exchange with ORCID records. ORCID membership is open to any organization interested in integrating ORCID identifiers. The Member API allows your systems and applications to connect to the ORCID registry, including reading from and writing to individual ORCID records with the user’s permission. Learn more at ORCID Membership.
This article will show you how to setup importing a user’s ORCID record as well as add and update Funding records using the ORCID API. You will need Global Administrator access to setup the ORCID integration in SmartSimple Cloud.
Use cases
- Once logged into the system, users sign into their ORCID accounts using their registered email address and password or they can create a new account and then authorize your system to obtain their ORCID iD. Storing authenticated ORCID iDs in your system ensures you get the correct ORCID iD for the user and that the information on that record reflects their research activities.
- Once the user has granted permission, information that the user has set as visible to trusted parties in addition to the information set as visible to everyone is imported to their profile. The display of the ORCID records on the user’s profile is permissioned by role to allow staff or reviewers an overview of the user’s research activities.
- The user’s process is streamlined by retrieving data from their ORCID records on their profile to populate application or progress report forms. In SmartSimple Cloud, data from ORCID is stored in JSON format to allow specific formatting and allow your team to use the data in different ways within the system.
- By enabling the functionality for staff to add and update data in ORCID funding records, it can help make life easier for your users by connecting validated information to their ORCID records. Since this action is triggered by a workflow, it can be configured for specific roles to trigger at a particular status. Mapping of the data fields sent to ORCID is determined by your system administrator.
- The display of the user’s ORCID data on their profile is complementary to any configuration capturing researcher profile data and outputs currently configured in your system. In SmartSimple Cloud, the data from ORCID is stored in JSON format to allow your system administrator to create specific views of information from different sources for your team or processes specific to your organization.
Configuration – Essentials
Obtain Keys to Use the ORCID API
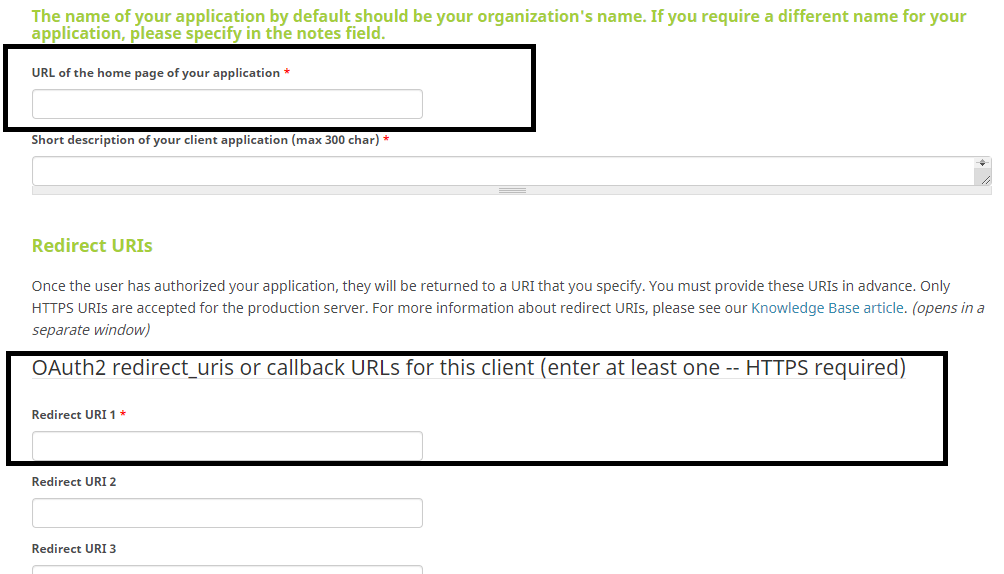
To use the ORCID Integration, a ORCID Member API (Production Member API) is required. Each instance URL will need its own API. During signup, you will need to provide the Homepage URL and also a Redirect URL . Please refer to the ORCID API application for more information.
Below is a screenshot of the ORCID Member API application on ORCID:
ORCID URL Configuration
Example of "URL of the home page of your application"
https://alias.smartsimple.com
This is the URL you use to access your instance of SmartSimple Cloud.
Example of "Redirect URI"
https://alias.smartsimple.com/links/orcid/callback.jsp
This is a link to the callback server page for your instance of SmartSimple. Note that the URL will be different as it must match that used to access your own copy of SmartSimple Cloud.
Integration Key Management
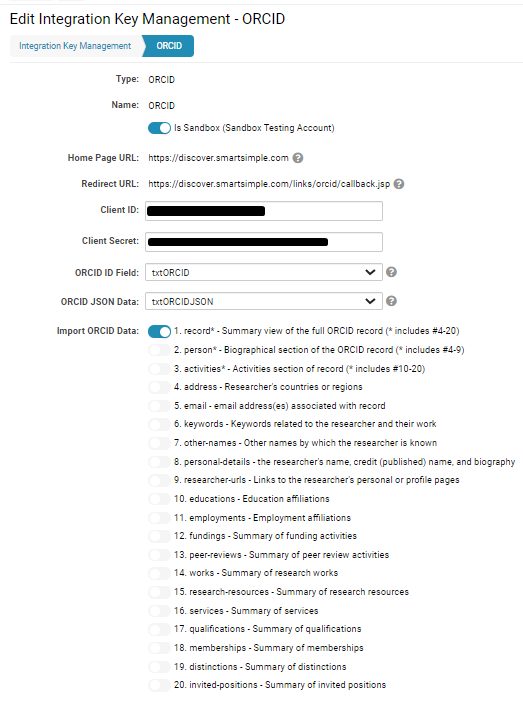
After a successful ORCID Member API application, set up your Client ID and Client Secret in your system in Integration Key Management.
- Go to Global Settings > Integrations > Integration Key Management.
- Click on New Integration Key (+ button).
- Key Type: set to ORCID.
- Copy the Home Page URL and Redirect URL for ORCID Member API application.
- Fill in Client ID and Client Secret from your ORCID API application.
- Choose user custom fields to store the ORCID iD and JSON data.
- Select one or more Import ORCID Data record types. These determine the set of information that will be pulled from ORCID.
Note: ORCID offers a sandbox testing server to try the ORCID API. You can create user accounts and test out API calls on the sandbox without needing to worry about affecting production data or accidentally spamming researchers.
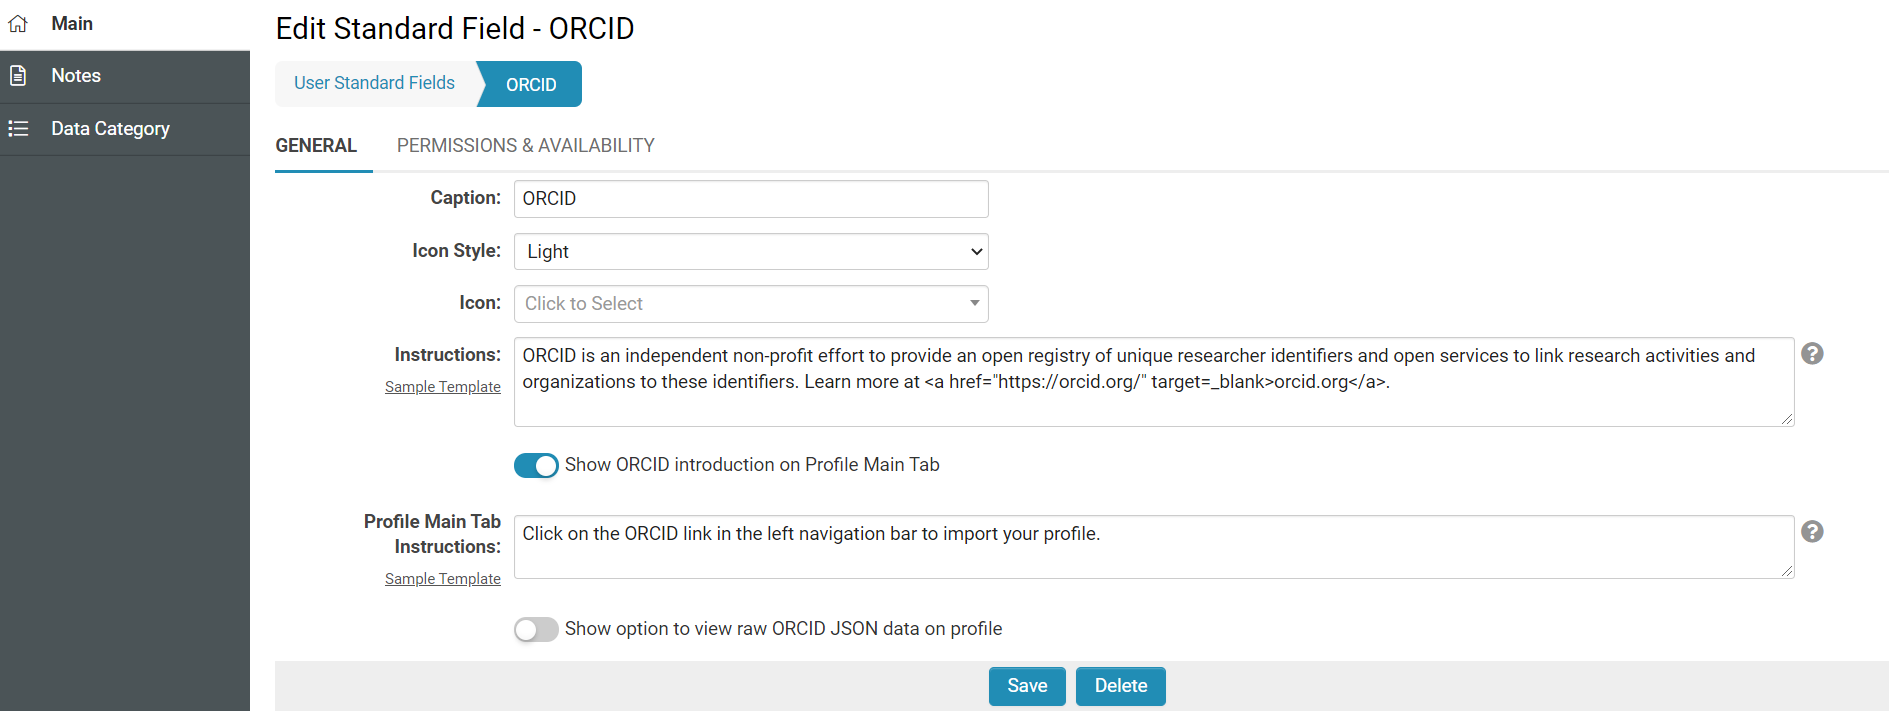
Enable ORCID Tab on User Profile
SmartSimple Cloud supports importing a user’s ORCID records to their profile. The ORCID iD is stored to a user profile field and the data imported from ORCID is stored in JSON format.
Under Global Settings > Users > Standard Fields > ORCID, update the configuration to permission specific roles and statuses. It is advisable to include instructions and messaging on the Profile Main tab. Sample templates for messaging within these sections are available.
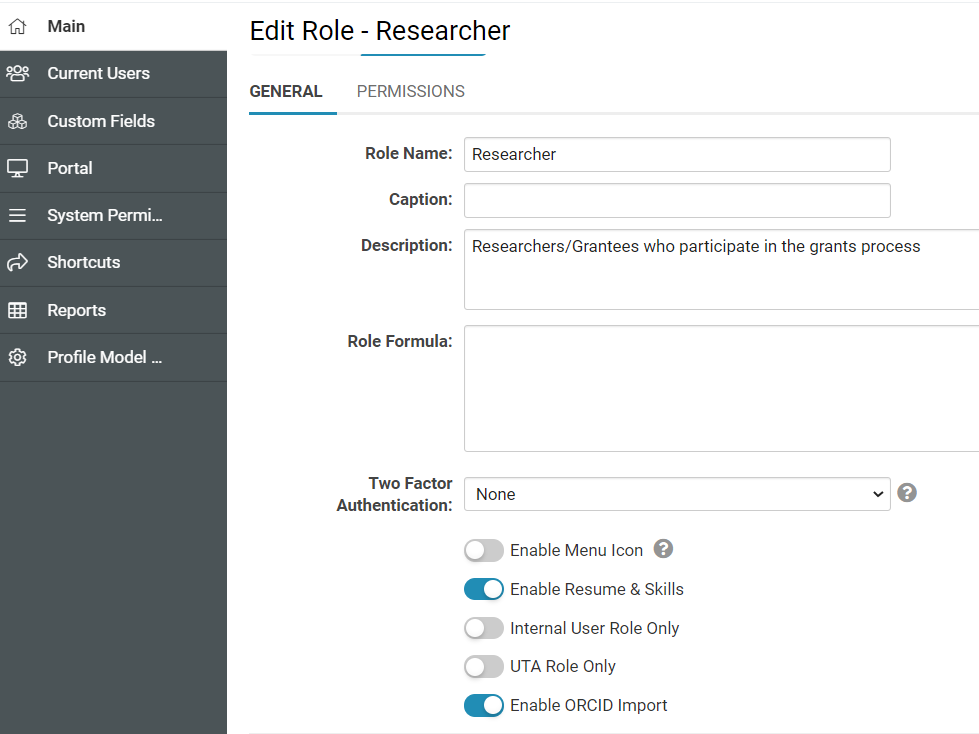
Configure Roles Using ORCID
Under Global Setting > Users > Roles, select a role and toggle on the option Enable ORCID Import. Users with the selected role will have the option for ORCID import in their profile.
Configuration – Advanced
Add and Update ORCID Funding by Configuring Fields on L1
SmartSimple Cloud currently supports adding and updating funding data on the user's ORCID record using the ORCID Member API. In order to update researcher records, the user must have an authenticated ORCID iD and provided permission for the specific system to make updates.
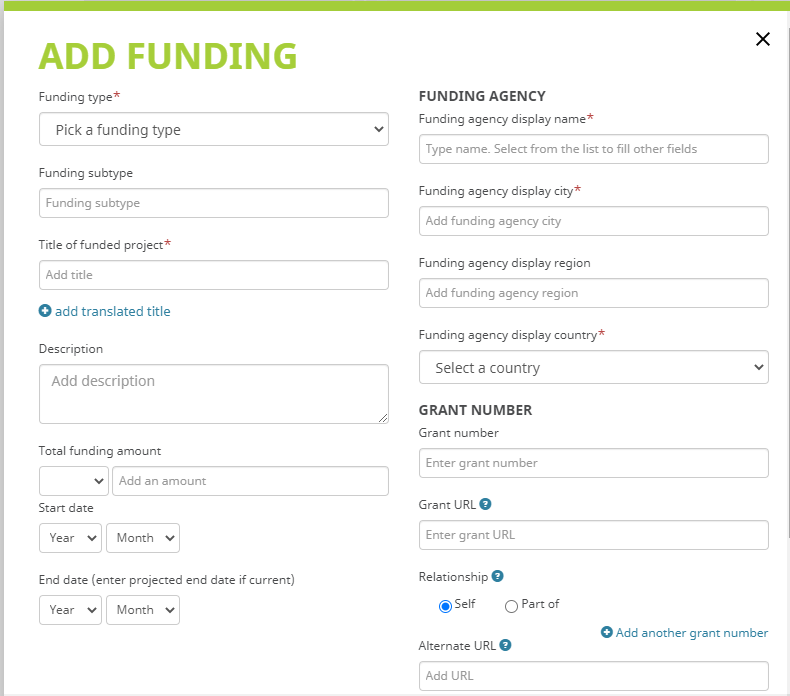
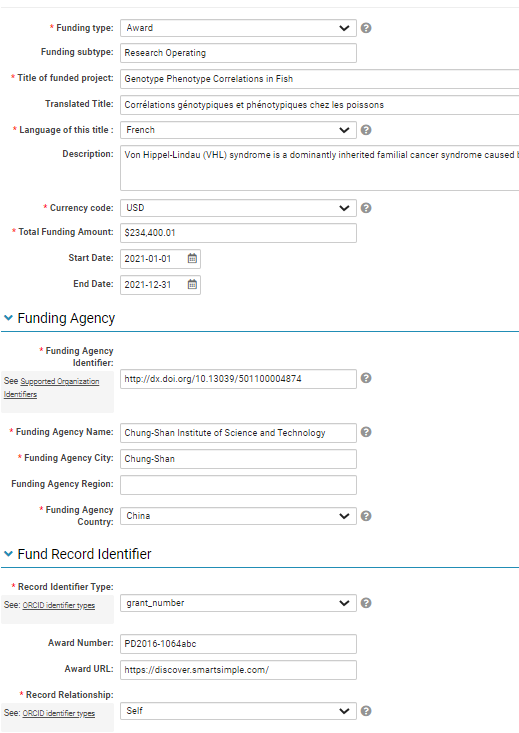
Below is a screenshot from ORCID when a user clicks the Add Funding page, where the user is required to complete several fields.
ORCID crosschecks information imported from SmartSimple Cloud. Certain fields must be configured using ORCID values.
An overview of the fields from the funding record is below, with key values and required fields indicated. Please refer to the ORCID support pages for the most up-to-date values used for the metadata.
| Data | Description | Recommended Configuration |
|---|---|---|
| Funding Type | The type of funding awarded. This field is selected from a list containing the following values: Award, Contract, Grant, Salary-award | Required field, Select One - Combo Box
This should be mapped to a custom field with ORCID values. Example: award=Award;grant=Grant;contract=Contract;salary-award=Salary Award If this is mapped to a text field, the entered value has to be one of the option values in the list. |
| Funding Subtype | This is stored as organization-defined-type in the ORCID funding record | Text Box |
| Title of Funded Project | The title of the funding item | Required field, Text Box |
| Translated Title | The title the funding appears under in another language | Text Box |
| Language of this Title | The language of the translated title is recorded as an attribute | Select One - Combo Box
This should be mapped to a custom field with ORCID values. If this is mapped to a text field, the entered value has to be one of the option values in the list. |
| Description | Description of the funding | Text Box |
| Currency | Currency of the funding | Required field, Select One - Combo Box
This should be mapped to a custom field with ORCID values. Although this list looks very much the same as the SmartSimple Cloud currency list, we would advise that the values provided by ORCID are used. If this is mapped to a text field, the entered value has to be one of the option values in the list. |
| Total Funding Amount | The value of the award | Required field, Text Box - Number |
| Start date | The date the funding began | Required field, Text Box - Date |
| End date | The date the funding ended | Required field, Text Box - Date |
| Funding URL | This can be the URL to a public funding website | Text Box |
| Funding Agency Identifier Link | ORCID verifies this link with the CrossRef list | Required field, Text box
If the link entered in record is not found in the CrossRef list, ORCID rejects the record. |
| Funding Agency Display Name | The funding agency name should correspond to the organization that is specified in the Funding Agency Identifier Link. | Required field, Text box
Example: "Centre for Global Change Science, University of Toronto" from the CrossRef list. A different name can be entered but ORCID uses the identifier link to identify the funding organization. |
| Funding Agency Display City | The funding agency's city should correspond to the organization that is specified in the Funding Agency Identifier Link. | Required field, Text box |
| Funding Agency Display Region | The funding agency's region should correspond to the organization that is specified in the Funding Agency Identifier Link. | Text box |
| Funding Agency Display Country | ORCID checks the country code against the agency specified in Funding Agency Identifier Link, if they don't match, ORCID rejects the record. | Required field, Select One - Combo Box
This should be mapped to a custom field with ORCID values. Example: "Centre for Global Change Science, University of Toronto" from the CrossRef list entered as the agency, but you put FI (Finland) as the country code, ORCID will reject the record. |
| Record Identifier Type | An identifier associated with the work, such as an ISBN, DOI, or PMID | Required field, Select One - Combo Box This should be mapped to a custom field with ORCID values. If this is mapped to a text field, the entered value has to be one of the option values in the list. If L1s are always be grants, map this to a field with value always equal to grant_number and hide the field. If this field is empty, the system will use doi as type and the external-id-value (normally the grant number) will be replaced with the value of Funding Agency Identifier Link, because otherwise ORCID rejects the record. To prevent this from occurring, specific form validation should be set up for your awarding process.
Example: The funding is for a book, ISBN number 10000005, then the record identifier type should be isbn. |
| Record Identifier Number | The identifier associated with the work | Required field, Text box
This field data will be used as the external identifier if identifier type is selected, if no data is specified for this field, the system will push data to ORCID using the Funding agency as the identifier. Although ORCID allows this, in the SmartSimpleCloud settings, the ID should always be available for the funding record. |
| Record Identifier URL | The URL where the identifier resolves to | Text box |
| Record Relationship | This is to indicate the relationship of the funding item to the identifier. | Required field, Select One - Combo Box
This should be mapped to a custom field with ORCID values. Example: If the funding item is for one phase of a multi-part grant, and the identifier is for the multi-part grant, then the relationship would be part-of if the identifier is for the individual phase, then the relationship would be self. |
| Contributor Role | Describes the relationship of the individuals who received the funding | Required field, Select One - Combo Box (L1 association common field)
This should be mapped to a custom field with ORCID values. Example: For each person involved in the funding, these users are added to the L1-Contacts and each identified as lead, co-lead, supported-by, etc. If multiple contacts are added to a funding record, for each of these contacts with an ORCID enabled role, and have authorized SmartSimple to access their ORCID record, a funding record will be pushed to each of their ORCID record. These users might represent different types of contributor roles in the funding. |
| Contributor Fund Code | Stores the unique identifier of the funding data that was uploaded to ORCID user's profile. | Required field, Text box
This is used when the fund data has already been added to ORCID user profile from the L1 and used when the workflow is triggered again to push updated data to ORCID. |
| Error Message | Error response from process of uploading fund to ORCID user profiles will be saved to this field. | Required field, Text box |
Mapping the L1 Fields
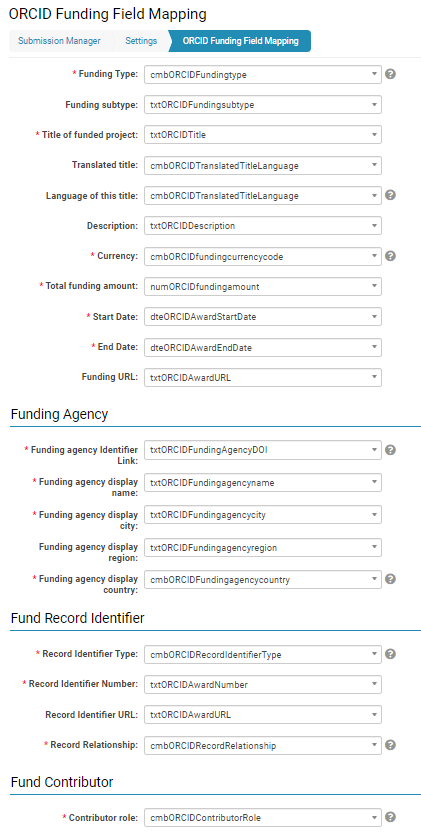
Each of these fields are mapped in the specific UTA. Go to UTA Settings > Connectivity > Service Settings > ORCID Funding Field Mapping.
The fields required in the ORCID Funding record are displayed in the left column and the SmartSimple Cloud L1 fields are displayed in the right column. Mandatory fields are indicated with a red asterisk. SmartSimple Cloud fields are selected using a drop-down.
Workflow to use Task Type: Push Fund records to users’ ORCID Record
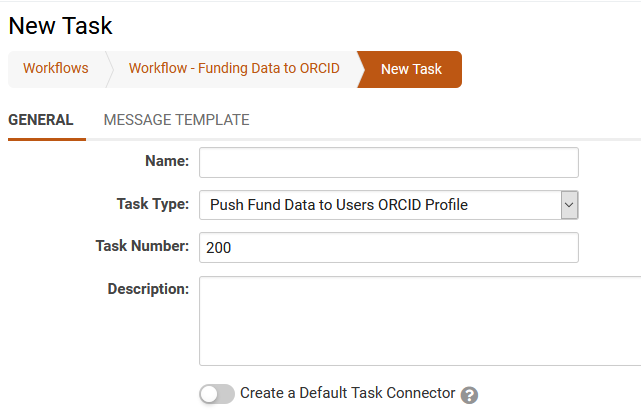
In a L1 workflow, create a new task type: Push Fund Data to Users ORCID Record. If desired, this task can be incorporated into an existing workflow.
We currently support Adding a new funding record to the user’s ORCID record. The update fund data will only run for L1 - Contacts which have a valid fund code in the Contributor Fund Code (L1 contact association field) field where this fund code is unique to the ORCID user’s profile.
Using the ORCID Integration
Import ORCID record to User Profile
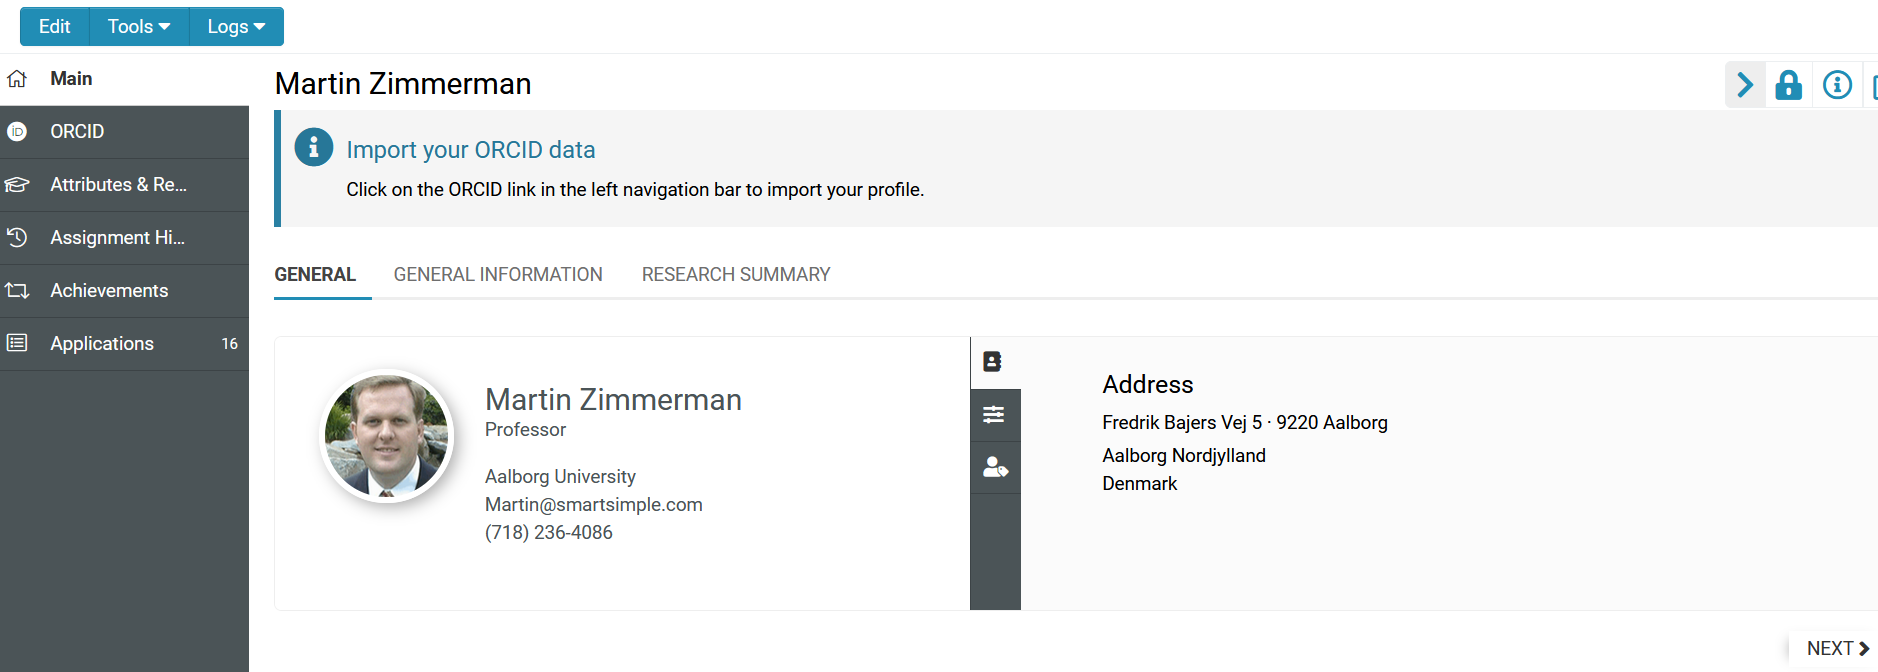
1. When the user logs into their portal, if they have not previously imported their ORCID record, a message appears instructing them to navigate to the correct section.
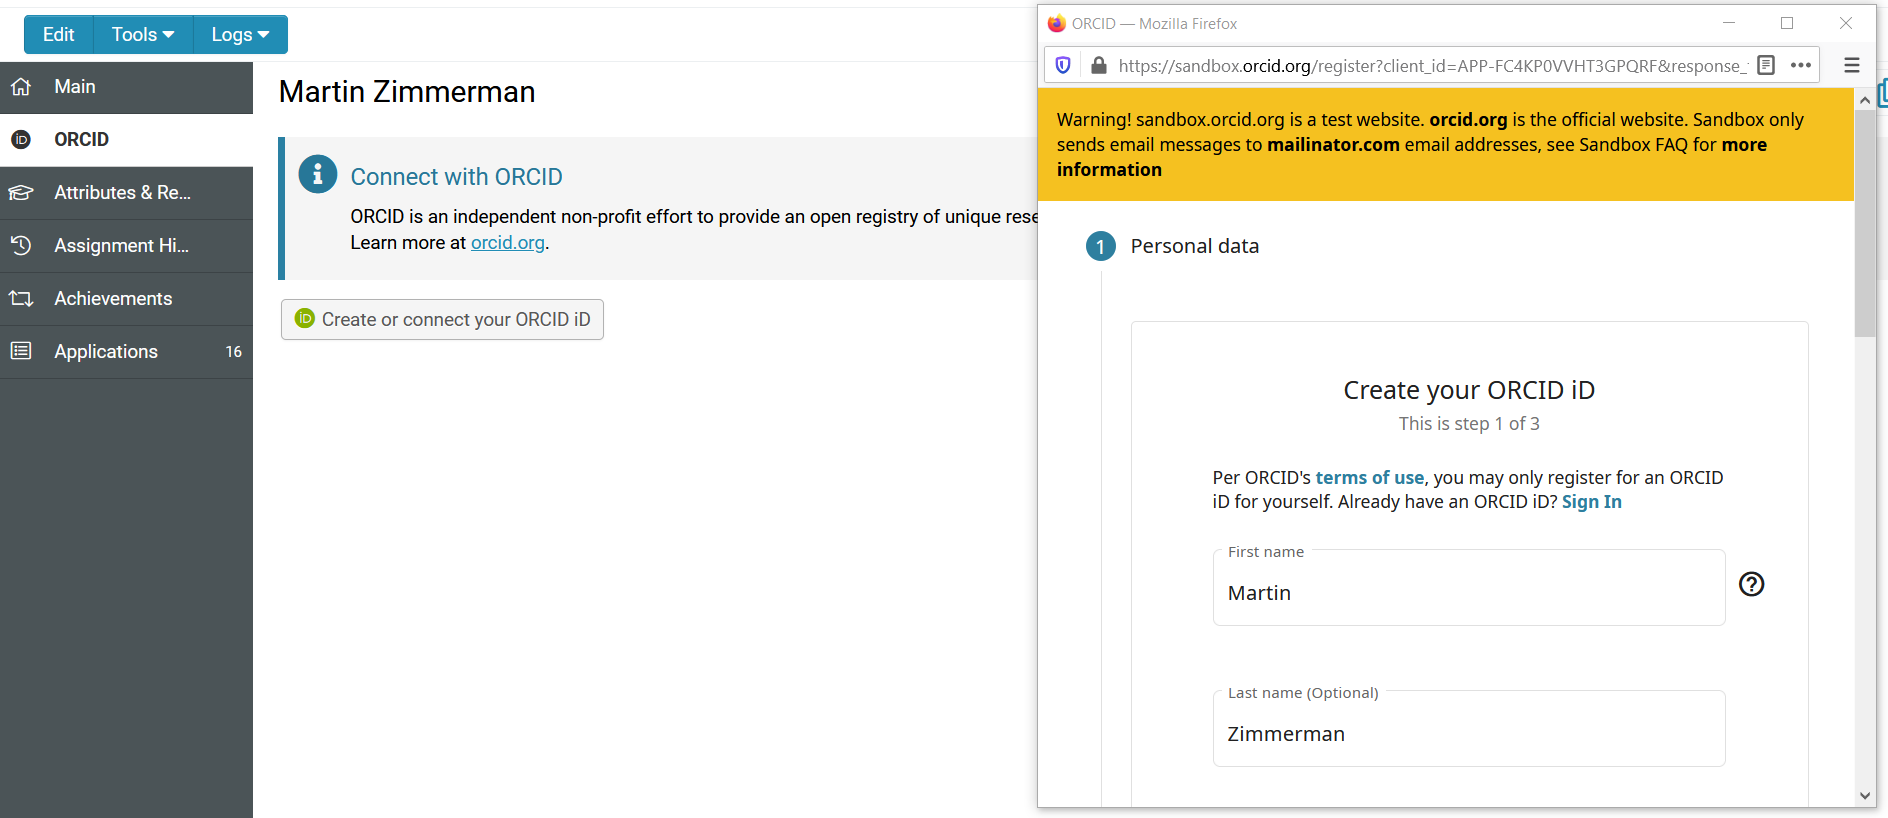
2. When the user navigates to the ORCID tab on their profile, they have the option to connect their ORCID iD. Instructions appear to the user in this tab. These instructions should introduce users to ORCID, why you are requesting access to their ORCID record, and what you will do with their data.
3. When the user clicks on the Create or connect your ORCID iD button, a new window appears for the user to create or login to ORCID. This process uses OAuth to authenticate ORCID iDs.
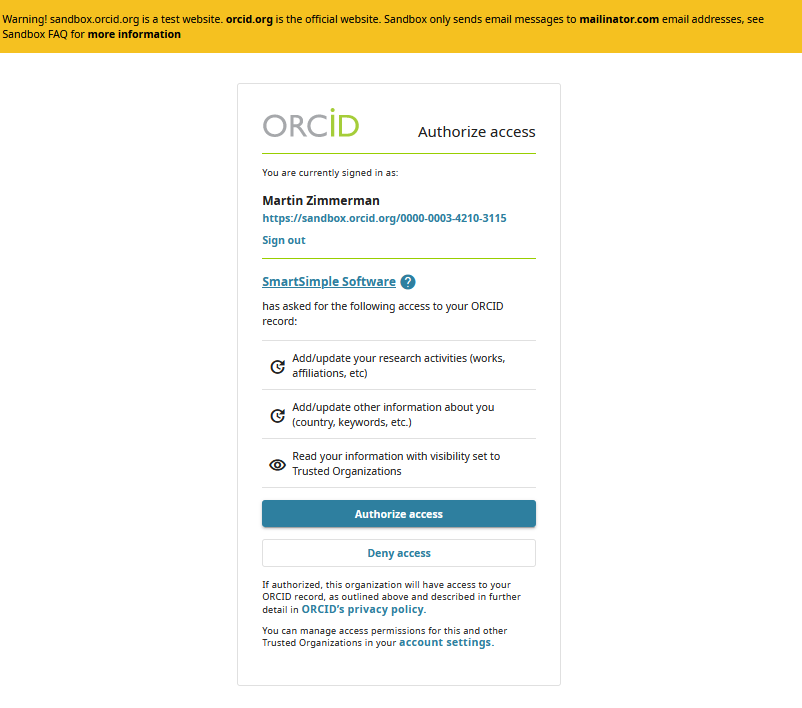
4. Once the user's credentials are entered, the user is prompted to Authorize access for the system. Note that the organization name will be the one used to apply for the ORCID API and not SmartSimple Cloud.
5. Once the Authorize access is clicked, the ORCID iD is authorized and the user is prompted with a button to Continue to import your ORCID data. The ORCID iD is stored in the field designated in the configuration settings. Note the ORCID iD, access tokens and refresh tokens are all stored into the same record for the user in the system database. If Deny access is clicked, the process ends.
6. When the user clicks Continue to import your ORCID data, the data is automatically refreshed on their profile and a thank you message appears. The user can close the separate window at their leisure. The user’s data is stored in JSON format in the field designated in the settings.
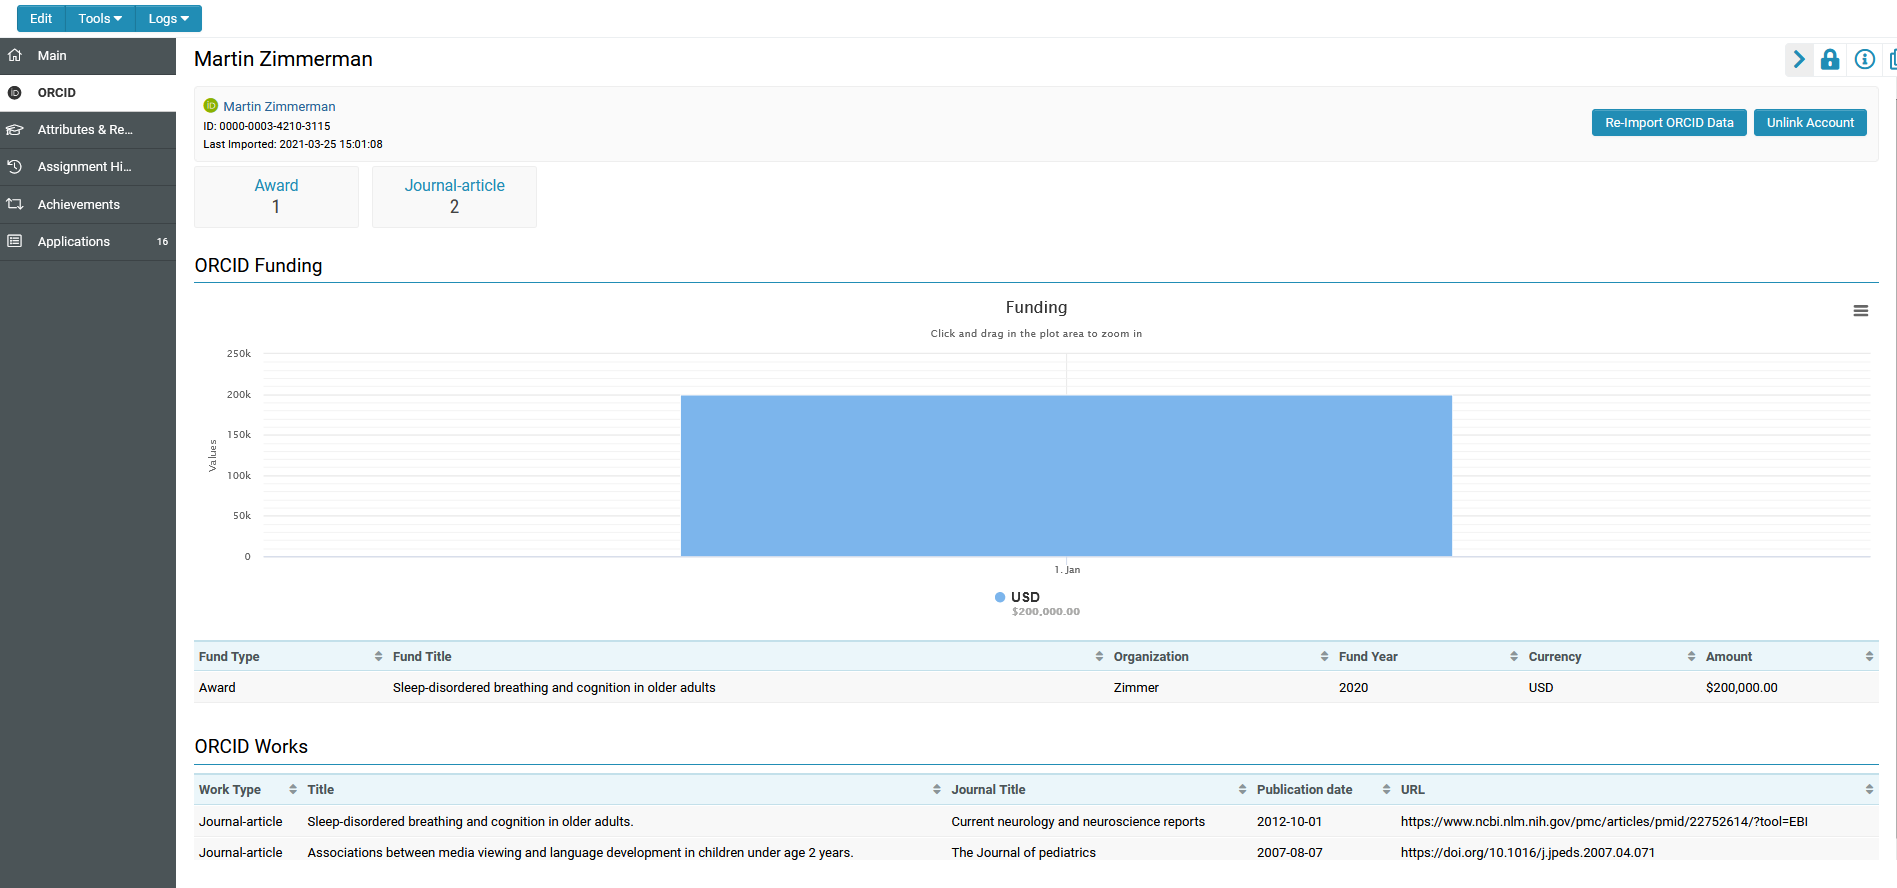
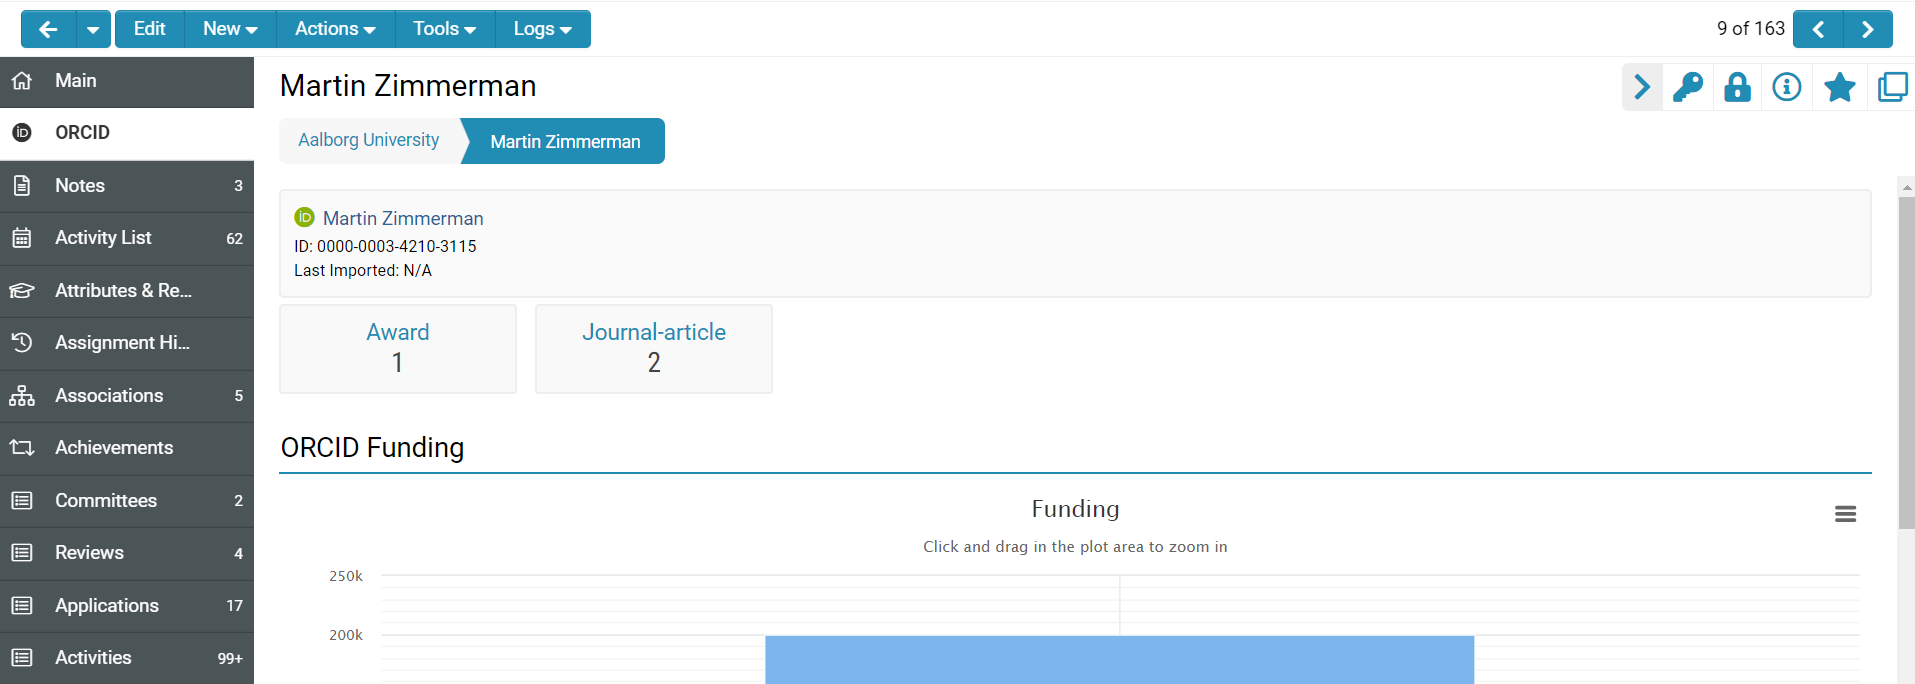
7. The user profile displays an overview of their ORCID record. A count of different Funding Types and Works is provided at the top of the page. Details of the Funding and Works are listed.
8. If specific Funding records do not contain a year or amount, they are excluded from the chart and a message to the user is displayed.
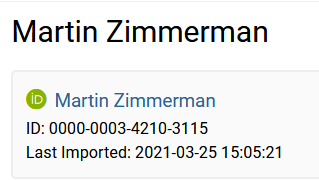
9. An ORCID iD icon is displayed to the top of the page next to the profile name on the ORCID tab of the profile. This has a hyperlink to the public ORCID record of the user’s account. The user’s iD and last imported date is displayed.
10. A button captioned Re-Import ORCID Data is available for the user to trigger a re-Import of their ORCID record. Any data that has been updated or added to ORCID will be imported and the profile page automatically refreshed. The Last Imported date will be updated. 11. A button captioned Unlink Account is available for the user to unlink their account. A message appears for the user to confirm. When confirmed, the ORCID record information is immediately removed from the ORCID tab of their profile.
Viewing Other Users’ ORCID records
1. For roles able to view the user’s profile, such as internal staff, if the user has not previously imported their ORCID record, a message appears indicating that they have not connected to ORCID. Note that the user themselves has to login to the system in order to authenticate their iD to import their profile.
2. For roles able to view the user’s profile, such as internal staff, once the user has connected to ORCID and imported their profile, the ORCID record can be viewed.
Adding/Updating ORCID Records
1. Complete all of the fields in the L1 funding record with the data to be transferred to ORCID. ORCID verifies this link with the CrossRef list. Not all of the fields in the example are required for the ORCID Funding record.
2. For each of the L1 - Contacts, identify their role in the funding. When adding a contributor to a funding record, ORCID supports the following roles: lead, co-lead, supported-by and other-contribution. As an example, in your L1, you have three L1 contacts, each with a different UTA role: Lead Investigator, Co-Lead and Co-Applicant, where Co-Applicants are support staff. In the L1 association common field, for Lead Investigator, select "lead", for Co-lead, select "co-lead" and Co-Applicant, select "supported-by".
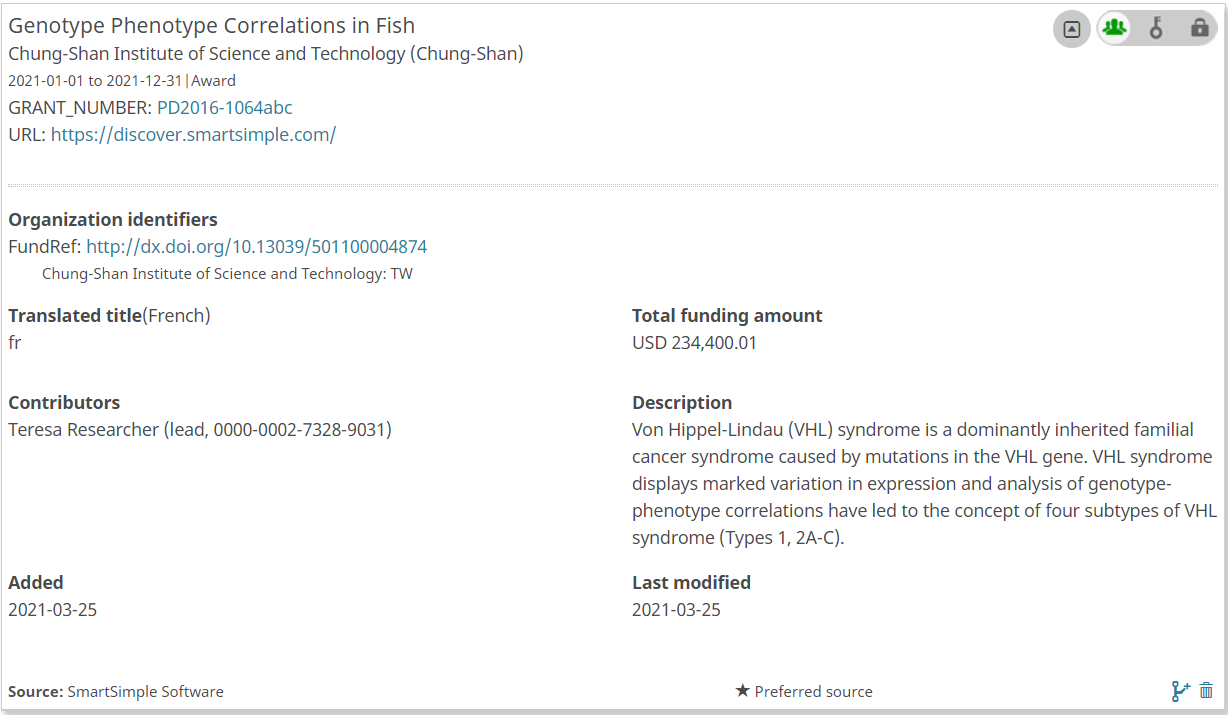
3. Trigger the workflow to send the information to ORCID. The new funding record will populate the user’s ORCID record.
