Difference between revisions of "Template:OneSpan"
Mark Bridger (talk | contribs) (→Example: Using Variables) |
Mark Bridger (talk | contribs) (→Example: Using Hard Code) |
||
| Line 46: | Line 46: | ||
(image) | (image) | ||
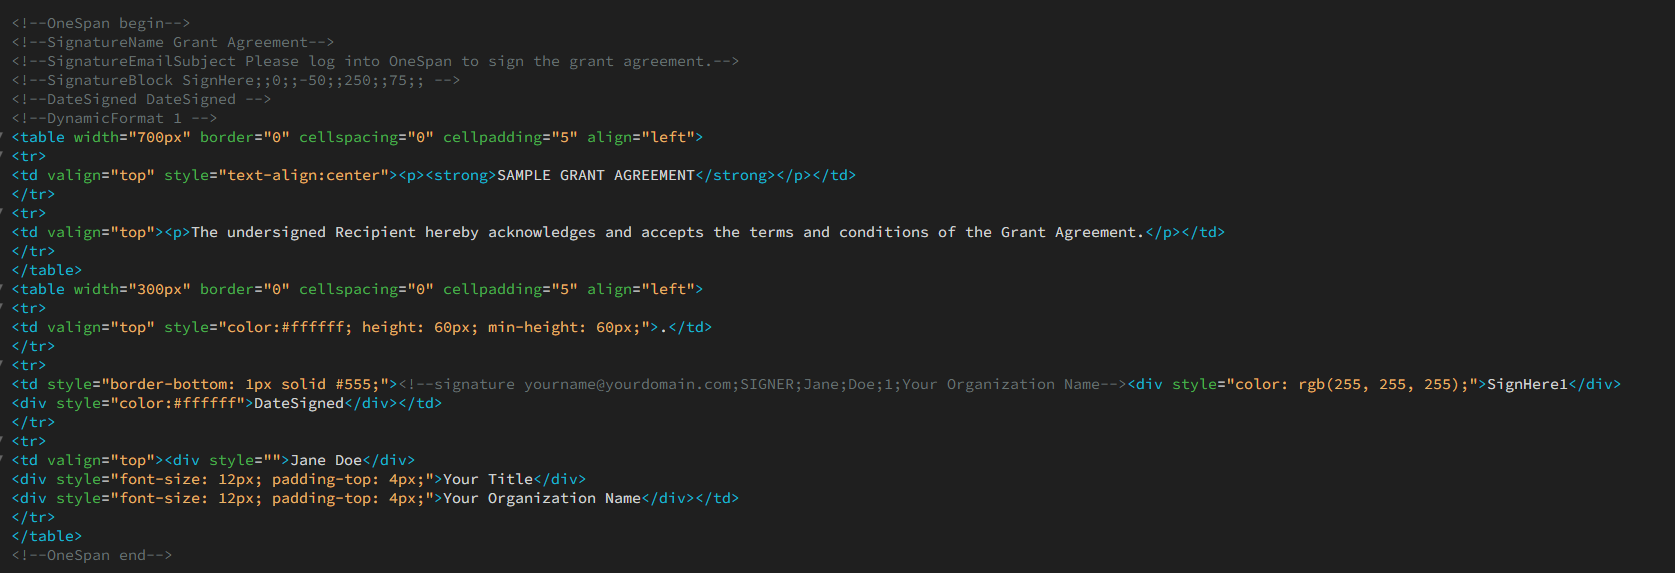
| − | [[File:onespan-hardcode.png|thumb|none|alt=Sample | + | [[File:onespan-hardcode.png|thumb|none|alt=Sample code with hardcoded information|800px|Sample code using hardcoded information for signers]] |
====Example: Using Variables==== | ====Example: Using Variables==== | ||
Revision as of 09:23, 26 September 2023
Contents
Overview
The OneSpan electronic signature integration is used within a document agreement or approval process. Users digitally sign documents to express their intent to comply with (or acknowledge the terms of) the contents of the signed document. Documents are typically generated within SmartSimple Cloud using the Special - Web Page View custom field and subsequently sent to OneSpan for the user to sign. Once all desired signatures have been collected, the document is sent back to SmartSimple Cloud.
This article will walk you through how to set up this integration and the related configuration within SmartSimple Cloud. You will need Global Administrator access as well as your own OneSpan license in order to to configure this integration.
Configuration – Essentials
Creating a OneSpan Account
To use this integration, you must bring your own OneSpan license. This is done outside of SmartSimple Cloud. Reach out directly to OneSpan to get a licensed account and learn more about their products. Once you have an account and license, follow the steps below.
- Log in to OneSpan. Based on your country, your login URL may be different.
- Select “API Access” under the “Admin” option in the menu. An API key will be automatically assigned.
- Under “Client Apps”, click the “Add” button to generate a “Client ID” and “Client Secret”. Be sure to copy and save both items as these codes will only appear once when first generated.
Note: Depending on your setup, you may be required to whitelist specific IP addresses. More information can be found in OneSpan's quick start guides for environment URLs and IP addresses.
Setting up the Integration Key in SmartSimple Cloud
Follow the steps below to set up an integration key within SmartSimple Cloud:
- Log in as a Global Administrator and go to Menu Icon > Global Settings > Integrations tab > Integration Key Management.
- Click the New Integration Key button represented by the plus sign.
- Set the Type to be “OneSpan Sign”.
Note: You are only allowed a single integration key with the Type of “OneSpan Sign”. - Add your Environment URL. This refers to the URL used for authentication into your OneSpan account (Example: https://apps.e-signlive.com). The URL may differ based on your account and location.
- Paste the “Client ID” and “Client Secret” saved earlier into their respective fields.
Selecting the E-signature Provider
You may only use one e-signature provider at a time within SmartSimple Cloud. Select "OneSpan Sign" as the desired e-signature provider by following the steps below:
- Go to Menu Icon > Global Settings > Integrations tab > Select “OneSpan Sign” for E-signature Provider.
- Click Save.
Creating a Web Page View
After creating your OneSpan account, setting up your integration key, and choosing OneSpan as your e-signature provider, you can now configure a web page view that will be used to send a document to OneSpan for signing by following the steps below:
- Create or edit a Special - Web Page View custom field. This field will be used to generate a document and send it for signing.
- For HTML Template, click "SmartFields Sample Template" link to insert the sample template into the field.
- Replace the variable “@SmartFields@” with your desired content. See the Web Page View Sample Code section below for examples.
- Toggle on Enable E-signature.
- For Failed to Complete Workflow, choose the desired workflow you wish to run in the event that the e-signature process fails to complete. Typically you will want to notify someone so they can take action.
- Toggle on Enable Save to Server. This is required for the signed PDF document to be saved within SmartSimple Cloud.
- Click Save.
Web Page View Sample Code
There are multiple ways you can configure the signing block for e-signatures. We have included code samples that can be added to a web page view custom field.
Example: Using Hard Code
(image)
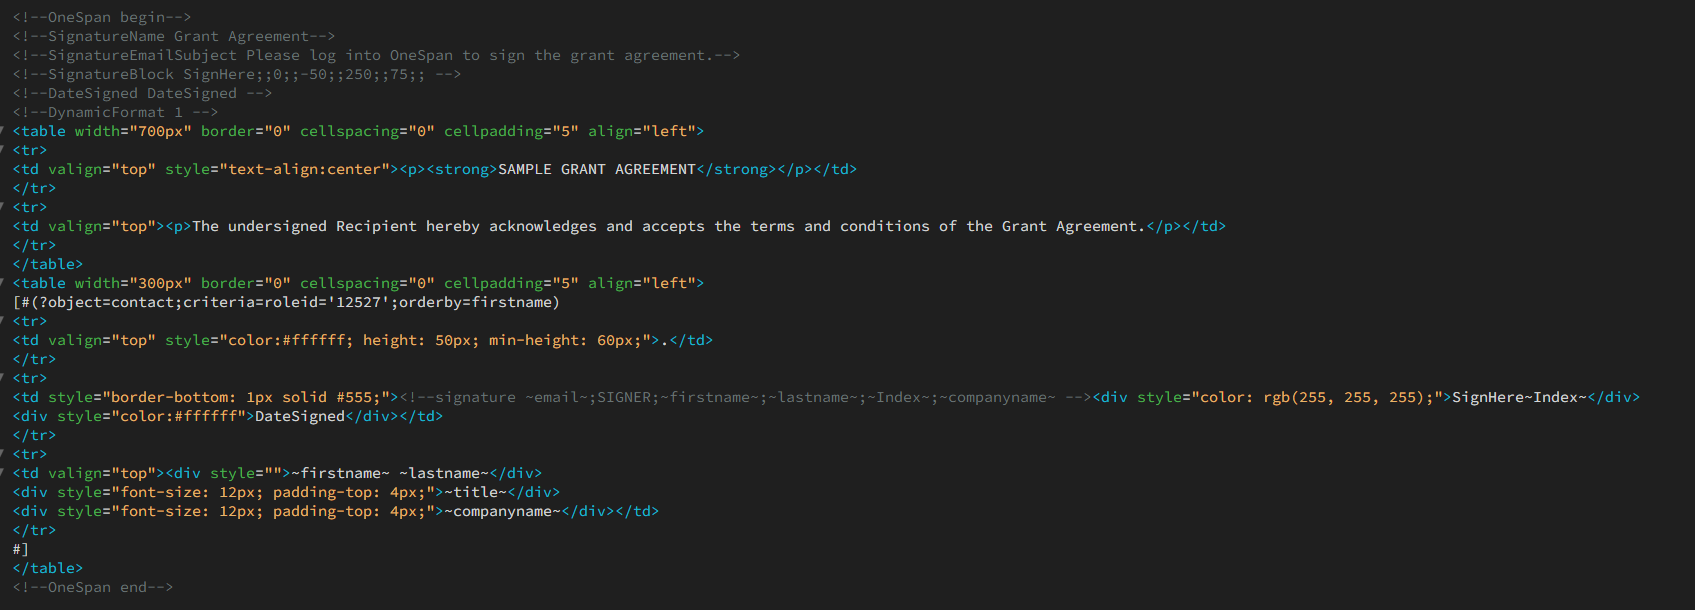
Example: Using Variables
(image)
Example: Using List Syntax
(image)
Submitting a Document for E-signatures
Follow the instructions below to submit a document from a web page view to OneSpan.
- Navigate to the desired Special - Web Page View field on the desired record and open it.
- Click the E-signature button
- Click Submit this document to send the document to OneSpan. The status will change to “Pending”.
Configuration – Advanced
Mandatory OneSpan Tags
The following tags are mandatory in order to configure contact details and signature placement:
| Function | Tag Format | Example | Notes |
| Assigns a name to the document that needs an e-signature |
<!--SignatureName Document Name--> |
<!--SignatureName Grant Agreement--> |
|
| Populates the subject of the email sent to requested signees |
<!--SignatureEmailSubject Place email subject text here--> |
<!--SignatureEmailSubject A Document Requires Your Signature--> |
|
| Defines the anchor string of the signature block |
<!--SignatureBlock Anchor String--> |
<!--SignatureBlock Sign Here: --> |
If you wish to have the signature block appear in the document in a fixed position, then you must include SignatureBlock tag with an anchor string defined and have a text string that matches the anchor string in the document itself. |
| Defines the anchor string for the date stamp |
<!--DateBlock Anchor String--> |
<!--DateBlock Date Signed: --> |
OneSpan will find the "Date Signed" anchor string in the HTML and place the date of the signature beside it. |
| Defines metadata for the target signature |
<!--signature Email;SIGNER;FirstName;LastName;Index;Company--> |
<!--signature youremail@example.com;SIGNER;John;Smith;1;ABC Company Name, Inc.--> |
This tag should be placed beside the SignatureBlock tag in the HTML |


