Difference between revisions of "Email & Email Broadcast Security"
m (removing reference to deleted page Email Designated as Spam) |
|||
| (14 intermediate revisions by one other user not shown) | |||
| Line 2: | Line 2: | ||
The Email and Email Broadcast Settings function allows you to determine how your emails will be system-generated, who is able to access email functionality, set failed email alerts, and more. | The Email and Email Broadcast Settings function allows you to determine how your emails will be system-generated, who is able to access email functionality, set failed email alerts, and more. | ||
| − | = | + | =Enabling Email & Email Broadcast Settings menu= |
| − | |||
| − | |||
===From Global Settings=== | ===From Global Settings=== | ||
1. Click the 9-square menu icon on the top right of your page. | 1. Click the 9-square menu icon on the top right of your page. | ||
| Line 16: | Line 14: | ||
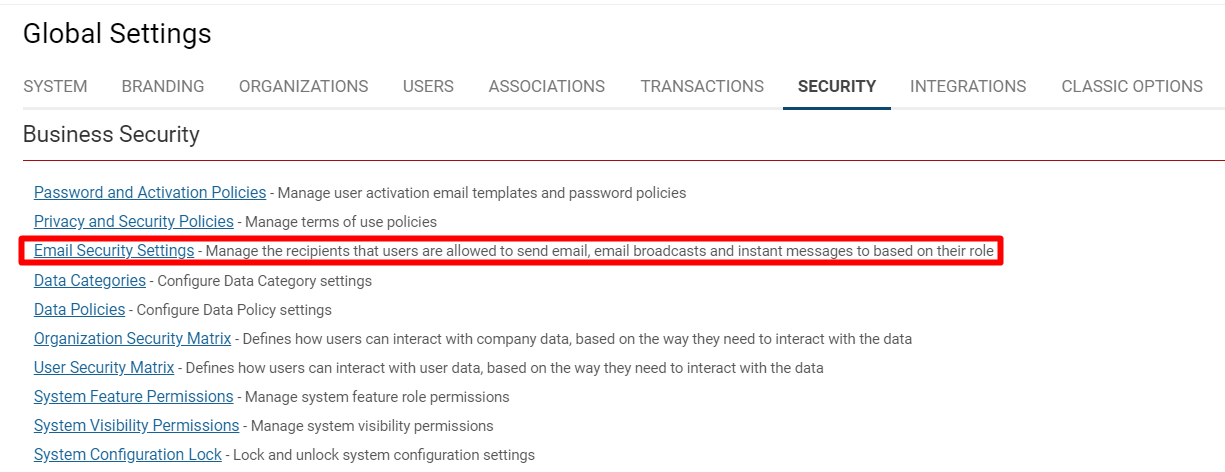
:: [[File:Email security.png|800px|border]] | :: [[File:Email security.png|800px|border]] | ||
| + | ====Enabling Email & Email Broadcast as Menu Item for Roles==== | ||
| + | In order to enable the '''Email Broadcast '''feature as a menu item for certain roles or for all roles, follow these steps: | ||
| + | |||
| + | 1. Click on the 9-square menu icon on the top right of your page. | ||
| + | |||
| + | :: {{Icon-Menu}} | ||
| + | 2. Under the heading '''Configuration, '''select '''Roles and Security. ''' | ||
| + | |||
| + | 3. Select the hyperlink '''User Roles.''' | ||
| + | |||
| + | 4. To make this feature available to all roles, click on the '''pencil icon '''next to the '''Common '''role. Otherwise, click this same icon next to the specific role(s) that you would like to enable '''Email Broadcast''' as a menu item for. | ||
| + | |||
| + | 5. Click on the '''Menu '''tab on the left-hand side menu of the role page. | ||
| + | |||
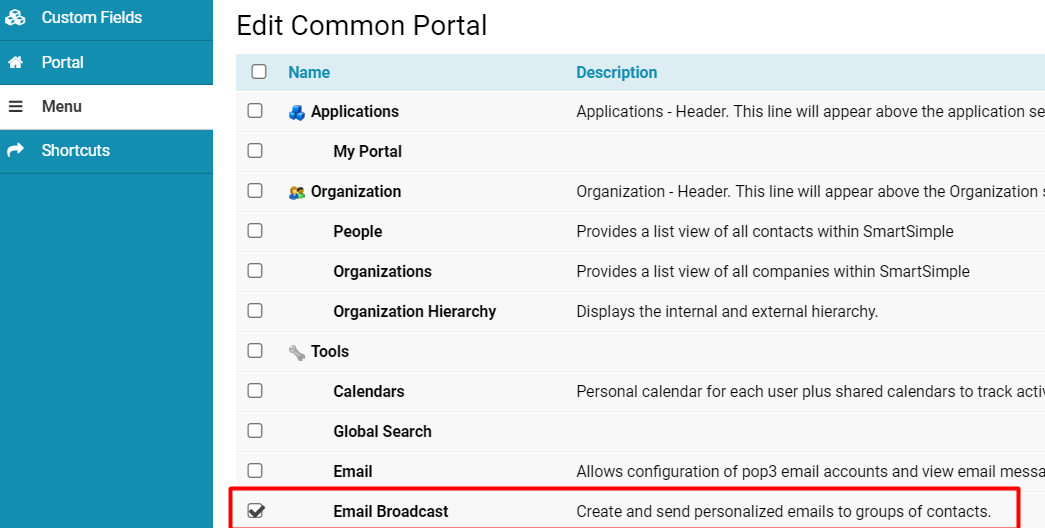
| + | 6. Check the box next to the '''Email '''and '''Email Broadcast '''features in the list. | ||
| + | |||
| + | :: [[File:Enabling email broadcast.png|500px|border]] | ||
| + | 7. Click '''Save.''' | ||
| + | |||
===From the Email Broadcast Feature=== | ===From the Email Broadcast Feature=== | ||
| + | Once the '''Email Broadcast '''and '''Email '''features have been enabled as menu items, you will be able to access them on your menu and open '''Email & Email Broadcast Settings.''' | ||
| + | |||
1. Click the 9-square menu icon on the top right of your page. | 1. Click the 9-square menu icon on the top right of your page. | ||
:: {{icon-Menu}} | :: {{icon-Menu}} | ||
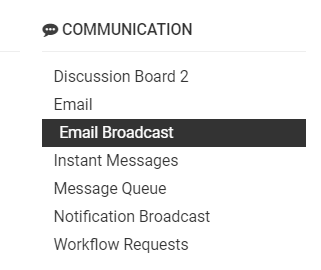
| − | 2. Under the | + | 2. Under the heading, '''Communications, '''click '''Email Broadcast.''' |
| − | :: [[File:Email broadcast.png| | + | :: [[File:Email broadcast.png|300px|border]] |
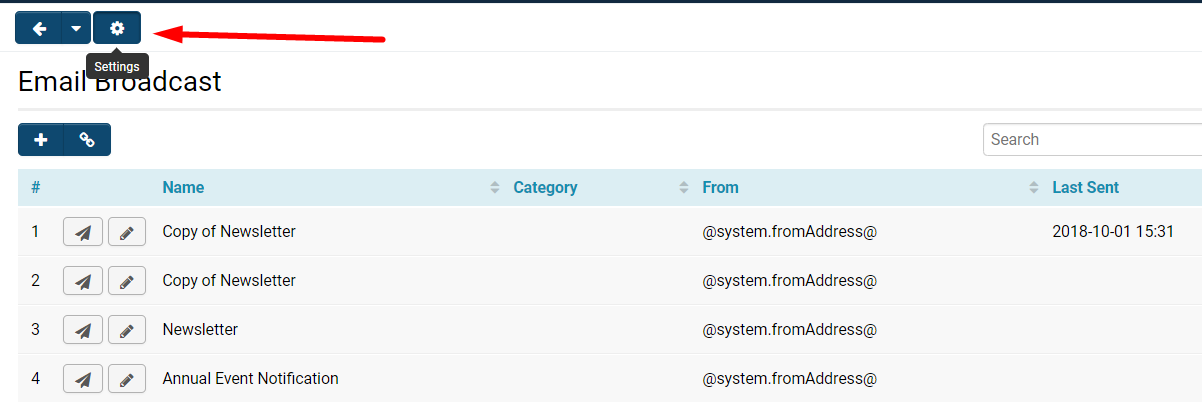
3. Once the Email Broadcast list is open, click on the '''cog icon '''at the top that will open up the Email Broadcast settings. | 3. Once the Email Broadcast list is open, click on the '''cog icon '''at the top that will open up the Email Broadcast settings. | ||
:: [[File:Email broadcast settings.png|750px|border]] | :: [[File:Email broadcast settings.png|750px|border]] | ||
| − | =Email & Email Broadcast Settings | + | =Email & Email Broadcast Settings= |
:: [[File:Email settings security.png|800px|border]] | :: [[File:Email settings security.png|800px|border]] | ||
The Email Settings menu has the following options available under the heading '''Security.''' | The Email Settings menu has the following options available under the heading '''Security.''' | ||
| Line 69: | Line 88: | ||
==Enabling Role Restrictions== | ==Enabling Role Restrictions== | ||
:: [[File:Email settings roles.png|400px|border]] | :: [[File:Email settings roles.png|400px|border]] | ||
| + | If the '''Enable Role Restriction''' feature listed at the top of the page has been toggled on, then it will work in conjunction with the restrictions that you specify in this section. Simply click into each text box in order to reveal a drop-down of [[User role|roles]] available in your SmartSimple system, from which you can select the roles to have certain permissions or restricted access. | ||
| + | : | ||
| + | :* '''Email Broadcast Manager Roles: '''[[User role|Roles]] selected to act as Manager. | ||
| + | :* '''Restrict Email Access: '''Enabling role restrictions will limit who the users in that role can send an email to. The email address field on new emails become '''Read-Only. '''If a user clicks on an email address of a user that they are not permissioned to send an email to, then they will receive a pop-up message that they do not have permission to contact that indvidual. | ||
| + | :* '''Restrict Instant Message Access: '''Select which roles you do not want to have Instant Message functionality in their use of the system. | ||
| − | |||
| − | |||
| − | |||
| − | |||
| − | |||
| − | |||
| − | |||
| − | |||
| − | |||
| − | |||
| − | |||
| − | |||
| − | |||
See also - [[UTA]] - (Use Email Role Restriction) on the [[UTA]] [[Application|application]] '''settings''' page | See also - [[UTA]] - (Use Email Role Restriction) on the [[UTA]] [[Application|application]] '''settings''' page | ||
| − | |||
| − | |||
| − | |||
| − | |||
=Enable Failed Email Alert= | =Enable Failed Email Alert= | ||
| − | [[File: | + | :: [[File:Email fail template.png|800px|border]] |
| − | + | {| class="wikitable" | |
| − | + | |- | |
| − | + | ||'''Frequency''' | |
| − | + | ||This will check for failed emails from the [[Message Queue]], and will in turn send an automatically generated email notifying the senders based on this failed email template. | |
| − | + | |- | |
| − | + | ||'''From Address''' | |
| − | + | ||Must contain a From Address Email. A common issue with failed emails is caused from this. | |
| − | + | |- | |
| + | ||'''To Address''' | ||
| + | ||If certain staff or the system administrator needs to be notified of failed emails, the recipient[s] of the failed email message should be listed here. | ||
| + | |- | ||
| + | ||'''Subject''' | ||
| + | ||Write the subject of the email here - '''ex: ''Failed to Send Email. '''''The maximum length of a subject line is 255 characters. | ||
| + | |- | ||
| + | ||'''Body''' | ||
| + | ||Body of the email to recipients. | ||
| + | |} | ||
| + | Click '''Save '''once you are done filling everything out. | ||
==See Also== | ==See Also== | ||
| + | * [[Email]] | ||
* [[Email restriction|Email Restriction]] | * [[Email restriction|Email Restriction]] | ||
| + | * [[Message Queue]] | ||
[[Category:Email]][[Category:Email Broadcast]][[Category:Security]][[Category:Global Settings]] | [[Category:Email]][[Category:Email Broadcast]][[Category:Security]][[Category:Global Settings]] | ||
Latest revision as of 08:27, 9 May 2023
Contents
[hide]Overview
The Email and Email Broadcast Settings function allows you to determine how your emails will be system-generated, who is able to access email functionality, set failed email alerts, and more.
From Global Settings
1. Click the 9-square menu icon on the top right of your page.
2. Under the heading Configuration, select Global Settings.
3. Click on the tab labelled Security.
4. Under the first subheading, Business Security, click the hyperlink Email Security Settings.
Enabling Email & Email Broadcast as Menu Item for Roles
In order to enable the Email Broadcast feature as a menu item for certain roles or for all roles, follow these steps:
1. Click on the 9-square menu icon on the top right of your page.
2. Under the heading Configuration, select Roles and Security.
3. Select the hyperlink User Roles.
4. To make this feature available to all roles, click on the pencil icon next to the Common role. Otherwise, click this same icon next to the specific role(s) that you would like to enable Email Broadcast as a menu item for.
5. Click on the Menu tab on the left-hand side menu of the role page.
6. Check the box next to the Email and Email Broadcast features in the list.
7. Click Save.
From the Email Broadcast Feature
Once the Email Broadcast and Email features have been enabled as menu items, you will be able to access them on your menu and open Email & Email Broadcast Settings.
1. Click the 9-square menu icon on the top right of your page.
2. Under the heading, Communications, click Email Broadcast.
3. Once the Email Broadcast list is open, click on the cog icon at the top that will open up the Email Broadcast settings.
Email & Email Broadcast Settings
The Email Settings menu has the following options available under the heading Security.
| Enable Role Restrictions | Define roles that are able to send to other roles and restrict the type filtering used when searching for recipients. Used in conjunction with User Roles settings. See Email Role Restrictions. |
| Disable From Address |
The email broadcast From field will be Read-Only. Managers are only able to set the From address field to a value other than their own email address. |
| Recipients Under Association Company | Allow associations to act as recipients. |
| Enable on Behalf Of |
Send emails on behalf of the From Address specified; emails will be sent from an instance-specific email address. This is to prevent emails from being blocked. For the DKIM Domain field, this function enables DKIM signatures for emails in order to improve their authenticity. The domain entered needs to match the domain of your SmartSimple server. It is currently limited to the following: smartsimple.ca, smartsimple.com, smartsimple.ie, smartsimple.us. The selector name for any of these will be 'dkim.' |
| Enable Reply-To |
Send emails with Reply-To set to the From Address specified. Toggling on this option will allow you to select from a list of set From Addresses, including the following:
|
| Enable Default From Address |
This email address will be set as the default From email address when composing an email. Toggling on this option will allow you to fill in which email is the default From address. |
Enabling Role Restrictions
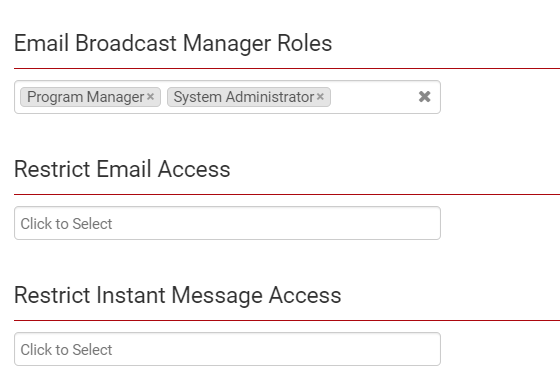
If the Enable Role Restriction feature listed at the top of the page has been toggled on, then it will work in conjunction with the restrictions that you specify in this section. Simply click into each text box in order to reveal a drop-down of roles available in your SmartSimple system, from which you can select the roles to have certain permissions or restricted access.
-
- Email Broadcast Manager Roles: Roles selected to act as Manager.
- Restrict Email Access: Enabling role restrictions will limit who the users in that role can send an email to. The email address field on new emails become Read-Only. If a user clicks on an email address of a user that they are not permissioned to send an email to, then they will receive a pop-up message that they do not have permission to contact that indvidual.
- Restrict Instant Message Access: Select which roles you do not want to have Instant Message functionality in their use of the system.
See also - UTA - (Use Email Role Restriction) on the UTA application settings page
Enable Failed Email Alert
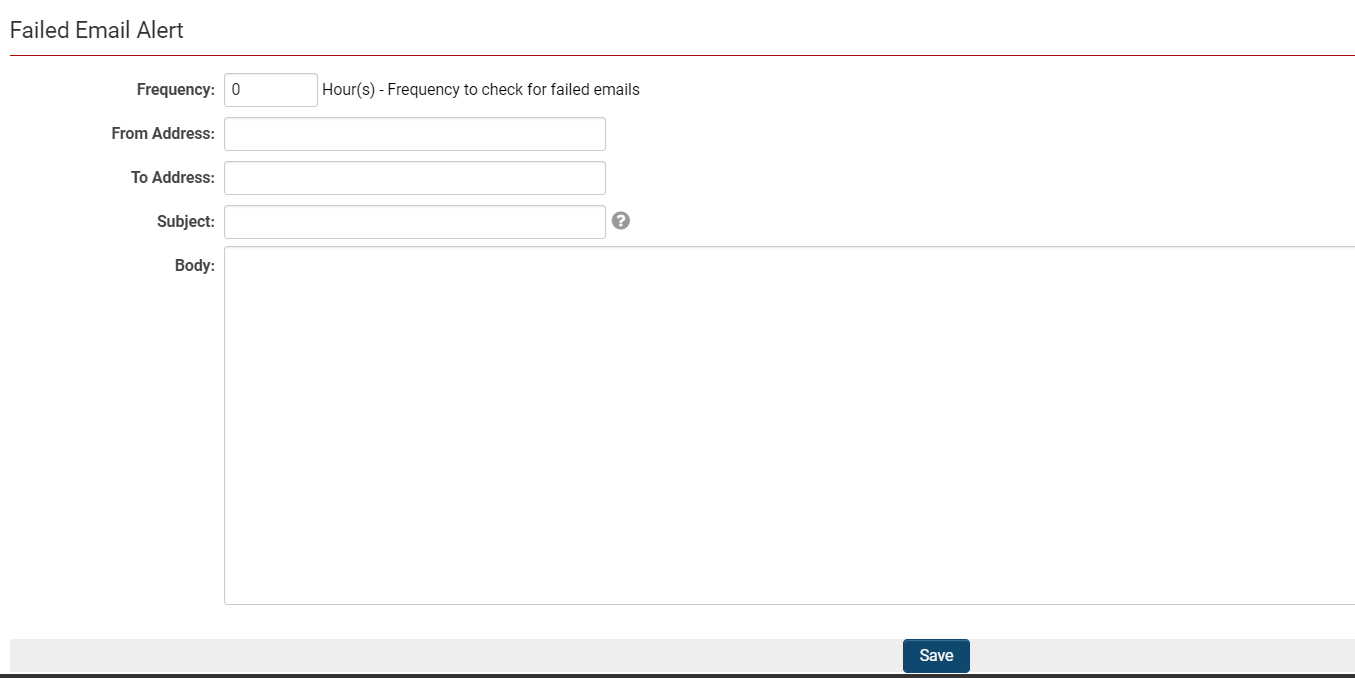
| Frequency | This will check for failed emails from the Message Queue, and will in turn send an automatically generated email notifying the senders based on this failed email template. |
| From Address | Must contain a From Address Email. A common issue with failed emails is caused from this. |
| To Address | If certain staff or the system administrator needs to be notified of failed emails, the recipient[s] of the failed email message should be listed here. |
| Subject | Write the subject of the email here - ex: Failed to Send Email. The maximum length of a subject line is 255 characters. |
| Body | Body of the email to recipients. |
Click Save once you are done filling everything out.
