Difference between revisions of "Message Queue"
| Line 108: | Line 108: | ||
Click the '''Save '''button when you are done permissioning the Message Queue functionality. | Click the '''Save '''button when you are done permissioning the Message Queue functionality. | ||
| + | |||
| + | ===Enabling Failed Message Alerts=== | ||
| + | To enable failed message alerts that will automatically send and periodically check the '''Failed '''tab from the Message Queue, go to [[Email & Email Broadcast Settings]]. | ||
==See Also== | ==See Also== | ||
* [[Attaching a File to a Workflow Email]] | * [[Attaching a File to a Workflow Email]] | ||
| + | * [[Email & Email Broadcast Settings]] | ||
[[Category:Communications]][[Category:Email]] | [[Category:Communications]][[Category:Email]] | ||
Revision as of 15:21, 18 June 2019
Overview
The Message Queue feature in SmartSimple allows you to view a list of system-generated emails. These emails could have been sent from a variety of sources within the system, including from Workflows and password activations.
The Message Queue is particularly useful for ensuring that emails have properly been sent, for record-keeping, and for allowing you some leeway to delete messages should they have been sent in error.
Configuration - Essentials
Accessing the Message Queue
1. Click on the 9-square menu icon on the top right of your page.
2. Under the heading Configuration, select Global Settings.
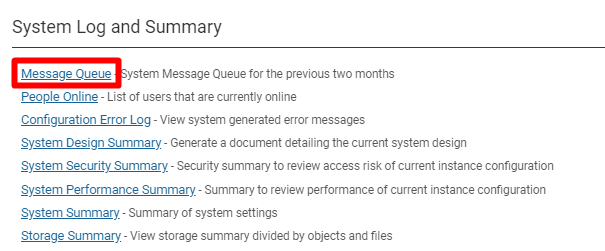
3. Scroll down on the first tab to the subheading System Log and Summary.
4. Click on the hyperlink Message Queue.
Emails that have been generated from the system for a maximum of one year previous will appear in the Message Queue.
- Note: The Message Queue may need some time to load depending on the amount of emails that will be listed.
Understanding the Message Queue
The message queue has several tabs that provide different functions.
On the top, right underneath the Message Queue title, are a number of options to determine what types of messages you can access.
| In Queue |
Any message that is in the queue means that though it has left our SmartSimple server, it has not yet reached the inbox of the receiver. Although this limbo time is variable, it usually approximates 5 minutes or so. Messages in the queue can be deleted to ensure that they won't reach the receiver; a use case would be for a message that has been sent in error, such as an "Application Accepted" message. Note: Although the Message Queue is useful for this function, it is not best practice to rely on the Message Queue to void your mistakes. Be careful with activating or sending system-generated emails to ensure that wrongful notifications are not sent to users. |
| Sent |
Any message in Sent has successfully reached the server of the receiver. Sent messages cannot be modified or deleted. Note: The Sent list cannot confirm that it has necessarily reached an inbox, but it can confirm that it has been sent to the server. The Sent area is a good section to check if you have a complaint about not receiving emails properly; the Sent list can confirm that an email was indeed sent, and in that case, the receiver should be directed to check the Spam mail in their inbox or the double-check their incoming mail. |
| Failed |
The Failed section will list all of the system-generated emails that did not go through into another server. The primary reasons for failed messages include an incorrectly typed email address, or an absentee email address. |
| Archived | The Archived section lists all emails that were sent over a year ago from the time that you check. |
Tip: Best practice is to check the Message Queue at least every 6 months or a year. You can ensure that emails are being properly sent out and upkeep records of email lists that IT or auditing departments may require.
Searching the Message Queue
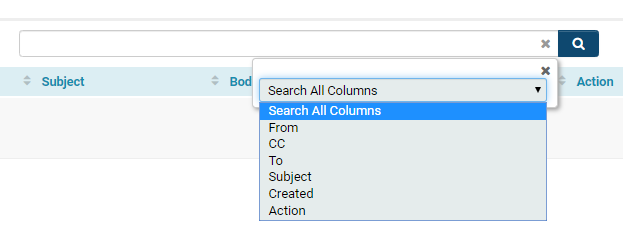
The Message Queue uses search functionality that allows you to filter the results.
The search bar will appear on the top right above the list of messages regardless of which tab you are in.
You can search selectively by the available Standard Fields displayed in the Message Queue list view:
- From
- CC
- To
- Subject
- Created
- Action
The default is to Search All Columns.
Note: Remember to clear your search when you begin or if the results are not appearing as you expected - our system is sticky, meaning that the search filters from your previous session will save when you log in again.
You can also toggle Sort Order by clicking on the label of each column. It will allow you to sort the results by ascending or descending order.
Viewing a Message
The Message Queue contains columns including Subject and Body options. The Body will display the content of the email; if it is too large to be fully exposed in the column, then it appears with an ellipsis.
Clicking into the ellipsis opens a modal window of the full email contents.
Deleting a Message
To delete a message in any of the tabs, add a check mark to the desired messages to be deleted. Once one or more of the messages have been selected, a trashcan icon will appear at the top of the list view. Clicking on this icon will open a modal window asking you to confirm your deletion, and upon acceptance, allow you to delete the selected messages.
Re-sending a Failed Message
Messages that were not successfully sent will be listed in the Failed tab. To resend a failed message, simply add a check mark to one or more of the messages while you are in the tab. This action will activate the Re-send button to appear. Clicking on the Re-send button and accepting the confirmation message that pops up will allow you to resend those previously failed messages.
Configuration - Advanced
Enabling Permissions for the Message Queue
To enable specific permissions for the Message Queue, you - as a System Administrator can select which roles in your copy of SmartSimple should have access and use of the Message Queue function.
1. Click on the 9-square menu icon on the top right of your page.
2. Under the heading Configuration, select Global Settings.
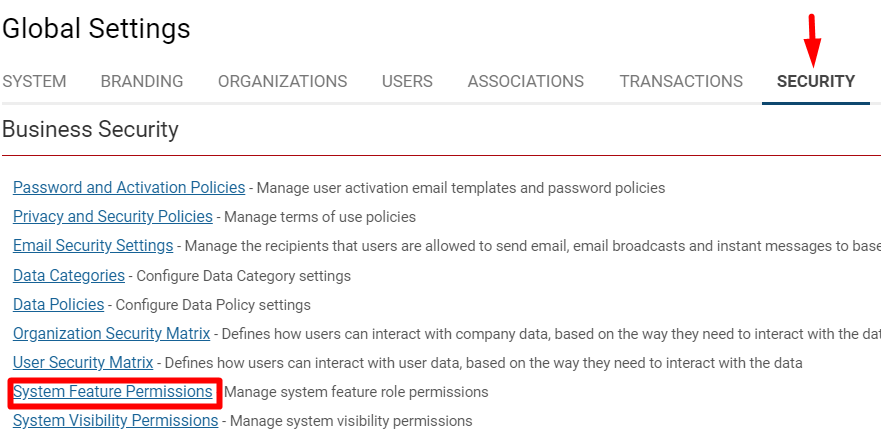
3. Click onto the tab labelled Security.
4. Under the first subheading, Business Security, select the hyperlink System Feature Permissions.
5. Under the last tab, Feature Permissions, scroll down until you find Enable Message Queue.
Clicking into the text will allow you to select from a drop-down of roles available in the system.
Click the Save button when you are done permissioning the Message Queue functionality.
Enabling Failed Message Alerts
To enable failed message alerts that will automatically send and periodically check the Failed tab from the Message Queue, go to Email & Email Broadcast Settings.


