Difference between revisions of "Payment Scheduler"
From SmartWiki
| Line 7: | Line 7: | ||
==Overview== | ==Overview== | ||
| − | The Payment Scheduler enables the generation of multiple payments in batch | + | The Payment Scheduler enables the generation of multiple payments in batch simplifying the payment scheduling process. It allows the scheduling of [[Level 2 Entity|Level 2]] payments from a [[Level 1 Entity|Level 1]] based on a set of specified criteria (total amount, start date, end date, duration). Users can map specific criteria to Level 1 fields and enable the scheduler on certain Level 1 field types. The Payment Scheduler also allows mappings for Level 2 fields (L2 type, L2 status, payment amount, payment date, payment number, etc.). Based on the criteria an initial payment schedule is generated. At this stage, the scheduler pre-populates the payment fields, however no records are created yet. New records are created on the '''Save''' action. |
| − | |||
==How to Implement the Payment Scheduler== | ==How to Implement the Payment Scheduler== | ||
Revision as of 12:24, 1 February 2016

|
This article will explain how you can implement this feature for use on your SmartSimple system. |
Contents
Overview
The Payment Scheduler enables the generation of multiple payments in batch simplifying the payment scheduling process. It allows the scheduling of Level 2 payments from a Level 1 based on a set of specified criteria (total amount, start date, end date, duration). Users can map specific criteria to Level 1 fields and enable the scheduler on certain Level 1 field types. The Payment Scheduler also allows mappings for Level 2 fields (L2 type, L2 status, payment amount, payment date, payment number, etc.). Based on the criteria an initial payment schedule is generated. At this stage, the scheduler pre-populates the payment fields, however no records are created yet. New records are created on the Save action.
How to Implement the Payment Scheduler
Enable Payment Scheduler
- Select the desired
- Click on the UTA Settings icon
- Under the Level 1, select Templates
- Click on the edit icon for the Level 1 template
- Add a checkmark in the Enable Payment Scheduler (Beta) option box
Field Mapping
- Select the desired UTA
- Click on the UTA Settings icon
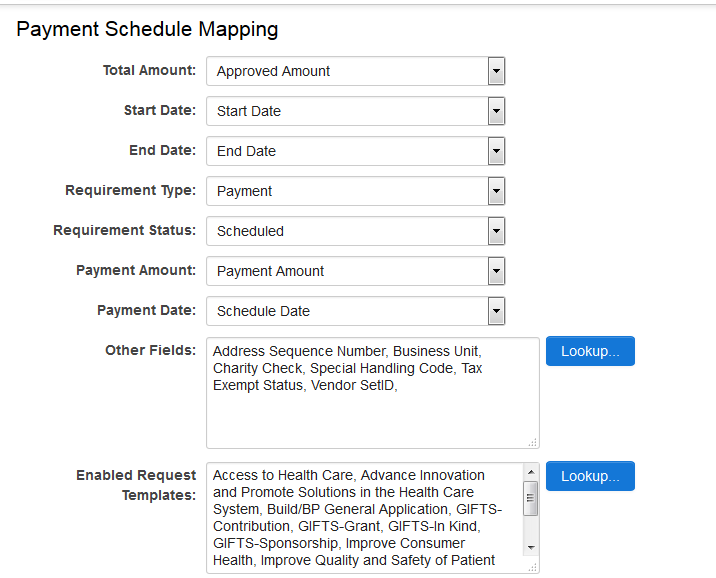
- Under the Level 2 tab, click on the "Payment Scheduler Mapping (Beta)" hyperlink
- Complete the form fields including Total Amount, Start Date, End Date, Activity Type, Activity Status, Payment Amount, Payment Date, and Other Fields.
- Click Save
- Additional optional fields can be added through the Other Fields field to the scheduler. These can include general L2 fields or fields under a mapped L2 type.
- The following field types are allowed: single line text field, multi line text field, select one combo box, and auto number.
Payment Scheduler page
- Once the Payment Scheduler is enabled and a valid mapping is created, the Payment Scheduler link will appear in edit/view L1 page.
- If the L1 doesn't have any payment L2 underneath, the L1 criteria fields with pre-populated values from mapping will appear. All criteria can be modified except for the total amount.
- Once criteria is set, click on the Preview button and the system will generate a list of payments. Please note this is created through javascript and just for preview purpose, no actual records created in the system.
- For each record: the date is generated according to the criteria date period and frequency; the amount is divided evenly according to total amount and number of payments (except for last record which might contain a remainder); the type and status will be populated according to mapping; all additional fields will be displayed and can be modified, but will not be pre-populated.
- The displayed records can be deleted or you can add new ones before submission.
- You can re-generate records by modify the criteria and click on Preview button again.
- Once everything looks good you can click on the Create Payment button. This will generate actual L2 records in the system and trigger workflow, template formula/status trigger etc.
- If the L1 has existing payment L2 underneath, the L1 criteria div will not be displayed. Only total amount is visible.
- You can edit the fields for existing L2 payments, delete existing L2 payments or add new ones on this page. Click on Create Payment button to update/add payments.
Notes
- If an existing L2 payment is in a locked status, the row will be read only.
- There is a validation that the sum of amounts on page should not exceeds total amount.
- Allowed field types: single line text field, multi line text field, select one combo box, and auto number.
- The scheduler will load the existing payments and add new payments or delete existing ones if the payments are not in locked status.
- Template formulas, workflows, status triggers will run for L2 payments when they are edited through the scheduler.
Also See

|
Click here to learn why this feature is a benefit to your organization. |

