Difference between revisions of "Auto Assignments"
From SmartWiki
| (One intermediate revision by the same user not shown) | |||
| Line 1: | Line 1: | ||
| − | '''Auto Assignments''' allow you to define rules for automatically assigning contacts to | + | '''Auto Assignments''' allow you to define rules for automatically assigning contacts to {{l1}} and {{l2}} entities. |
| − | |||
| − | |||
| − | |||
| + | '''NOTE:''' Auto Assignment between levels can only be used if the [[Relating_Contacts_and_Accounts_to_the_Universal_Tracking_Application#Multiple_Contact_List|Multiple Contact List]] at Level 2 is '''not''' enabled. | ||
Using the '''Auto Assignment''' function, the Owner of a [[Level 1 Entity|Level One]] [[Entity|entity]] can be automatically added to the '''Contacts''' section of the [[Level 1 Entity|Level One]]. | Using the '''Auto Assignment''' function, the Owner of a [[Level 1 Entity|Level One]] [[Entity|entity]] can be automatically added to the '''Contacts''' section of the [[Level 1 Entity|Level One]]. | ||
| Line 12: | Line 10: | ||
* On the [[UTA Settings - General]] page, select the "Enable Auto Assignments" setting. | * On the [[UTA Settings - General]] page, select the "Enable Auto Assignments" setting. | ||
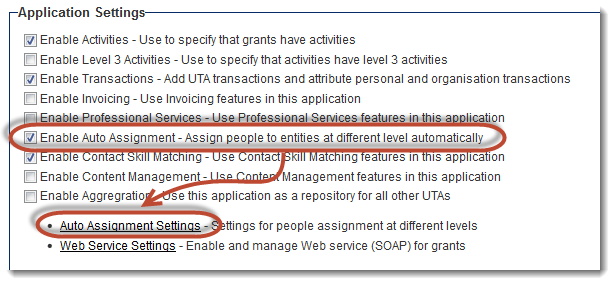
[[Image:EnableAutoAssignment.png|link=]] | [[Image:EnableAutoAssignment.png|link=]] | ||
| − | * The hyperlink to the Auto Assignments | + | * The hyperlink to the Auto Assignments Settings page will appear. |
| Line 19: | Line 17: | ||
*[[Manager Permissions]] | *[[Manager Permissions]] | ||
| − | [[Category:Universal Tracking Application]] | + | [[Category:Universal Tracking Application]][[Category:UTA Settings]] |
Latest revision as of 11:51, 9 October 2013
Auto Assignments allow you to define rules for automatically assigning contacts to Level 1 and Level 2 entities.
NOTE: Auto Assignment between levels can only be used if the Multiple Contact List at Level 2 is not enabled.
Using the Auto Assignment function, the Owner of a Level One entity can be automatically added to the Contacts section of the Level One.
Impact: This allows additional security permissions in the Security Matrix, and additional messaging options in workflows that send information based on a UTA role.
Enabling Auto Assignment
- On the UTA Settings - General page, select the "Enable Auto Assignments" setting.
- The hyperlink to the Auto Assignments Settings page will appear.
