Difference between revisions of "Preview UTA Forms Through Different Roles, Statuses, and Versions"
| (17 intermediate revisions by 3 users not shown) | |||
| Line 1: | Line 1: | ||
| − | + | ==Overview== | |
| − | + | The UTA Form Preview simplifies the process viewing how UTA forms will appear to their end users based on different [[status|statuses]], [[roles]], and form [[Versioning|versions]], without needing to log in as different users and completing mandatory fields. | |
| − | |[[ | ||
| − | |||
| − | |||
| − | == | + | ==Navigating to the Feature== |
| − | + | 1. Click on the 9-square menu icon on the top right of your page. | |
| − | + | :: {{Icon-Menu}} | |
| + | 2. Under the heading '''Applications, '''select the desired {{UTA}} whose form preview you want to see. | ||
| − | + | 3. Click on the '''gear icon '''above the UTA name to go into '''Configuration Mode.''' | |
| − | |||
| − | |||
| − | |||
| − | |||
| + | :: [[File:Gear icon.png|120px|border]] | ||
| + | 4. Click the appropriate {{L1}}, {{L2}}, or {{L3}} tab. They will go in sequential order following the '''General '''tab (remember, the nomenclature will be unique to your [[SmartSimple]] [[instance]]). | ||
| − | |||
| − | + | 5. Under the subsection title '''General Settings, '''click on the '''Form Preview '''hyperlink. | |
| − | |||
| − | |||
| − | |||
| − | |||
| − | + | :: [[File:Form preview.png|600px|border]] | |
| − | + | ==Form Preview - Essentials== | |
| + | After clicking '''Form Preview '''from the desired {{UTA}} and level of entity, a modal window will appear: | ||
| + | :: [[File:Preview campaign.png|800px|border]] | ||
| + | The first row of options will allow you to toggle between different [[Status|statuses]], [[Types|types]], [[User Role|roles]] and [[Versioning|Versions]], if applicable. By modifying these options and clicking the '''Preview '''button on the right, the specific view of fields included with those conditions will be displayed. | ||
| − | + | '''Notes: ''' | |
| − | |||
| − | |||
| − | |||
| + | * Any fields that are typically required will not be required for completion in the preview mode. | ||
| + | * Object variables will not be processed. | ||
| + | * Some [[Visibility|visibility conditions]] will be impacted due to the above conditions. | ||
==See Also== | ==See Also== | ||
| Line 39: | Line 33: | ||
* [[UTA]] | * [[UTA]] | ||
* [[Level 1 Entity|Level 1]] | * [[Level 1 Entity|Level 1]] | ||
| + | * [[Current Upgrade: January 2016|Upgrade: January 2016]] | ||
<!-- | <!-- | ||
| Line 46: | Line 41: | ||
|Click [[here]] to learn why this feature is a benefit to your organization. | |Click [[here]] to learn why this feature is a benefit to your organization. | ||
|} --> | |} --> | ||
| − | + | [[Category:How]] [[Category:Universal Tracking Application]] | |
| − | |||
| − | [[Category:How]] [[Category: | ||
Latest revision as of 16:44, 30 June 2019
Overview
The UTA Form Preview simplifies the process viewing how UTA forms will appear to their end users based on different statuses, roles, and form versions, without needing to log in as different users and completing mandatory fields.
1. Click on the 9-square menu icon on the top right of your page.
2. Under the heading Applications, select the desired whose form preview you want to see.
3. Click on the gear icon above the UTA name to go into Configuration Mode.
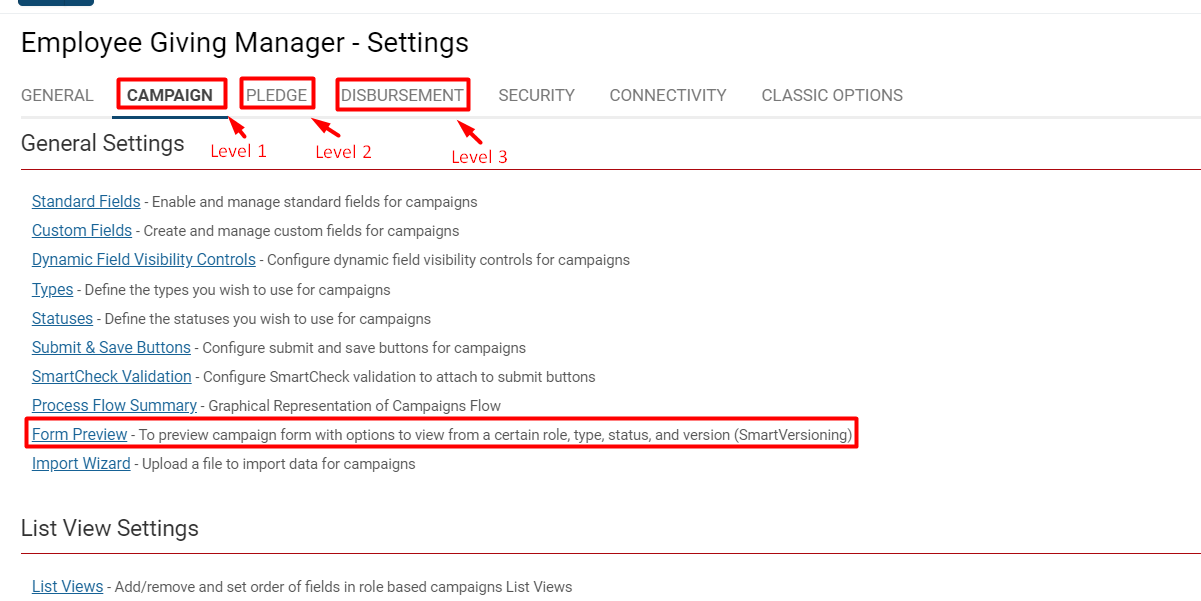
4. Click the appropriate Level 1, Level 2, or Level 3 tab. They will go in sequential order following the General tab (remember, the nomenclature will be unique to your SmartSimple instance).
5. Under the subsection title General Settings, click on the Form Preview hyperlink.
Form Preview - Essentials
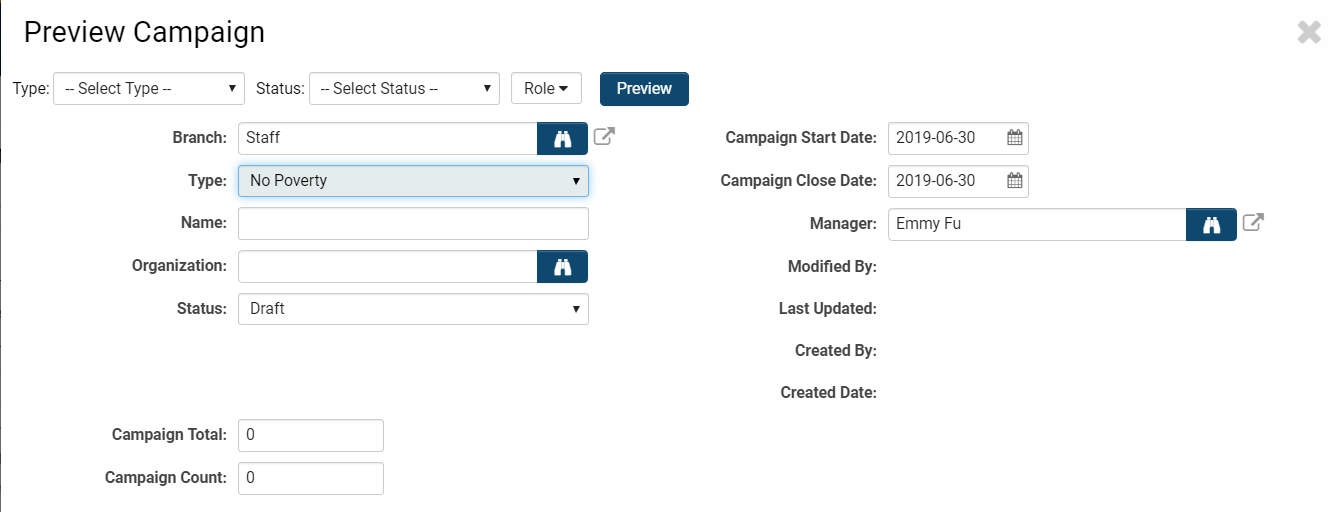
After clicking Form Preview from the desired and level of entity, a modal window will appear:
The first row of options will allow you to toggle between different statuses, types, roles and Versions, if applicable. By modifying these options and clicking the Preview button on the right, the specific view of fields included with those conditions will be displayed.
Notes:
- Any fields that are typically required will not be required for completion in the preview mode.
- Object variables will not be processed.
- Some visibility conditions will be impacted due to the above conditions.

