Personal Settings
Contents
Overview
The Personal Settings of a user's profile will control several key aspects of the user's interaction with their SmartSimple system.
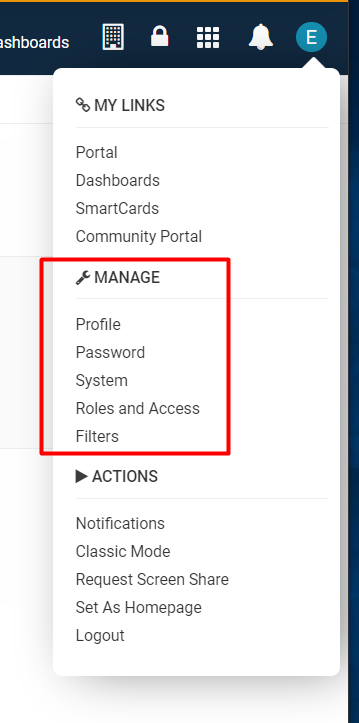
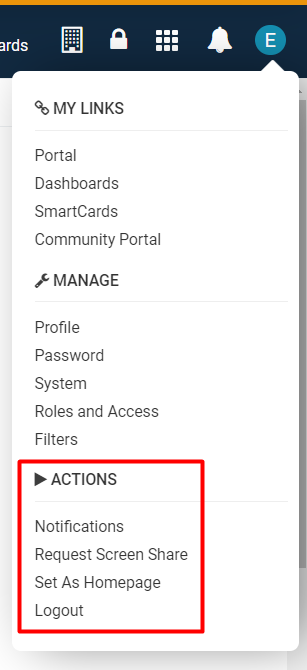
In order to access your personal settings, simply click the icon of your name on the top right corner of the screen.
The Personal Settings of a user's profile will control many aspect of the user's interaction with their SmartSimple system.
Your personal settings consist of the following:
- Contact details
- Password
- User System Setting
- User Roles and Access
- Filters
The following items may appear depending on your configuration:
- Folder
- Resource
Configuration - Essentials
Profile
Editing Profile
In order to edit your profile, simply click on the Profile link from that menu.
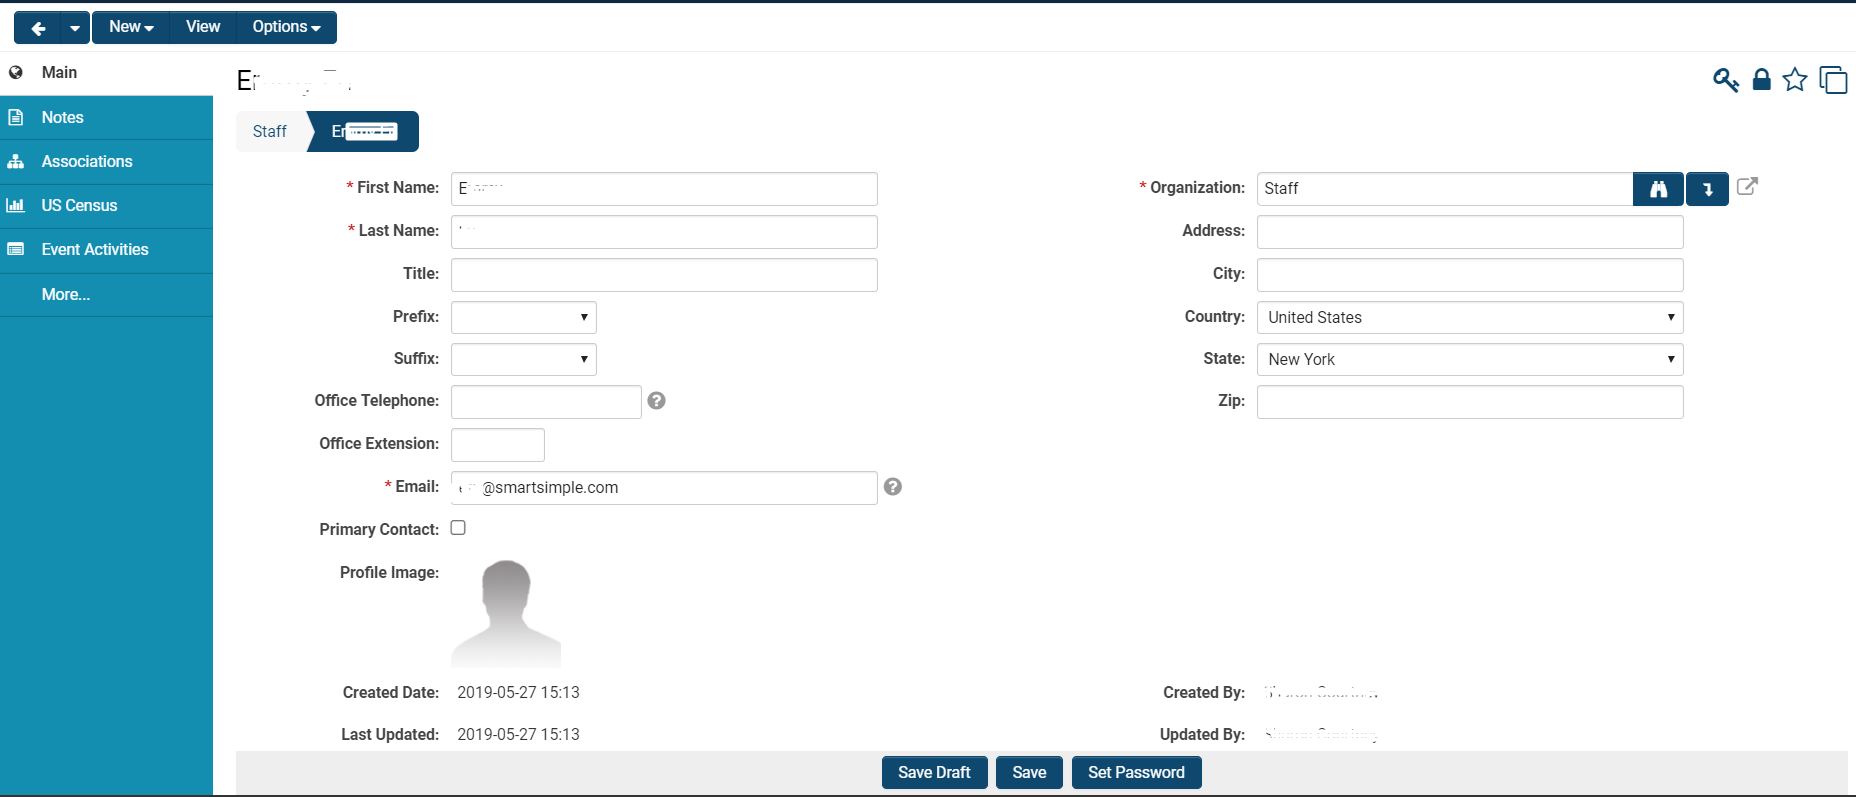
Your details will be displayed. To edit the text of fields associated with your profile, click the Edit button at the top.
Your screen will reload into Edit Mode - the fields will be able to be modified and the button at the top should now say View in order to switch back into read only viewing.
You are able to set the following values:
| First Name | First name of the person |
| Last Name | Last name of the person |
| Title | The business title of the person |
| Prefix | Prefix of the contact |
| Suffix | Suffix of the contact |
| Office Telephone | The phone number of the person's office |
| Office Extension | The direct extension that will enable calling the person |
| The email address of the person | |
| Primary Contact | Check this if this person should be displayed as the primary contact for their associated organization |
| Profile Image | Upload a profile image to accompany this person's profile |
| Organization |
Select which organization to which this person should be associated. Note: Changing the organization will "move" that person to another organization. For more information about creating organizations and associating users to organizations, see our Organization Hierarchy page. |
| Address |
The street address of the person, if different from their organization |
| City |
The city address of the person, if different from their organization |
| Country |
The country of the person, if different from their organization |
| State/Province |
This will pop up depending on the Country that is chosen. This will indicate the state or province of the person, if different from their organization |
| Zip/Postal |
This field will differ depending on the Country that is chosen - this will indicate the zip or postal code of the person, if different from their organization |
Note: Any field that has been configured with a red asterisk next to it is mandatory and must be filled out in order to publish the person's profile.
Fields that are auto-populated include the following:
- Created Date: The date and time stamp that the person was initially created into the SmartSimple system
- Last Updated: The date and time stamp of the last person that this person's profile was updated
- Created By: The name of the user who created this person
- Updated By: The name of the user who last updated this person's profile
At the bottom of the profile when you are in Edit mode will be three buttons:
- Save Draft: Clicking this button will allow storage of this information without validation (i.e. of the mandatory standard fields)
- Save: Clicking this button will store and publish this information depending on the validation
- Set Password: Clicking this button will allow you to set the password for the user.
Other Features of the Profile
The user profile will also have other notes and details:
- Notes are displayed as a tab on the right-hand menu.
- Any associations that the contact has will also be displayed as a tab on the right-hand menu.
- Activity information that you have recorded or participated in such as meetings, telephones calls and email messages, are displayed below your personal details.
- A number of additional tabs will be displayed depending on the configuration that you establish.
Changing the User’s Company or Address
In order the change a user's primary Organization, you can go into Edit Mode on the user's profile and locate another company and associate the user with that company.
Note: If you add a user to a company after you have added the company address, the user's address will be set to the same details as the company.
You are able to copy the organization address as the user address at any time with the down arrow icon to the right of the Organization field.
Once you have either clicked the Save or Save Draft button after adding an organization to a user, there will also be a View Organization button next to the Organization field in order to open up the organization's profile.
For more information about user profiles, see our Profile page.
Password
Clicking on the Password function from your profile menu will open a modal window that looks like this:
All passwords are randomly generated and sent by email when the System Administrator first authorizes a user to access a SmartSimple instance - no user or administrator can ever see another user's password in the system. For more information, see our Password Policy page.
In order to change your password from the Personal Settings tab, simply type in your current password, type and retype a new password, and click the Submit button.
There will be a policy note at the bottom of the modal window that describes the required complexity of your password before you can submit a new one into the system.
Remember: Passwords are case-sensitive!
If you are a SysAdmin, you are able to determine the complexity of passwords and security measures concerning passwords by following these steps:
1. Click on the 9-square menu icon on the top right of your page.
2. Under the heading Configuration, select Global Settings.
3. Under the tab Security, select Password and Activation Policies.
System
Clicking on the System option from your profile menu will open up a modal window that allows you to personalize and select the display settings of your use of the SmartSimple system.
The Security tab in this page will generate a TOTP (Time-based One-Time Password) secret key and QR code.
The Display tab in this page will allow you to modify the display views of the system. You can perform the following functions:
- Enable incoming Instant Messages to automatically open
- Open records within other records in a modal window that won't disrupt you from your main page
- Enable Translation Audit Mode
- Determine the amount of list view records per page
- Auto complete number of records that are displays
- Set a default/automatic email From Address that will be used when you send anything from your system
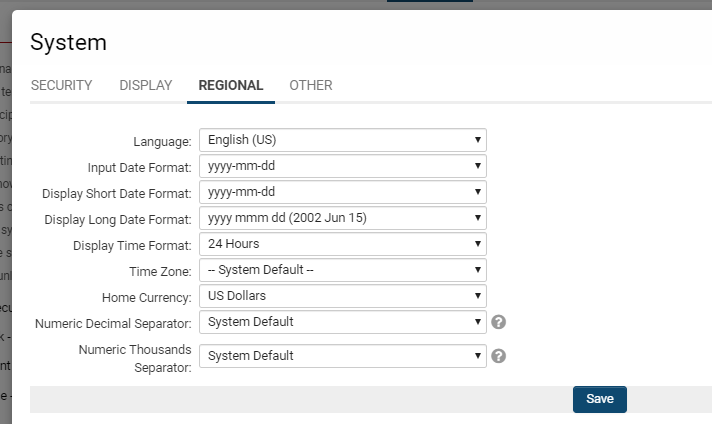
The Regional tab will allow you to modify certain features of the system settings based on regionally-based constrictions.
You can modify the following options:
- Language
- Input Date Format
- Display Short Date Format
- Display Long Date Format
- Display Time Format
- Time Zone
- Home Currency
- Numeric Decimal Separator
- Numeric Thousands Separator
It is always best practice to ensure a specific, appropriate, and correct regional time-zone settings, particularly if your company works in applications that maintain deadlines.
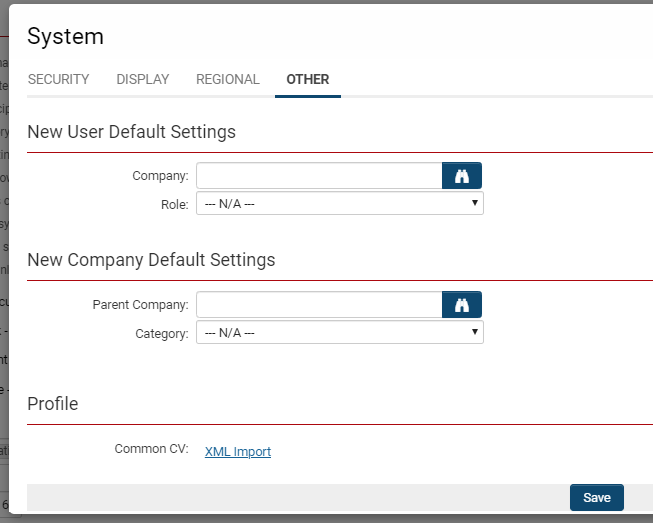
The Other tab allows you to set Default Settings regarding new users and organizations. You are able to select a company or role that all users will be organized into, and/or select the parent company and category that new organizations will be sorted into. This structure pertains to the organization hierarchy that every SmartSimple instance has as its base architecture. You are able to use XML import to set a common Profile template such as for CVs.
Roles and Access
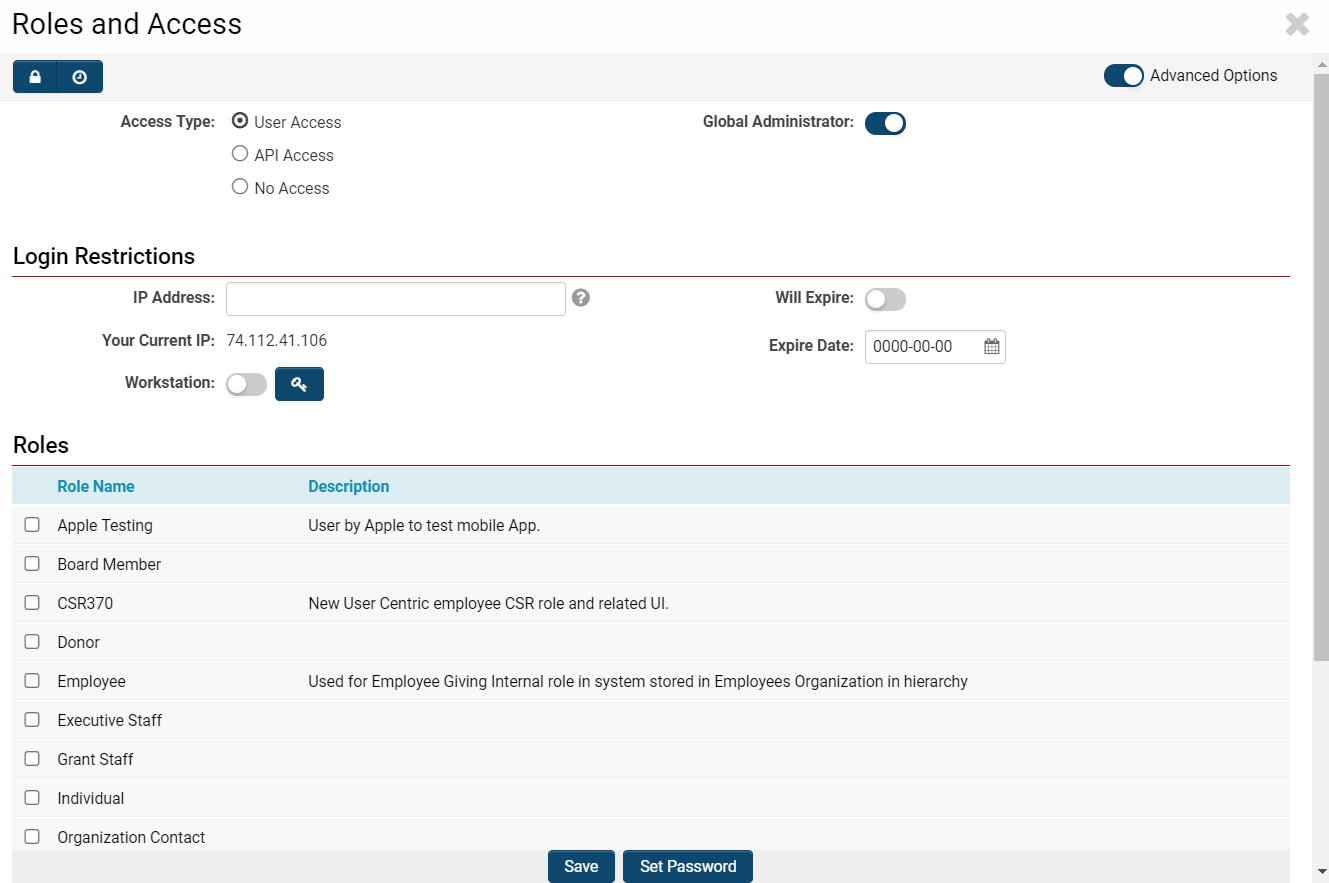
Selecting the Roles and Access option from your profile menu will open up a modal window that allows you to change your role and accessibility into the system.
Here you can set an access type, enable System Administrator privileges, set Login restrictions, and add, remove or modify roles. You are also able to set a pasword from the Roles and Access screen.
For more information, see Activating a User. To understand our role-based security with more in-depth detail, please see Roles and Security Settings.
Filters
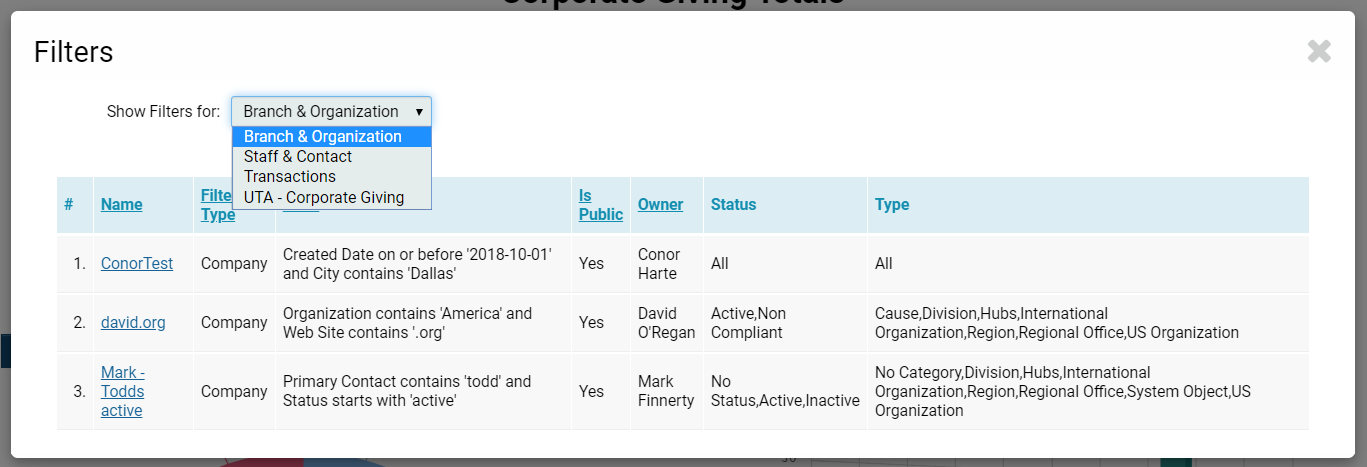
Clicking on the Filters option from your profile menu will open up a modal window that displays all of the system's Filters used for List View displays as well as for Search functionality.
You are able to toggle the list view so that it displays all the associated filters for the following:
- Branch and Organization
- Staff and Contact
- Transactions
- s
Clicking on the Name of each filter will open up another modal window that allows you to edit the filter - it displays the name, the public or private nature of the filter, and the actual criterion included in the filter.
Actions from Profile Menu
Underneath the Settings of the profile menu are also Actions that you can perform:
Notifications
Check your notifications at any time, with the ability to limit your results to certain time periods by selecting the dates on a calendar.
This will open up a modal window that shows which users also in your instance are currently online, whom you can then request to share your screen with for collaboration.
Set as Homepage
You can set the first page you will see when you log into the system.
1. Select the Communications, Pin board menu.
2. Click the Set Home button.
You can return to this page at any time by clicking the My Home button.
